#
Compute and concatenate attributes
#
What are concatenated and computed attributes?
Concatenated Attributes: These are attributes formed by combining or linking multiple data fields. For instance, in your PIM, a concatenated attribute could be a product's full name, made by joining its brand name, model, and variant. This practice simplify the display of information.
Computed Attributes: These attributes are derived from other data points through computational means. They often involve calculations or logical operations. For example, a computed attribute in a PIM could be the total weight of a product, calculated by adding the weight of the product to the weight of its packaging. Computed attributes help in providing more dynamic information based on existing data.
Both concatenated and computed attributes enhance the efficiency and accuracy of data management within PIM systems, facilitating better organization, searchability, and presentation of product information.
Quable PIM does not yet allow for you to handle concatenated and computed attributes in the PIM itself. We provide you with tools and information to still be able to compute and/or concatenate attributes if you need to do so, using Quable's webhooks, API and/or the file export feature.
#
Methods overview
We'll take a simple example that can be used for any rule and any type of attribute.
Let's say that your data model has three attributes for a product document type:
- color: the color of your product, possibly enriched via imports from your ERP
- marketing_label: the marketing name of your product, enriched by the teams within the PIM
- marketing_description: the marketing description of your product. This attribute must be filled in as follows: -
Two solutions are available when defining business processes: it can be done manually by the user, or with a script (ETL, specific development, etc.) that retrieves the data after modification, creates the computed or concatenated value, and pushes this data back into the PIM. We will focus on the latest.
We don't talk about how to set up the ETL job nor how to manage your rules.
We focus on the PIM to ETL and ETL to PIM flows.
Three methods are available to do so:
- Method 1: to perform real-time updates using webhook notifications & the API
- Method 2: to perform less frequent updates using the API only
- Method 3: to perform updates using CSV files exports
#
Method 1: Push Notification webhook & API
This is the most direct method.
It involves 4 steps:
- create a webhook in your PIM - see how on this page
- retrieve the attributes values
- perform the attribute concatenation or computation
- push the data back into the PIM
Notifications allow you to receive all document updates with details about modified attributes and the locales used at the very moment they're created.
When you receive these notifications on your systems, you can decide if the modification is relevant or not.
In our case, the only notifications to be taken into account are those declaring a modification on or .
Step 1: Retrieve attribute's values
If this is the case, the API must be used to get the attributes values live:
curl --request GET \
     --url https://{{instance}}.quable.com/api/documents/mydocumentID \
     --header 'accept: application/ld+json'
{
    "@context": {
        "@vocab": "https://education-developers.quable.com/api/docs.jsonld#",
        "hydra": "http://www.w3.org/ns/hydra/core#",
        "name": "DocumentOutput/name",
        "isActive": "DocumentOutput/isActive",
        "attributes": "DocumentOutput/attributes",
        "documentType": "DocumentOutput/documentType",
        "attributeSet": "DocumentOutput/attributeSet",
        "classifications": "DocumentOutput/classifications",
        "documentLinks": "DocumentOutput/documentLinks",
        "assetLinks": "DocumentOutput/assetLinks",
        "workflows": "DocumentOutput/workflows",
        "tags": "DocumentOutput/tags",
        "completenessResults": "DocumentOutput/completenessResults",
        "variants": "DocumentOutput/variants",
        "mainAssetThumbnailUrl": "DocumentOutput/mainAssetThumbnailUrl",
        "dateCreated": "DocumentOutput/dateCreated",
        "dateModified": "DocumentOutput/dateModified",
        "legacyId": "DocumentOutput/legacyId",
        "active": "DocumentOutput/active"
    },
    "@type": "Document",
    "@id": "/api/documents/reference_coat",
    "active": true,
    "attributes": {
        "r_type": [
            {
                "id": "jacket",
                "labels": {
                    "en_GB": "Jacket",
                    "en_US": "Jacket",
                    "fr_FR": "Veste"
                }
            }
        ],
        "r_brand": [
            {
                "id": "brand1",
                "labels": {
                    "en_GB": "Brand 1",
                    "en_US": "Brand 1",
                    "fr_FR": "Marque 1"
                }
            }
        ],
        "r_season": [
            {
                "id": "aw21",
                "labels": {
                    "en_GB": "AW21",
                    "en_US": "AW21",
                    "fr_FR": "AH21"
                }
            }
        ],
        "r_status": [
            {
                "id": "ref_active",
                "labels": {
                    "en_GB": "Active",
                    "en_US": "Active",
                    "fr_FR": "Actif"
                }
            }
        ],
        "r_made_in": [
            {
                "id": "italy",
                "labels": {
                    "en_GB": "Italy",
                    "en_US": "Italy",
                    "fr_FR": "Italie"
                }
            }
        ],
        "r_washing": [
            {
                "id": "30_degrees",
                "labels": {
                    "en_GB": "30 degrees",
                    "en_US": "30 degrees",
                    "fr_FR": "30 degrés"
                }
            }
        ],
        "r_pressing": [
            {
                "id": "hot",
                "labels": {
                    "en_GB": "Hot",
                    "en_US": "Hot",
                    "fr_FR": "Chaud"
                }
            }
        ],
        "r_supplier": [
            {
                "id": "supplier1",
                "labels": {
                    "en_GB": "Supplier 1",
                    "en_US": "Supplier 1",
                    "fr_FR": "Fournisseur 1"
                }
            }
        ],
        "r_continuity": [
            {
                "id": "r_seasonnal",
                "labels": {
                    "en_GB": "Seasonnal",
                    "en_US": "Seasonnal",
                    "fr_FR": "Saisonnier"
                }
            }
        ],
        "r_custom_code": [
            {
                "id": "6102",
                "labels": {
                    "en_GB": "6102-Women coats",
                    "en_US": "6102-Women coats",
                    "fr_FR": "6102-Manteaux femmes"
                }
            }
        ],
        "r_custom_name": [
            {
                "id": "6102_name",
                "labels": {
                    "en_GB": "Women coats",
                    "en_US": "Women coats",
                    "fr_FR": "Manteaux femmes"
                }
            }
        ],
        "r_drying_type": [
            {
                "id": "notrumbledry",
                "labels": {
                    "en_GB": "No trumble dry",
                    "en_US": "No trumble dry",
                    "fr_FR": "Pas de nettoyage à sec"
                }
            }
        ],
        "r_jacket_type": [
            {
                "id": "vest",
                "labels": {
                    "en_GB": "Vest",
                    "en_US": "Vest",
                    "fr_FR": "Veste"
                }
            }
        ],
        "r_maintenance": {
            "en_GB": "Wash with similar colors.",
            "en_US": null,
            "fr_FR": "Laver avec des couleurs similaires."
        },
        "reference_name": {
            "en_GB": "Long Coat",
            "en_US": null,
            "fr_FR": "Manteau long"
        },
        "r_main_material": {
            "en_GB": "Exterior : 100% Wool\nLining : 68% Acetate, 32% Polyester\nSleeve lining : 68% Acetate, 32% Polyester",
            "en_US": null,
            "fr_FR": "Doublure : 68% Acetate, 32% Polyester\nDoublure manches : 68% Acetate, 32% Polyester\nExterieur : 100% Laine"
        },
        "r_manufacturing_type": [
            {
                "id": "sewn",
                "labels": {
                    "en_GB": "Sewn",
                    "en_US": "Sewn",
                    "fr_FR": "Cousu"
                }
            }
        ]
    }
See the reference documentation
View the documentation to retrieve a specific document for more details.
Step 2: Compute/concatenate
Use the method of your choice that fits with your system and setup to compute or concatenate the attributes.
Step 3: Push the data back to the PIM
All that remains now is to push the information to the PIM via API:
curl --request PUT \
     --url https://{instance}.quable.com/api/documents/{documentID} \
     --header 'accept: application/json' \
     --header 'content-type: application/json'
This way, the computation or concatenation is nearly synchronous:
- You receive the notification as soon as the modification is done
- you are sure to send back the calculated value as soon as possible.
On the other hand, you must have an HTTP endpoint on your information system that is able to review these notifications.
It is possible to store notifications received from the PIM in a queue, asynchronously. This allows to process notifications in batches (e.g., every X minutes). Learn more in our section about asynchronous processing
#
Method 2: Using the API only
If using notifications isn't a good option for you, or if you don't need to perform real-time updates, you can use the API to retrieve all documents modified for a specific period of time via the API.
Step 1: retrieve attributes data
To do so, send this request:
curl --request GET \
     --url https://{{instance}}.quable.com/api/documents/mydocumentID \
     --header 'accept: application/ld+json'
Step 2: Compute/concatenate
Use the method of your choice that fits with your system and setup to compute or concatenate the attributes.
Step 3: Push the data back to the PIM
Push your data back to the PIM with this request:
    curl --request PUT \
     --url https://{instance}.quable.com/api/documents/{documentID} \
     --header 'accept: application/json' \
     --header 'content-type: application/json'
You can also push the data via CSV (2 possible methods):
- by dropping the file on the FTP(s) and scheduling imports (see how on this page)
- by pushing the CSV file via API (see the API reference documentation for more details)
#
Method 3: Export CSV files
You can alternatively schedule an export of your CSV data directly in Quable PIM to an FTP(s).
About planified exports
Learn more about how to schedule .csv files exports on this page.
This allows your job to:
- process the CSV
- compute or concatenate the desired values
- create a CSV file in order to import it
- push these files to the PIM (2 possible methods):
- by dropping the file on the FTP(s) and scheduled imports: see how on this page.
- by pushing the CSV file via API: check our API reference documentation to learn more.
#
How to automate attributes with Make.com
#
Video tutorial
This video tuturial shows how to perform the first steps of the full tutorial below.
It shows how to create connexion between your Make scenario and your PIM, and how to set up your first webhook to monitor events. It then shows how to make an API call (here, a GET document request) triggered by any document modification.
#
1. Listen for document updates
Step 1
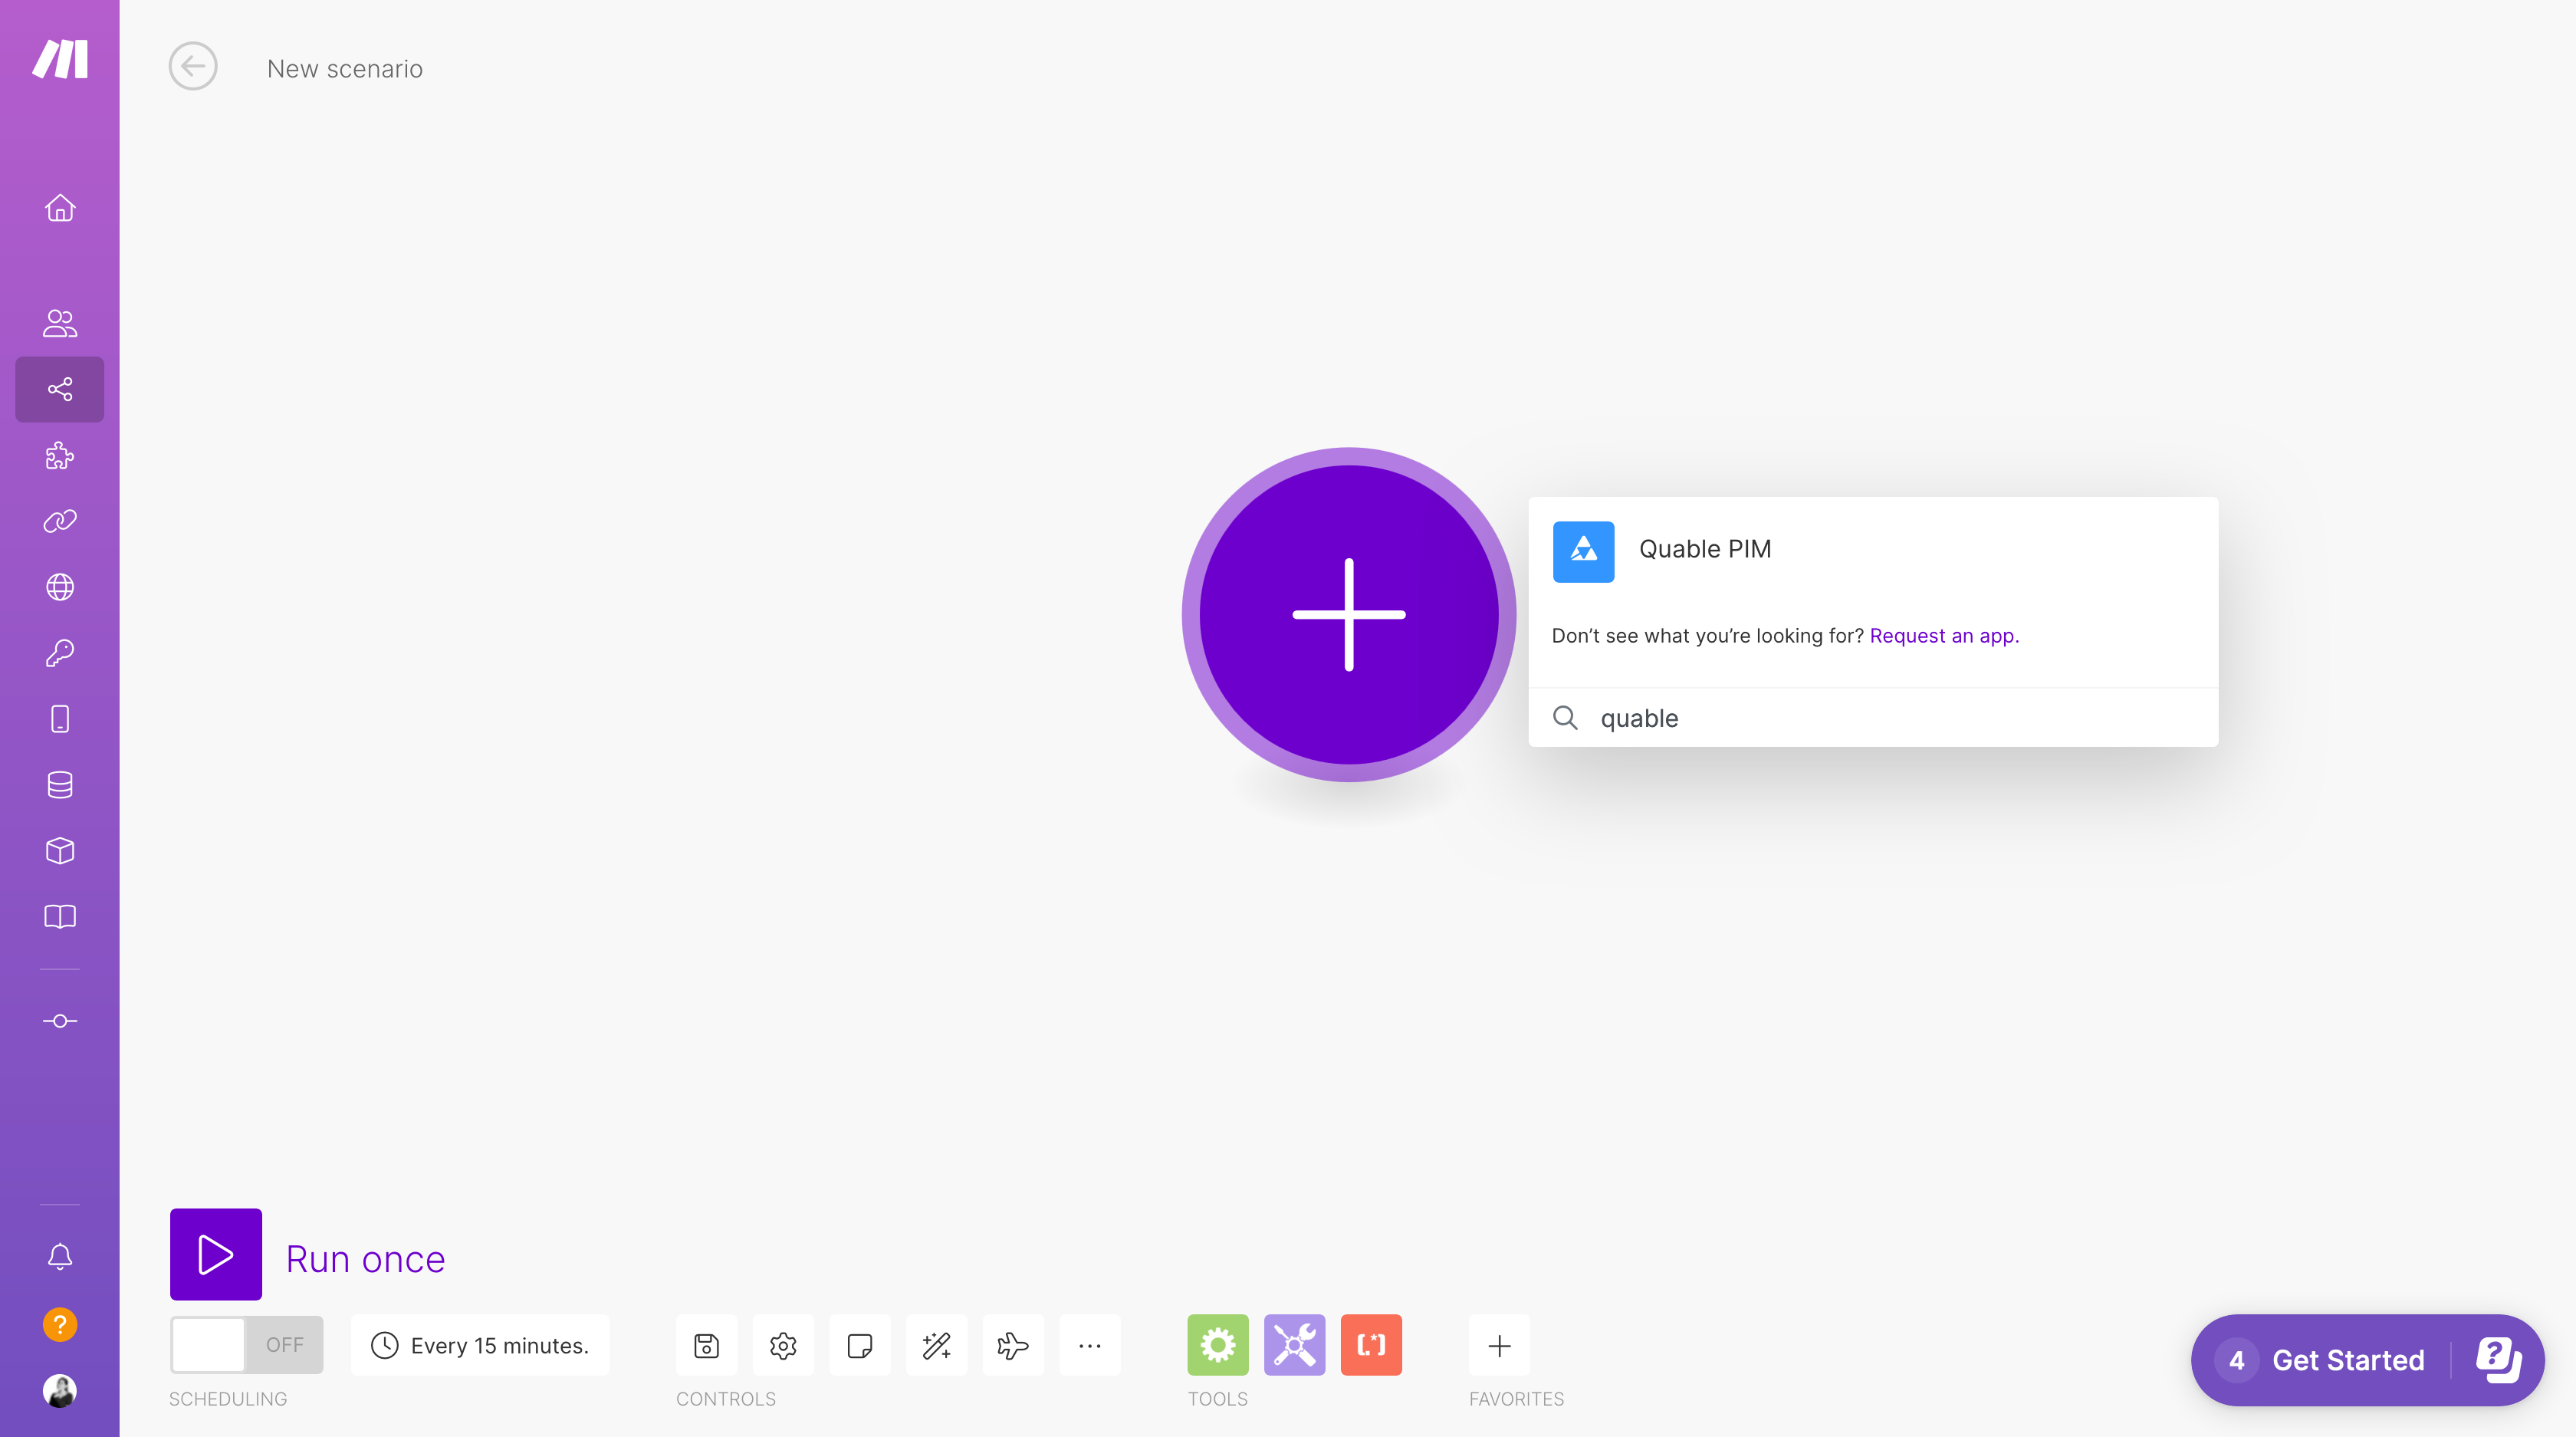
Go to your account on make.com, then select "Webhooks" and "Open Scenario Builder".
Step 2
Search for "Quable" in the list of apps.
Step 3
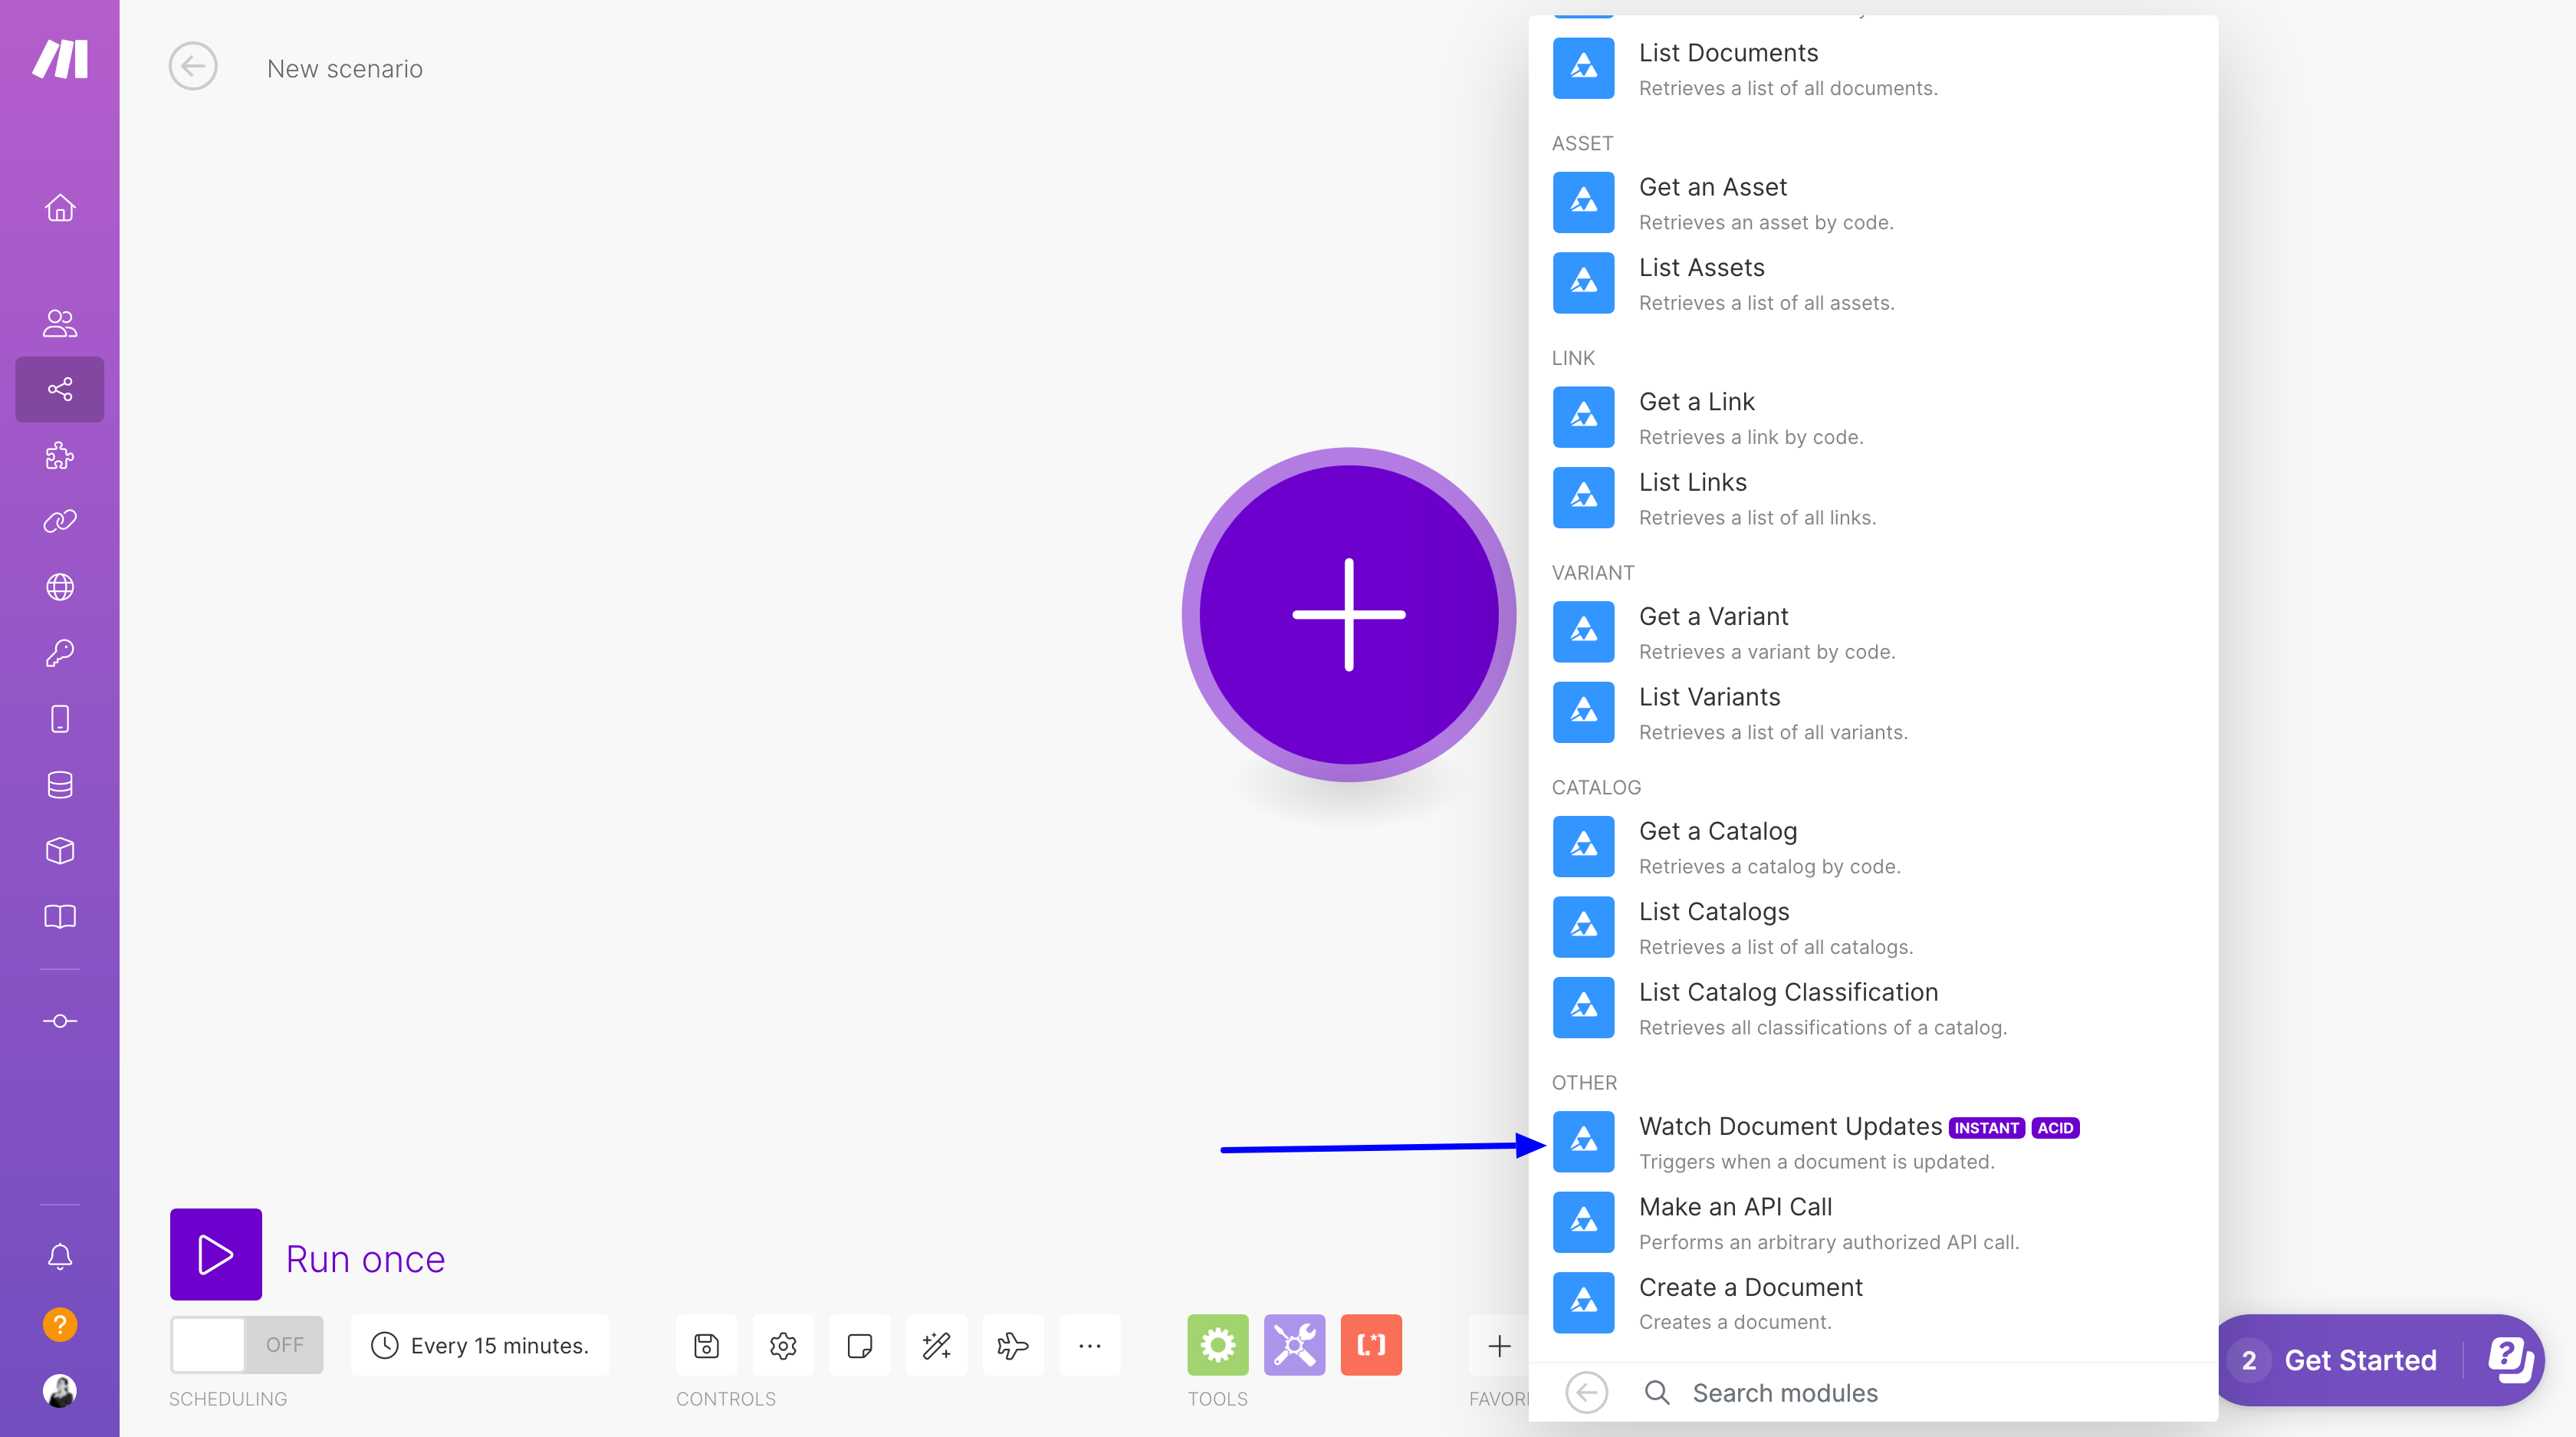
Look for the "Watch document updates" in the list of available actions.
Step 4
Click on "Create a webhook".
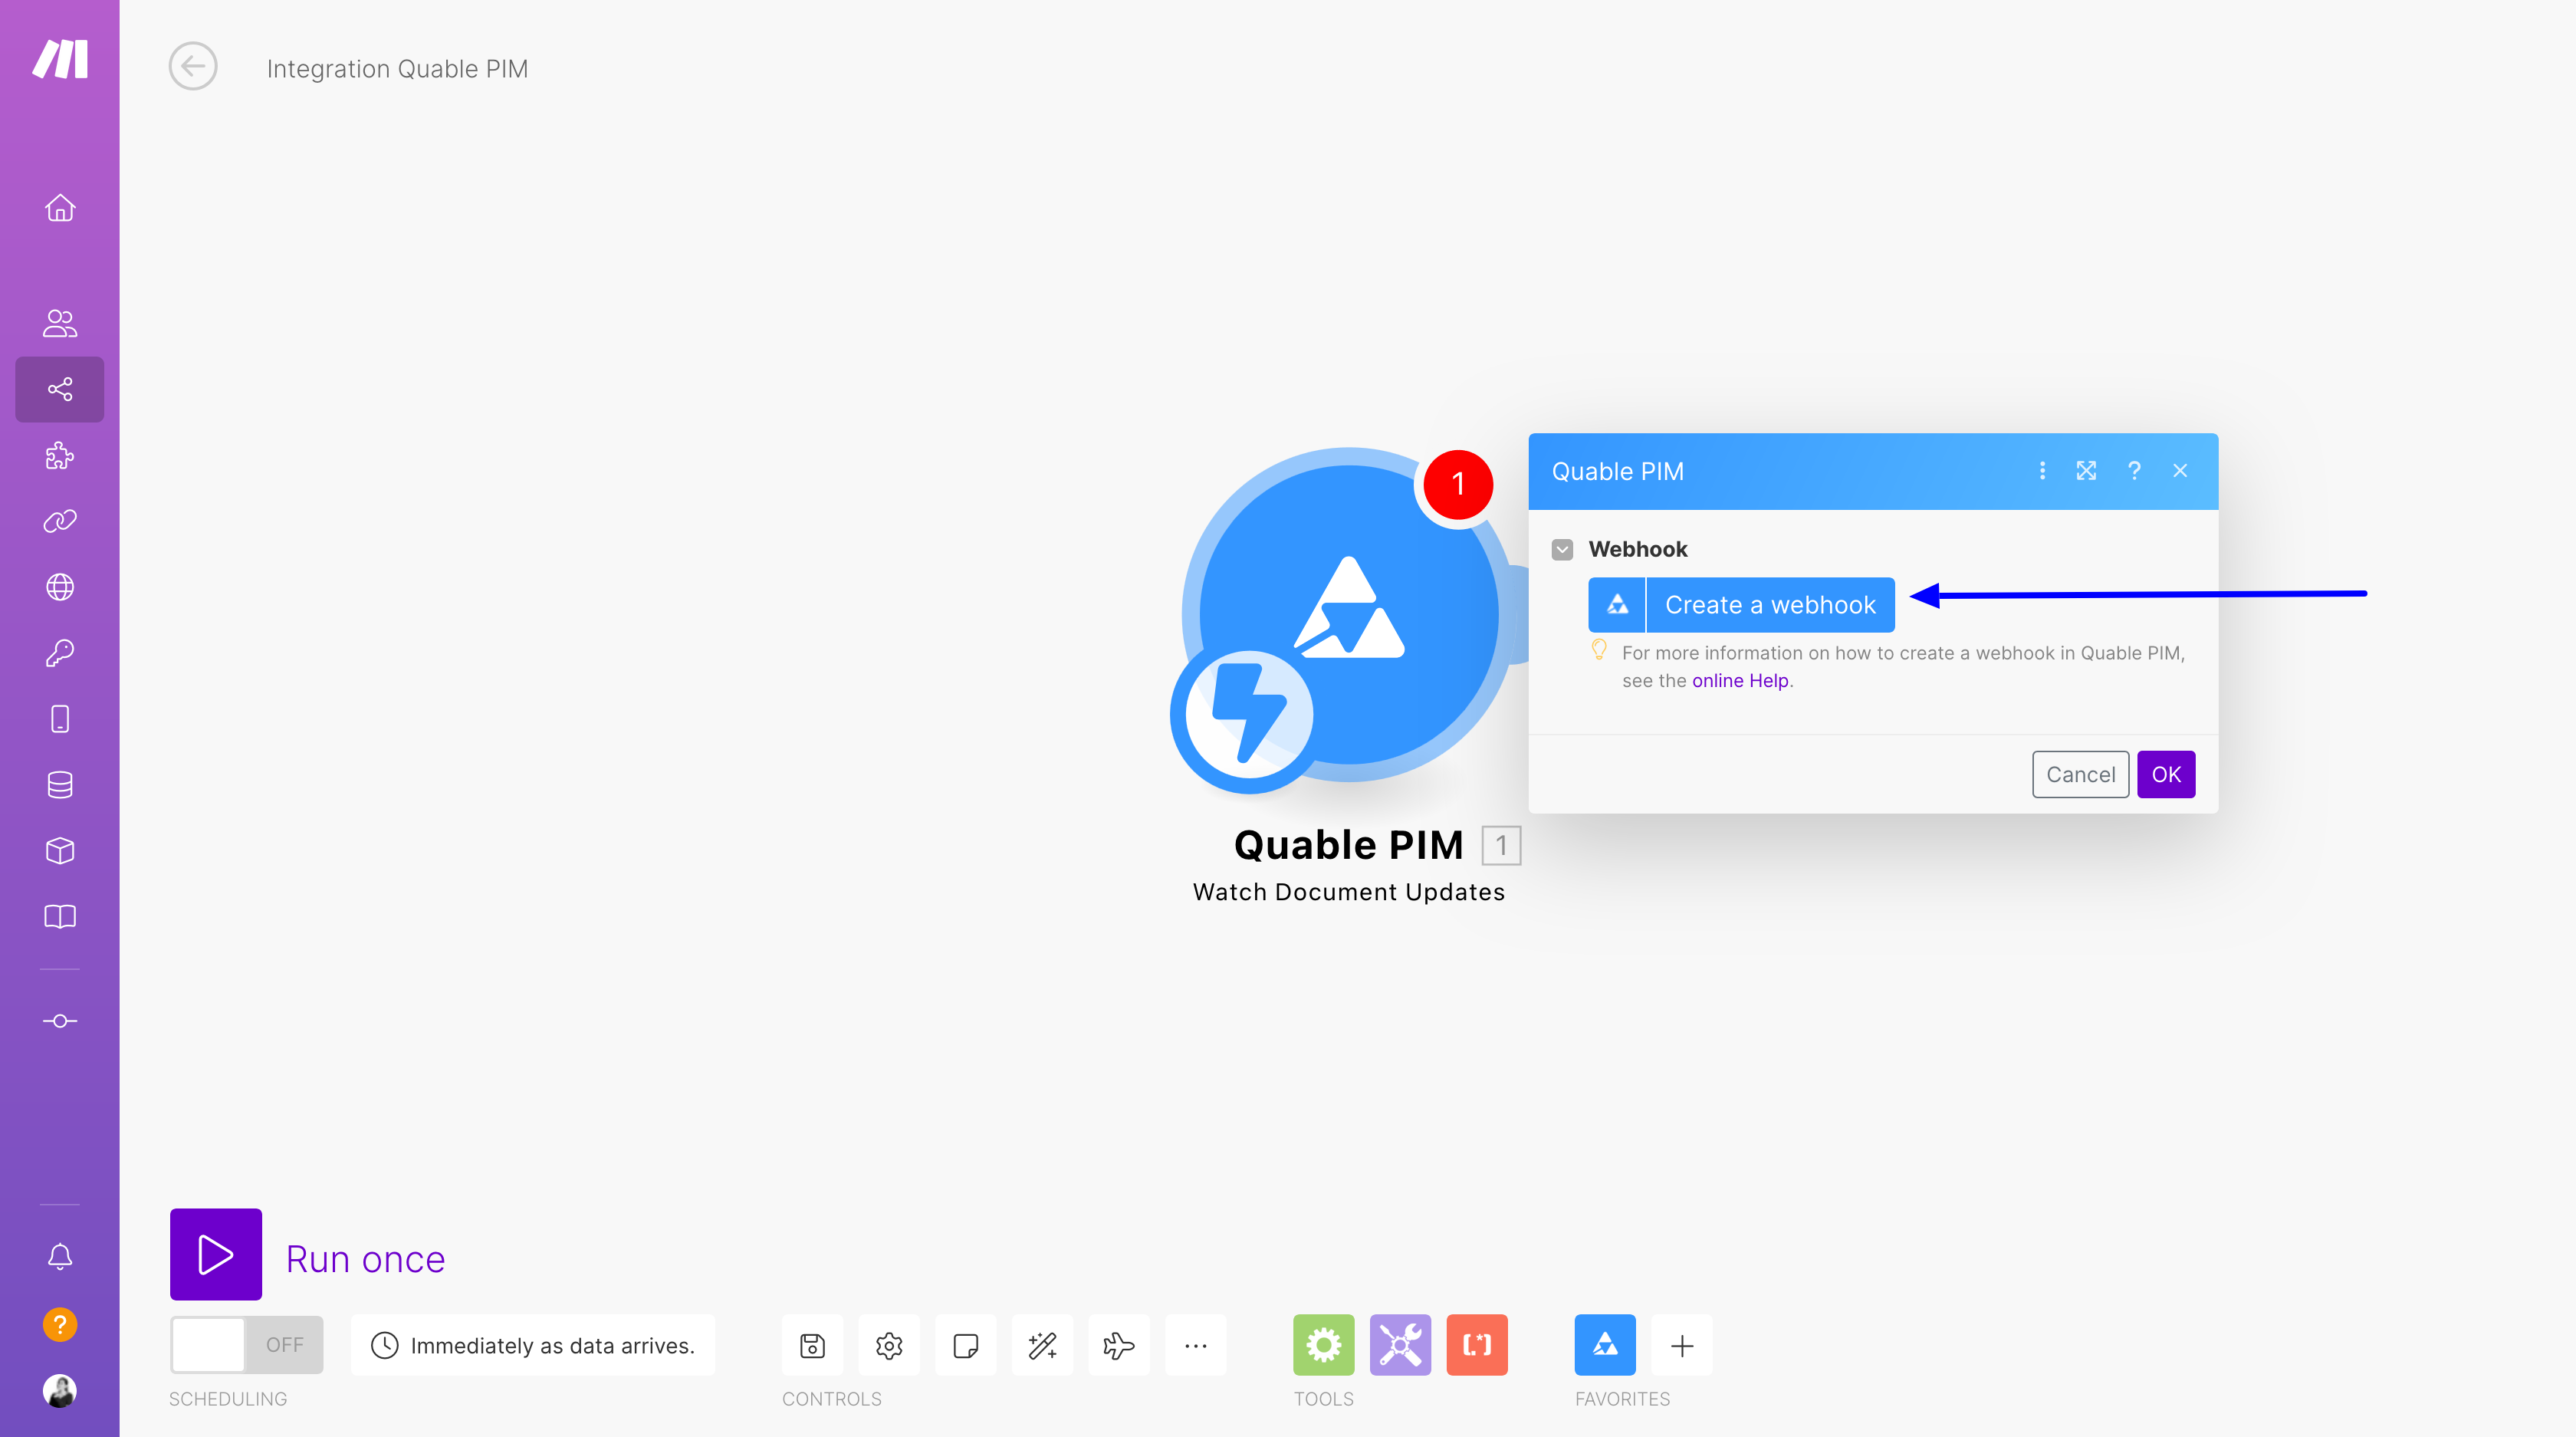
Step 5
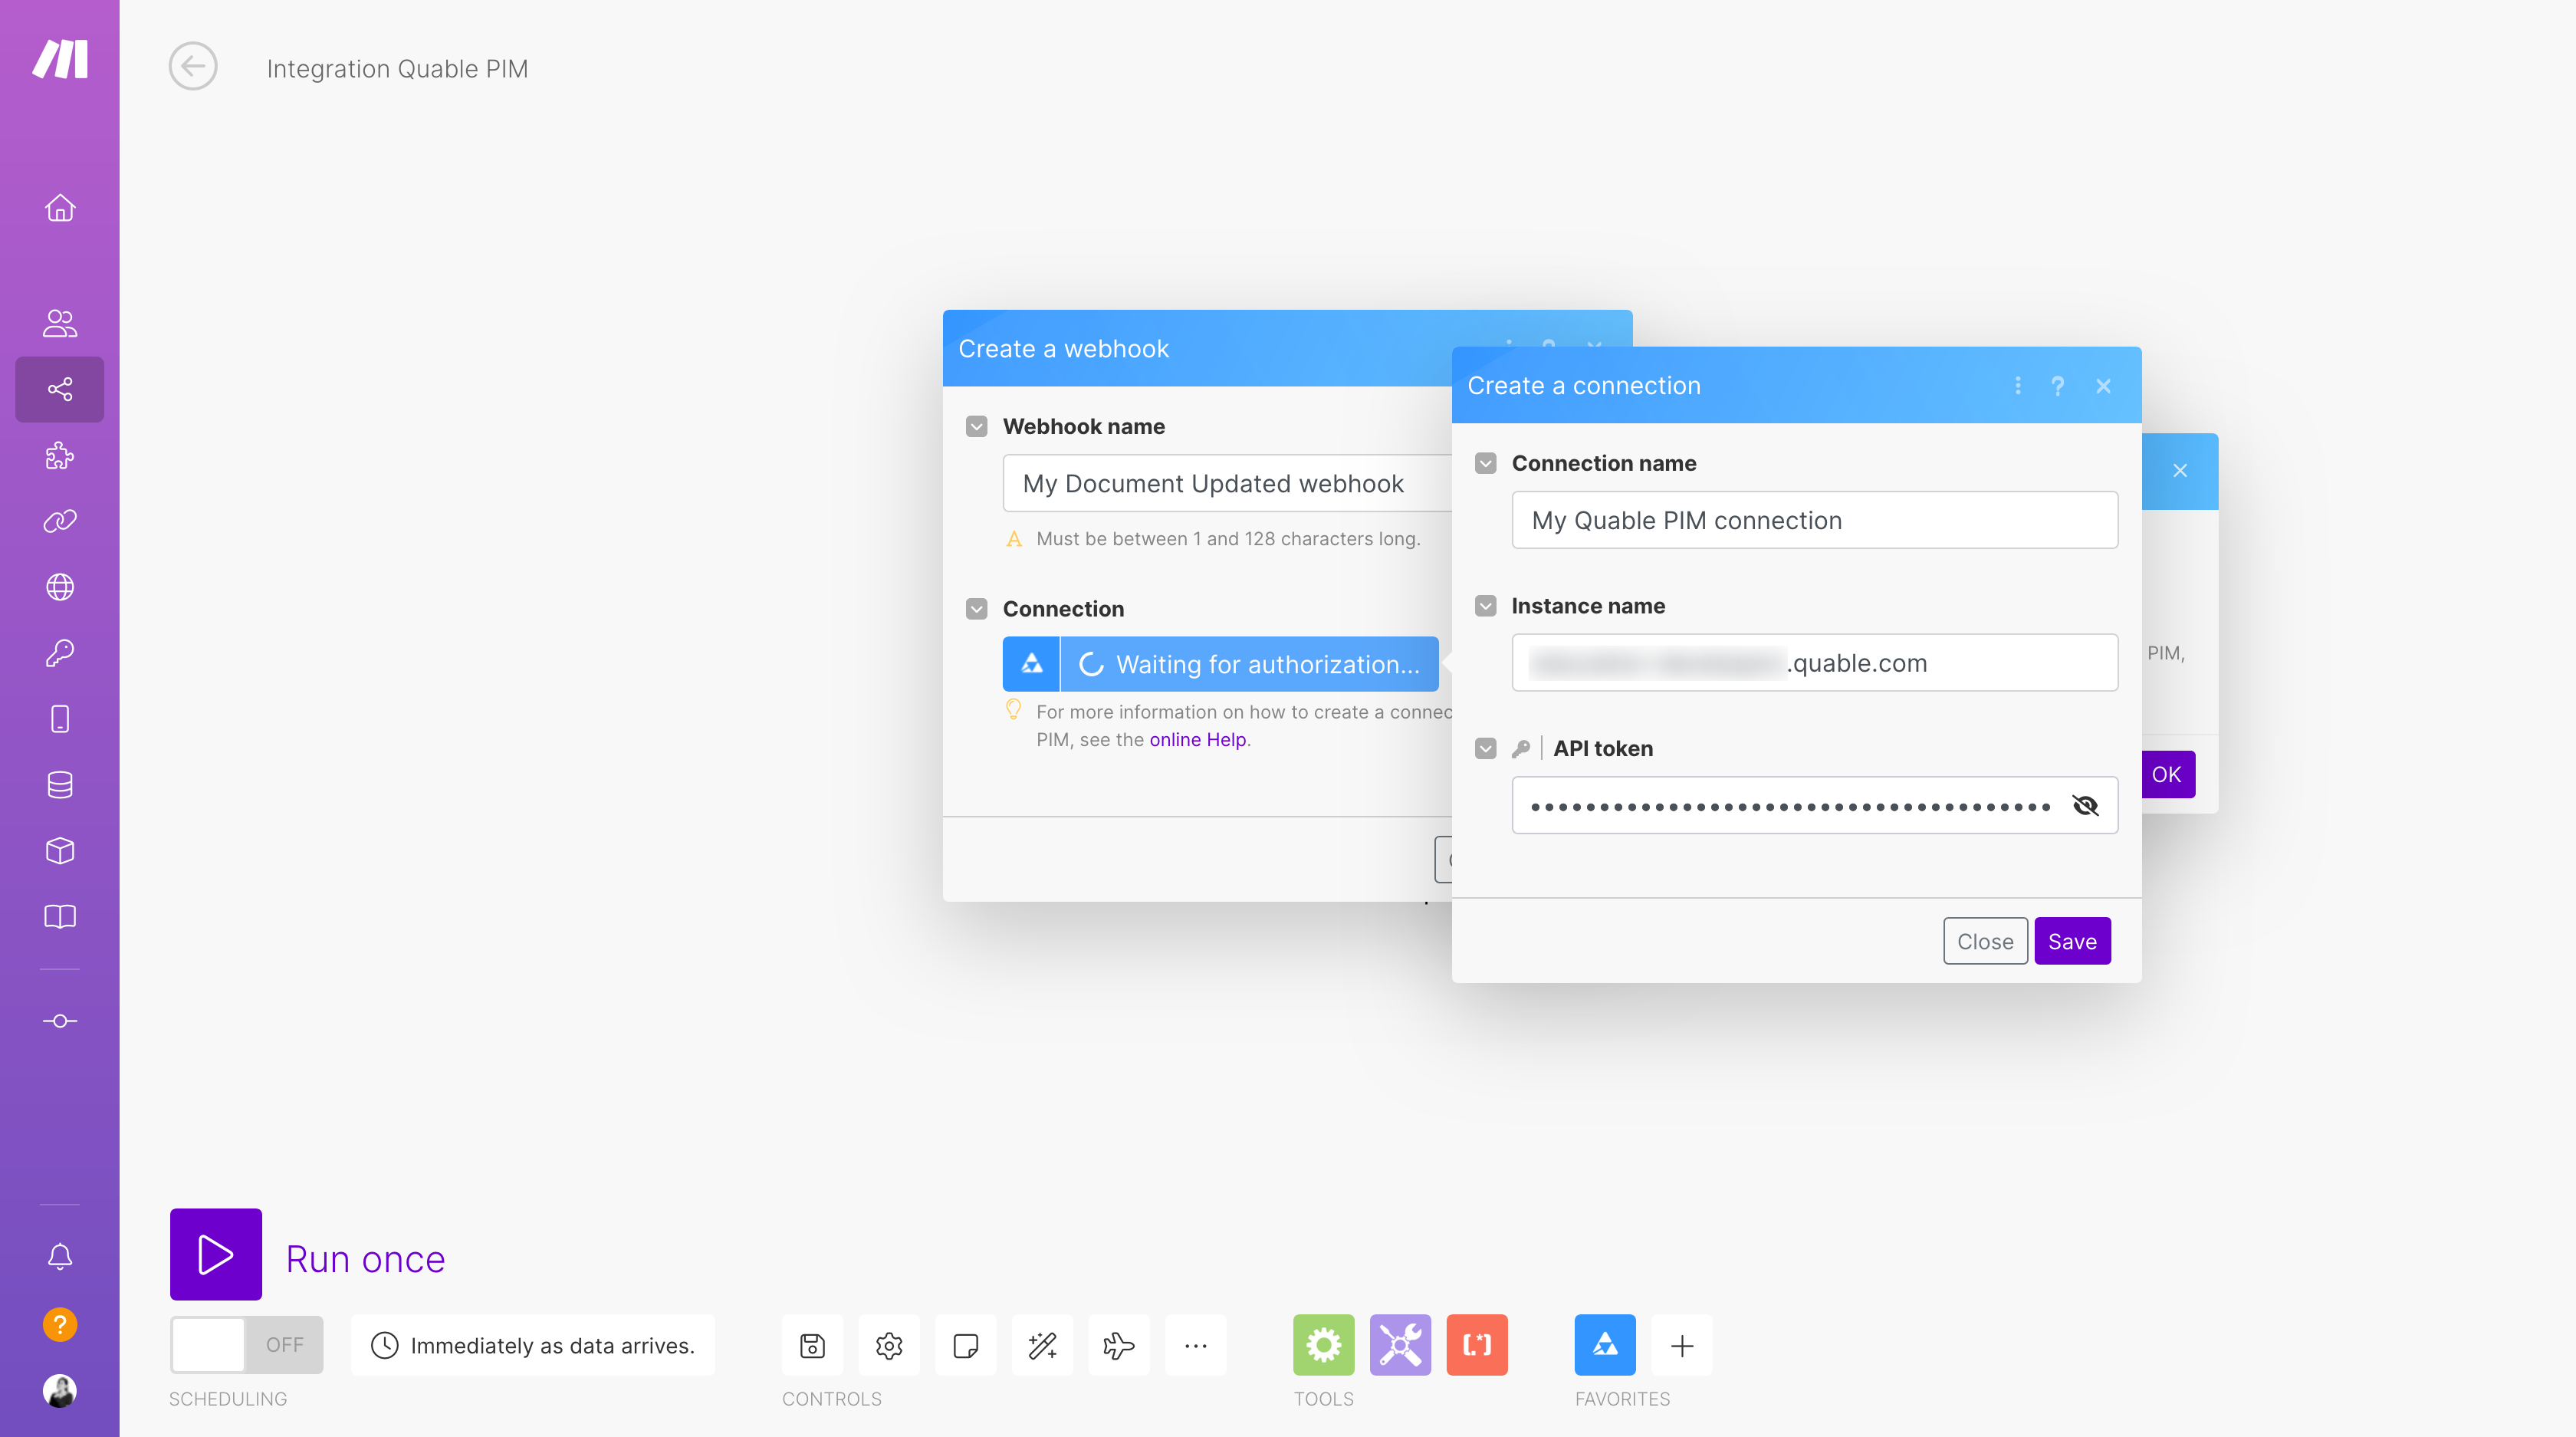
Name your new webhook and create a connexion with your PIM (it make is not already connected).
You will need to provide your instance's name and your API token (accessible in the settings of your PIM).
Click on "save" when you are done.
Step 6
Make will provide you with an URL. Copy-paste it and click on "OK".
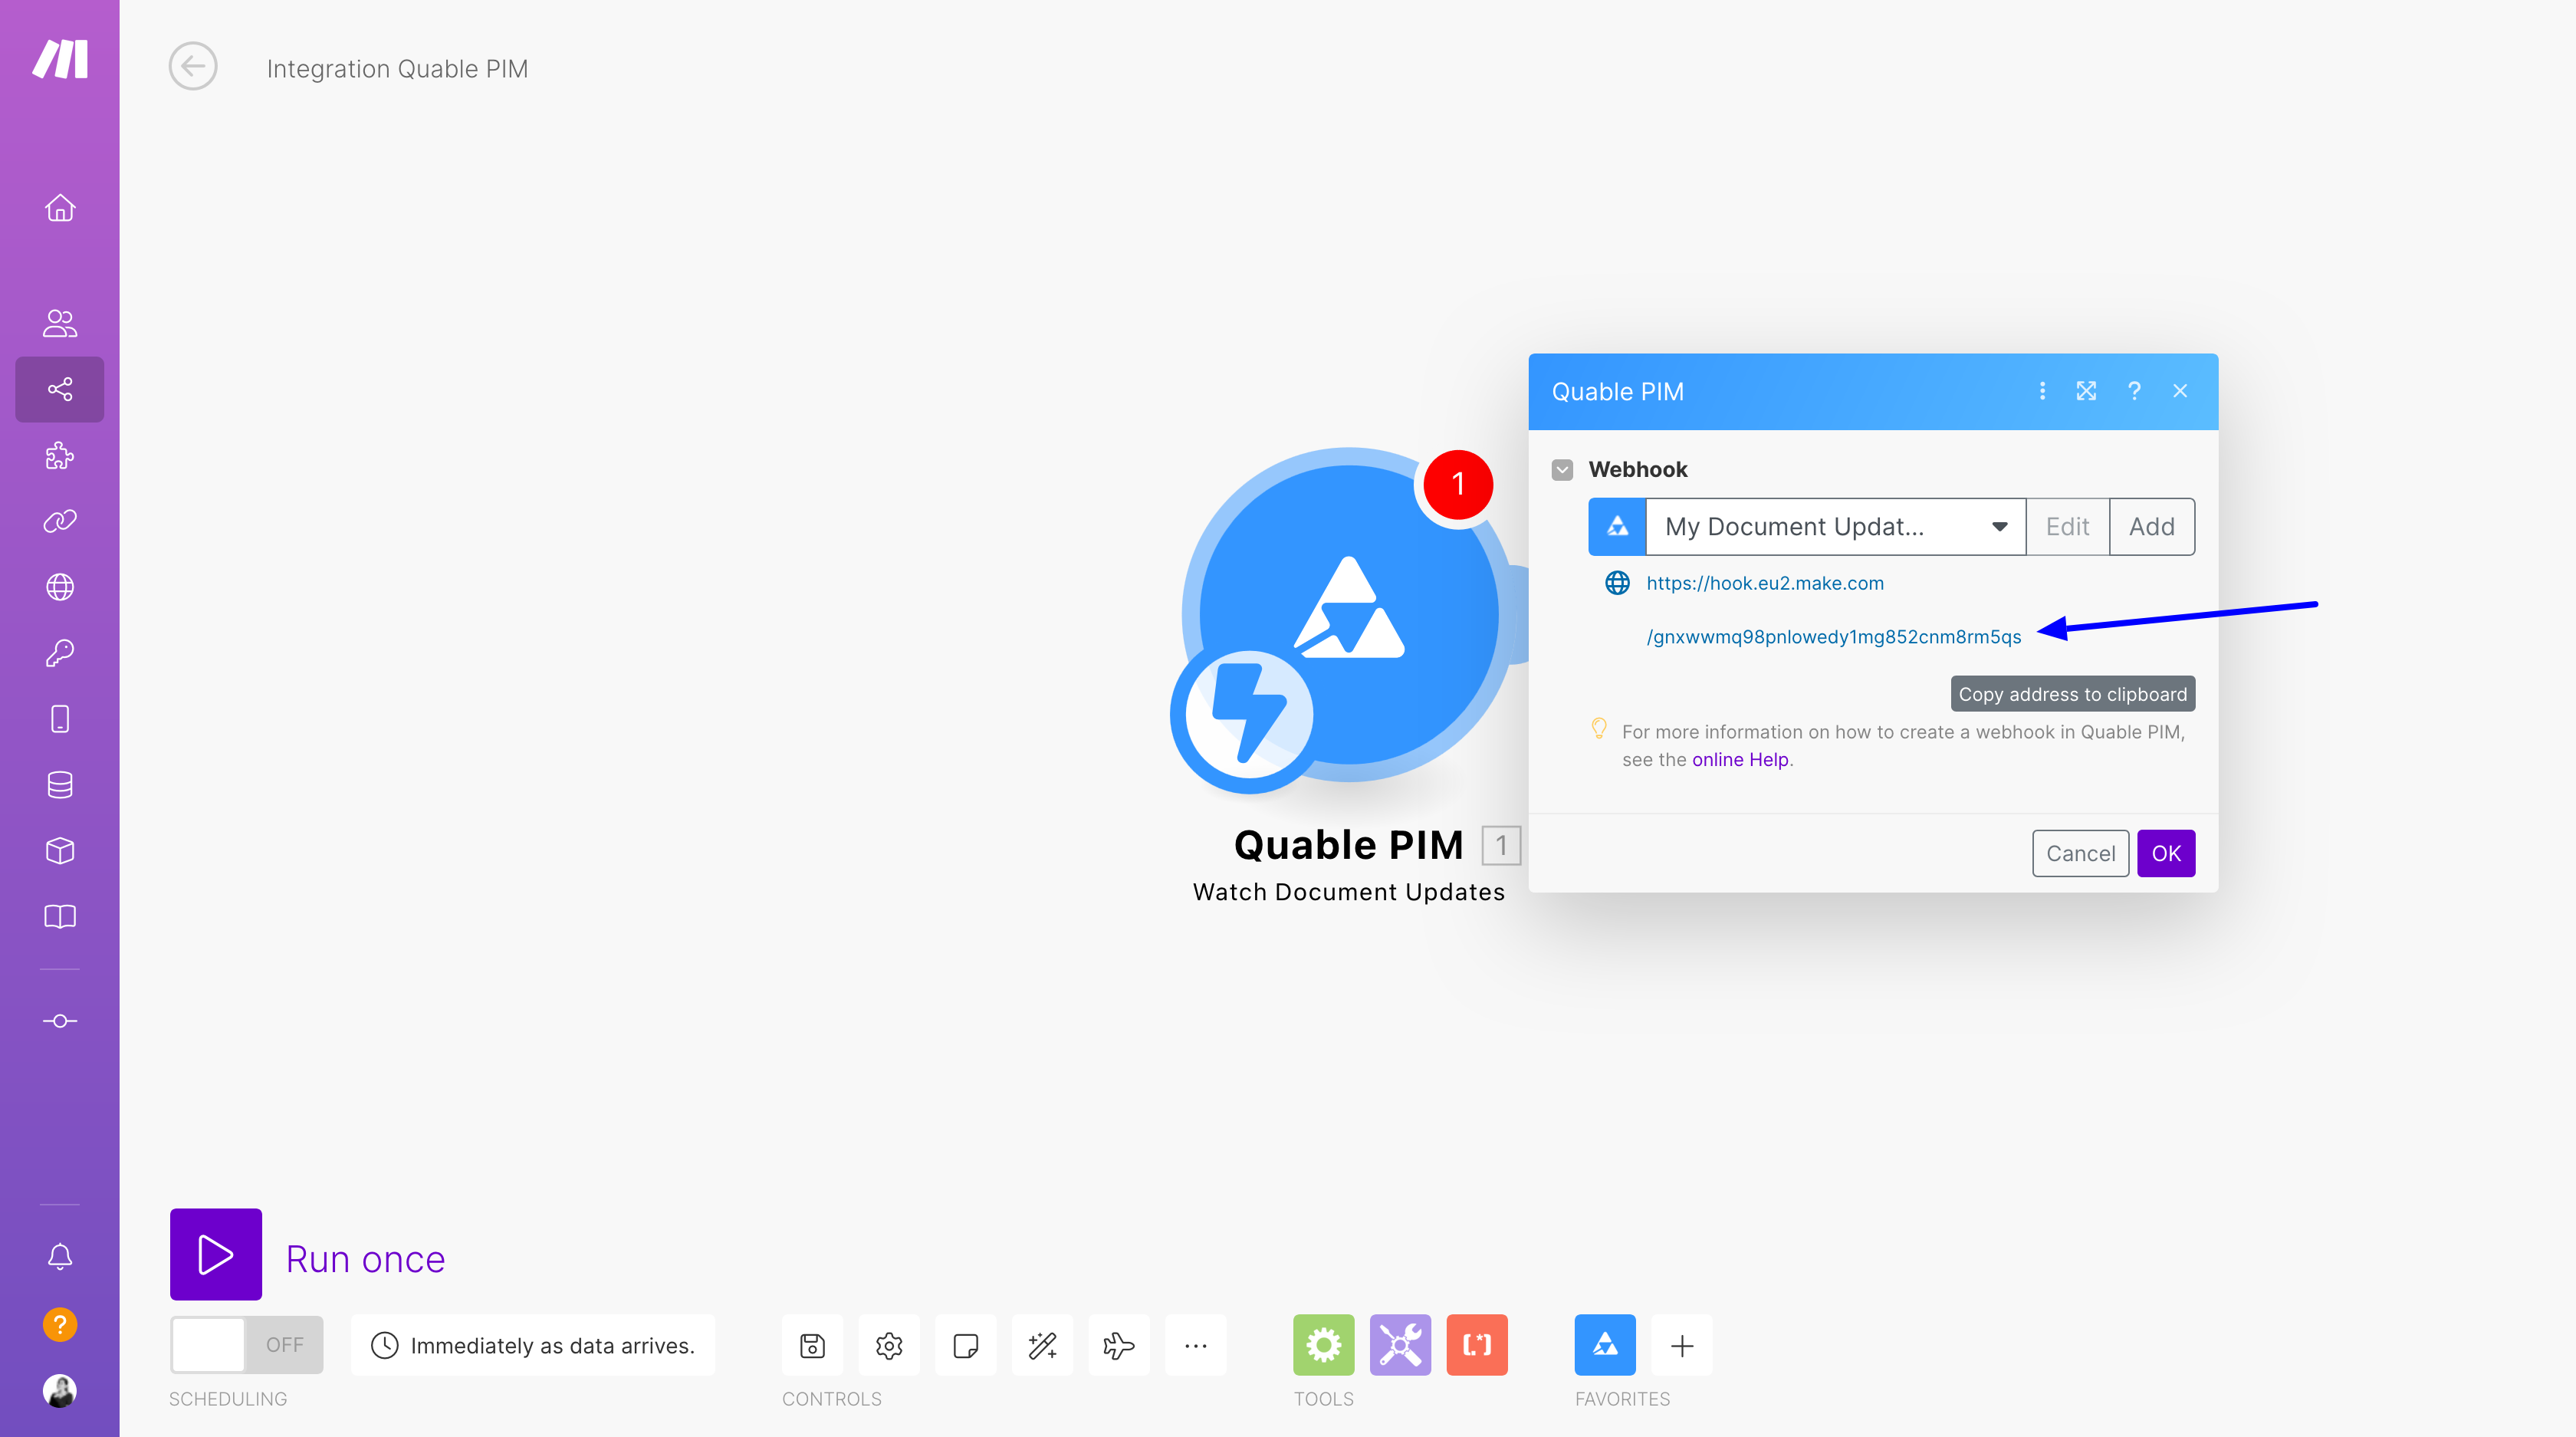
Step 7
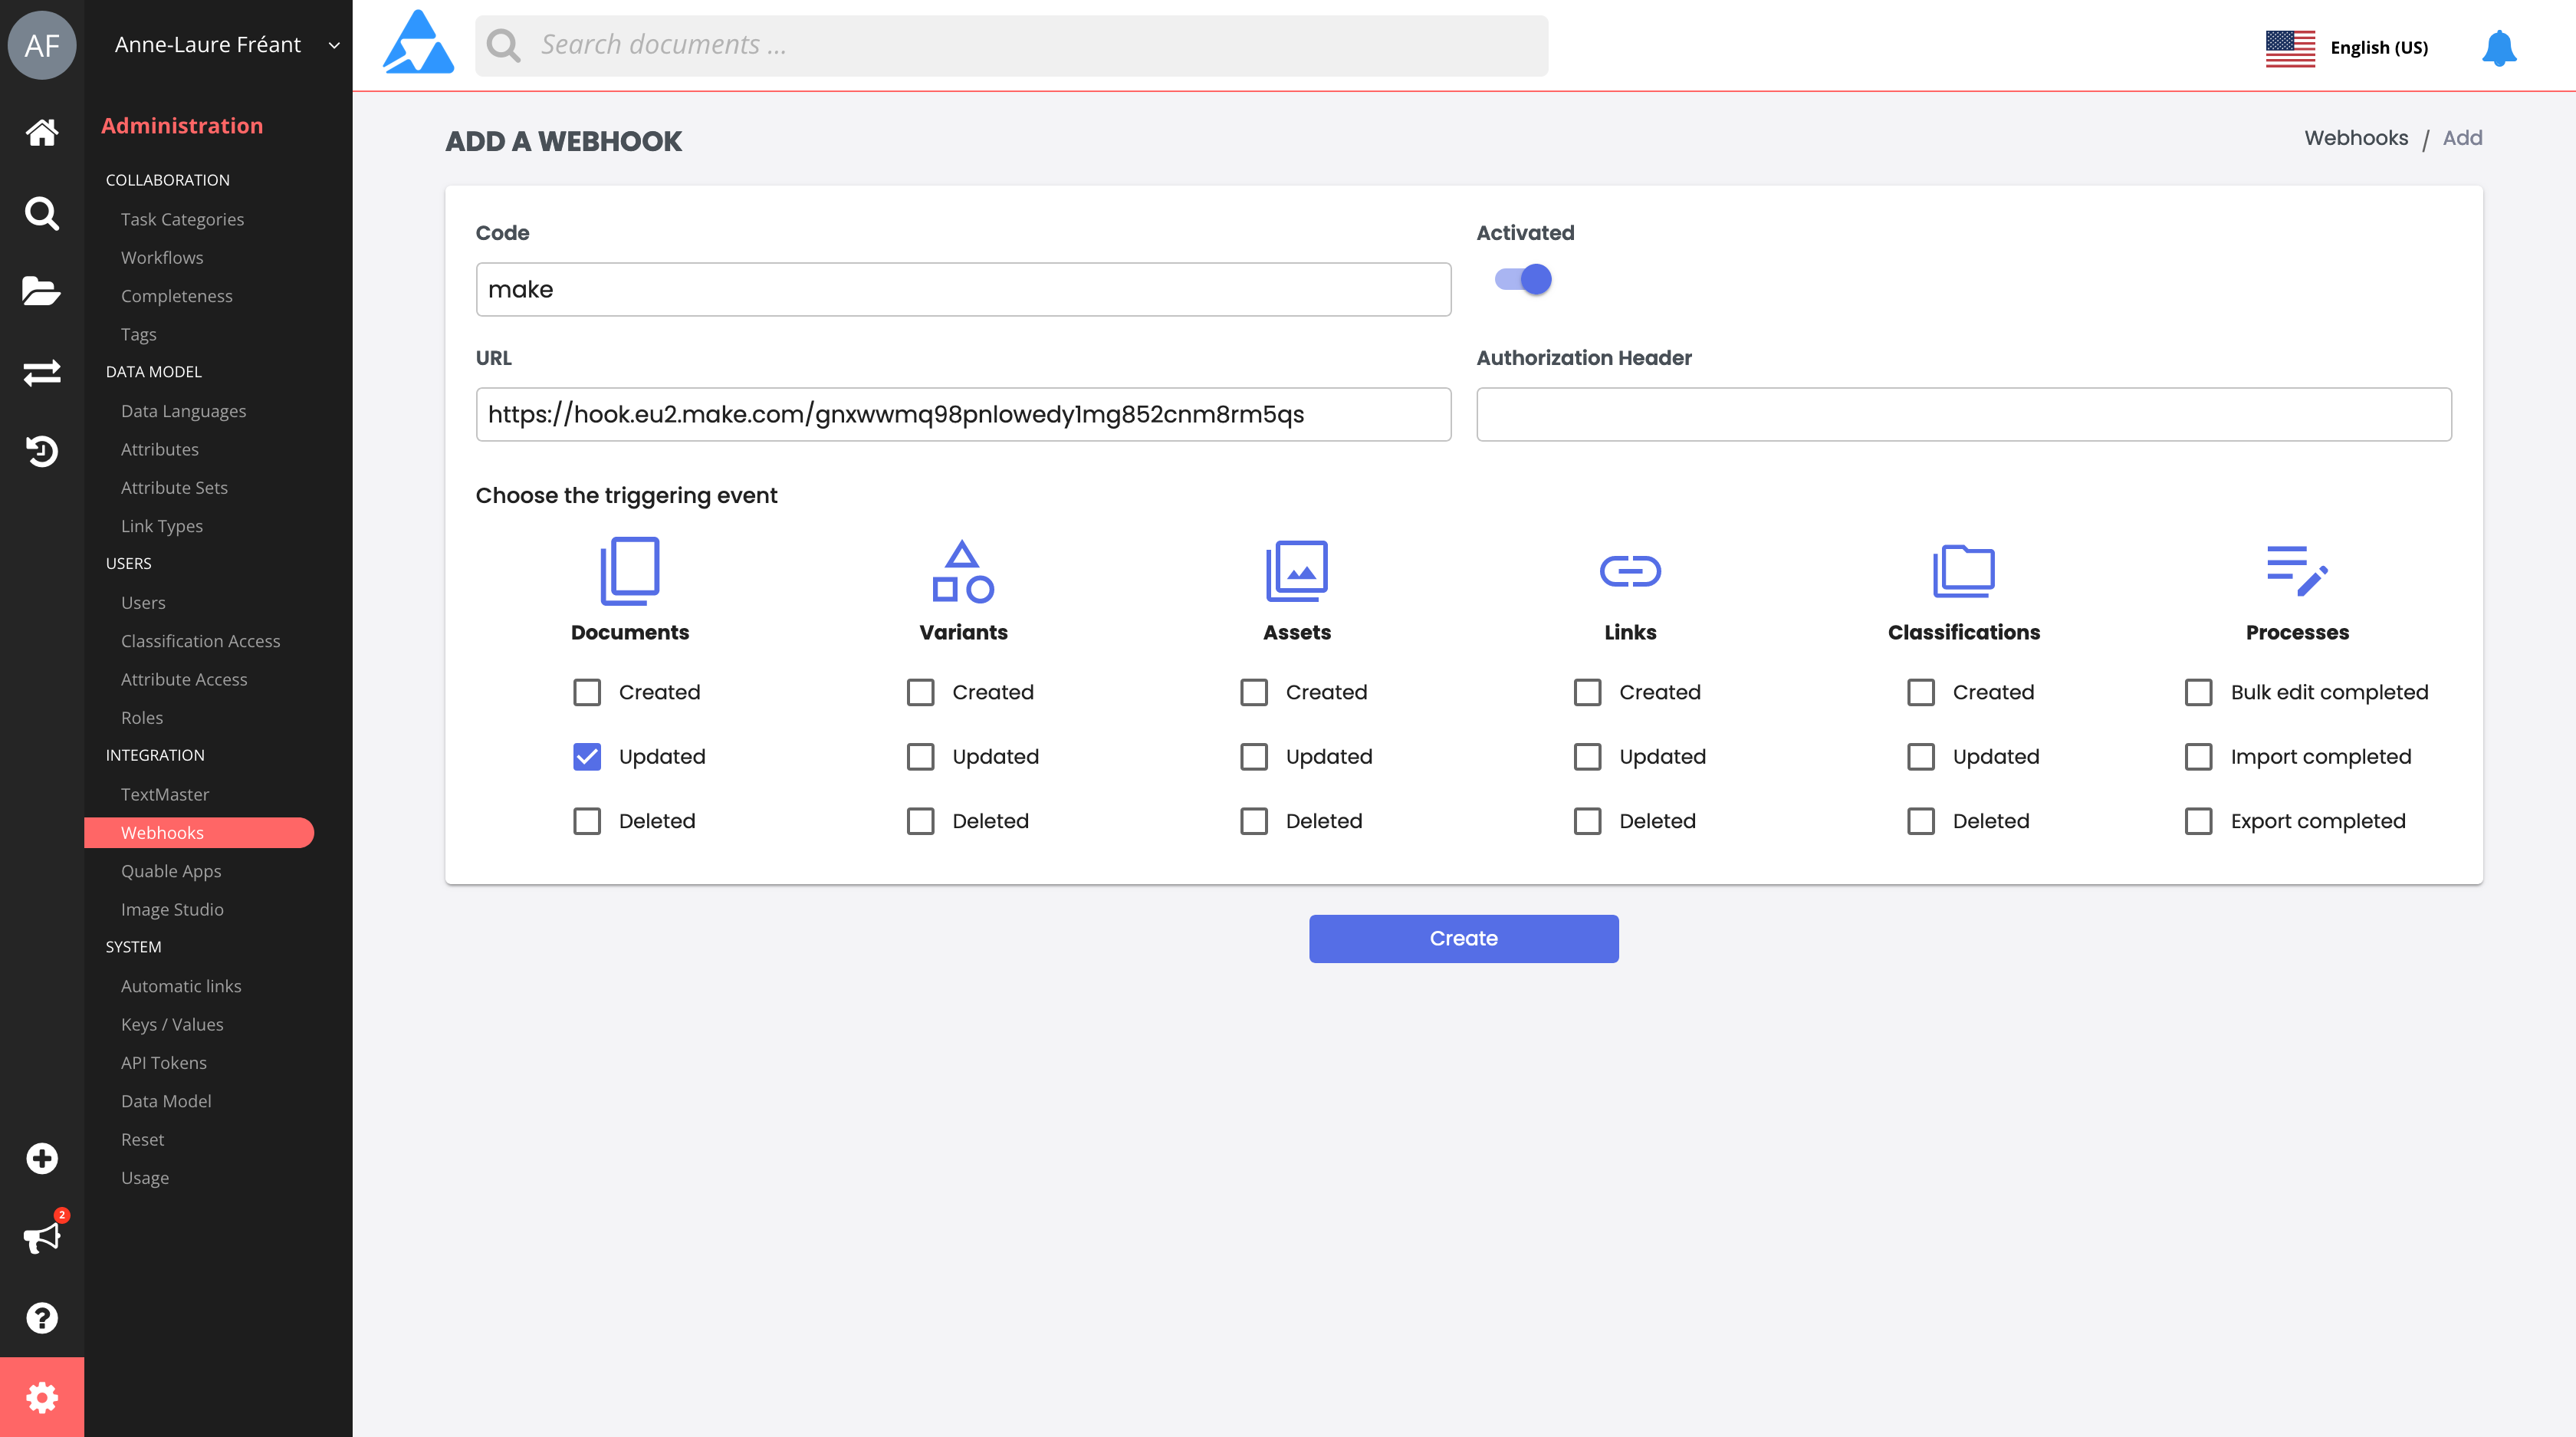
Go to your Quable PIM in the Webhook section, and click on "add a webhook".
You can there copy paste the URL in the URL field, add a code and a header, and click on "Create".
The header can remain empty.
#
2. Retrieve document data when a change occurs
#
Step 1
Add a module to your Make scenario, and select "Make an API call".
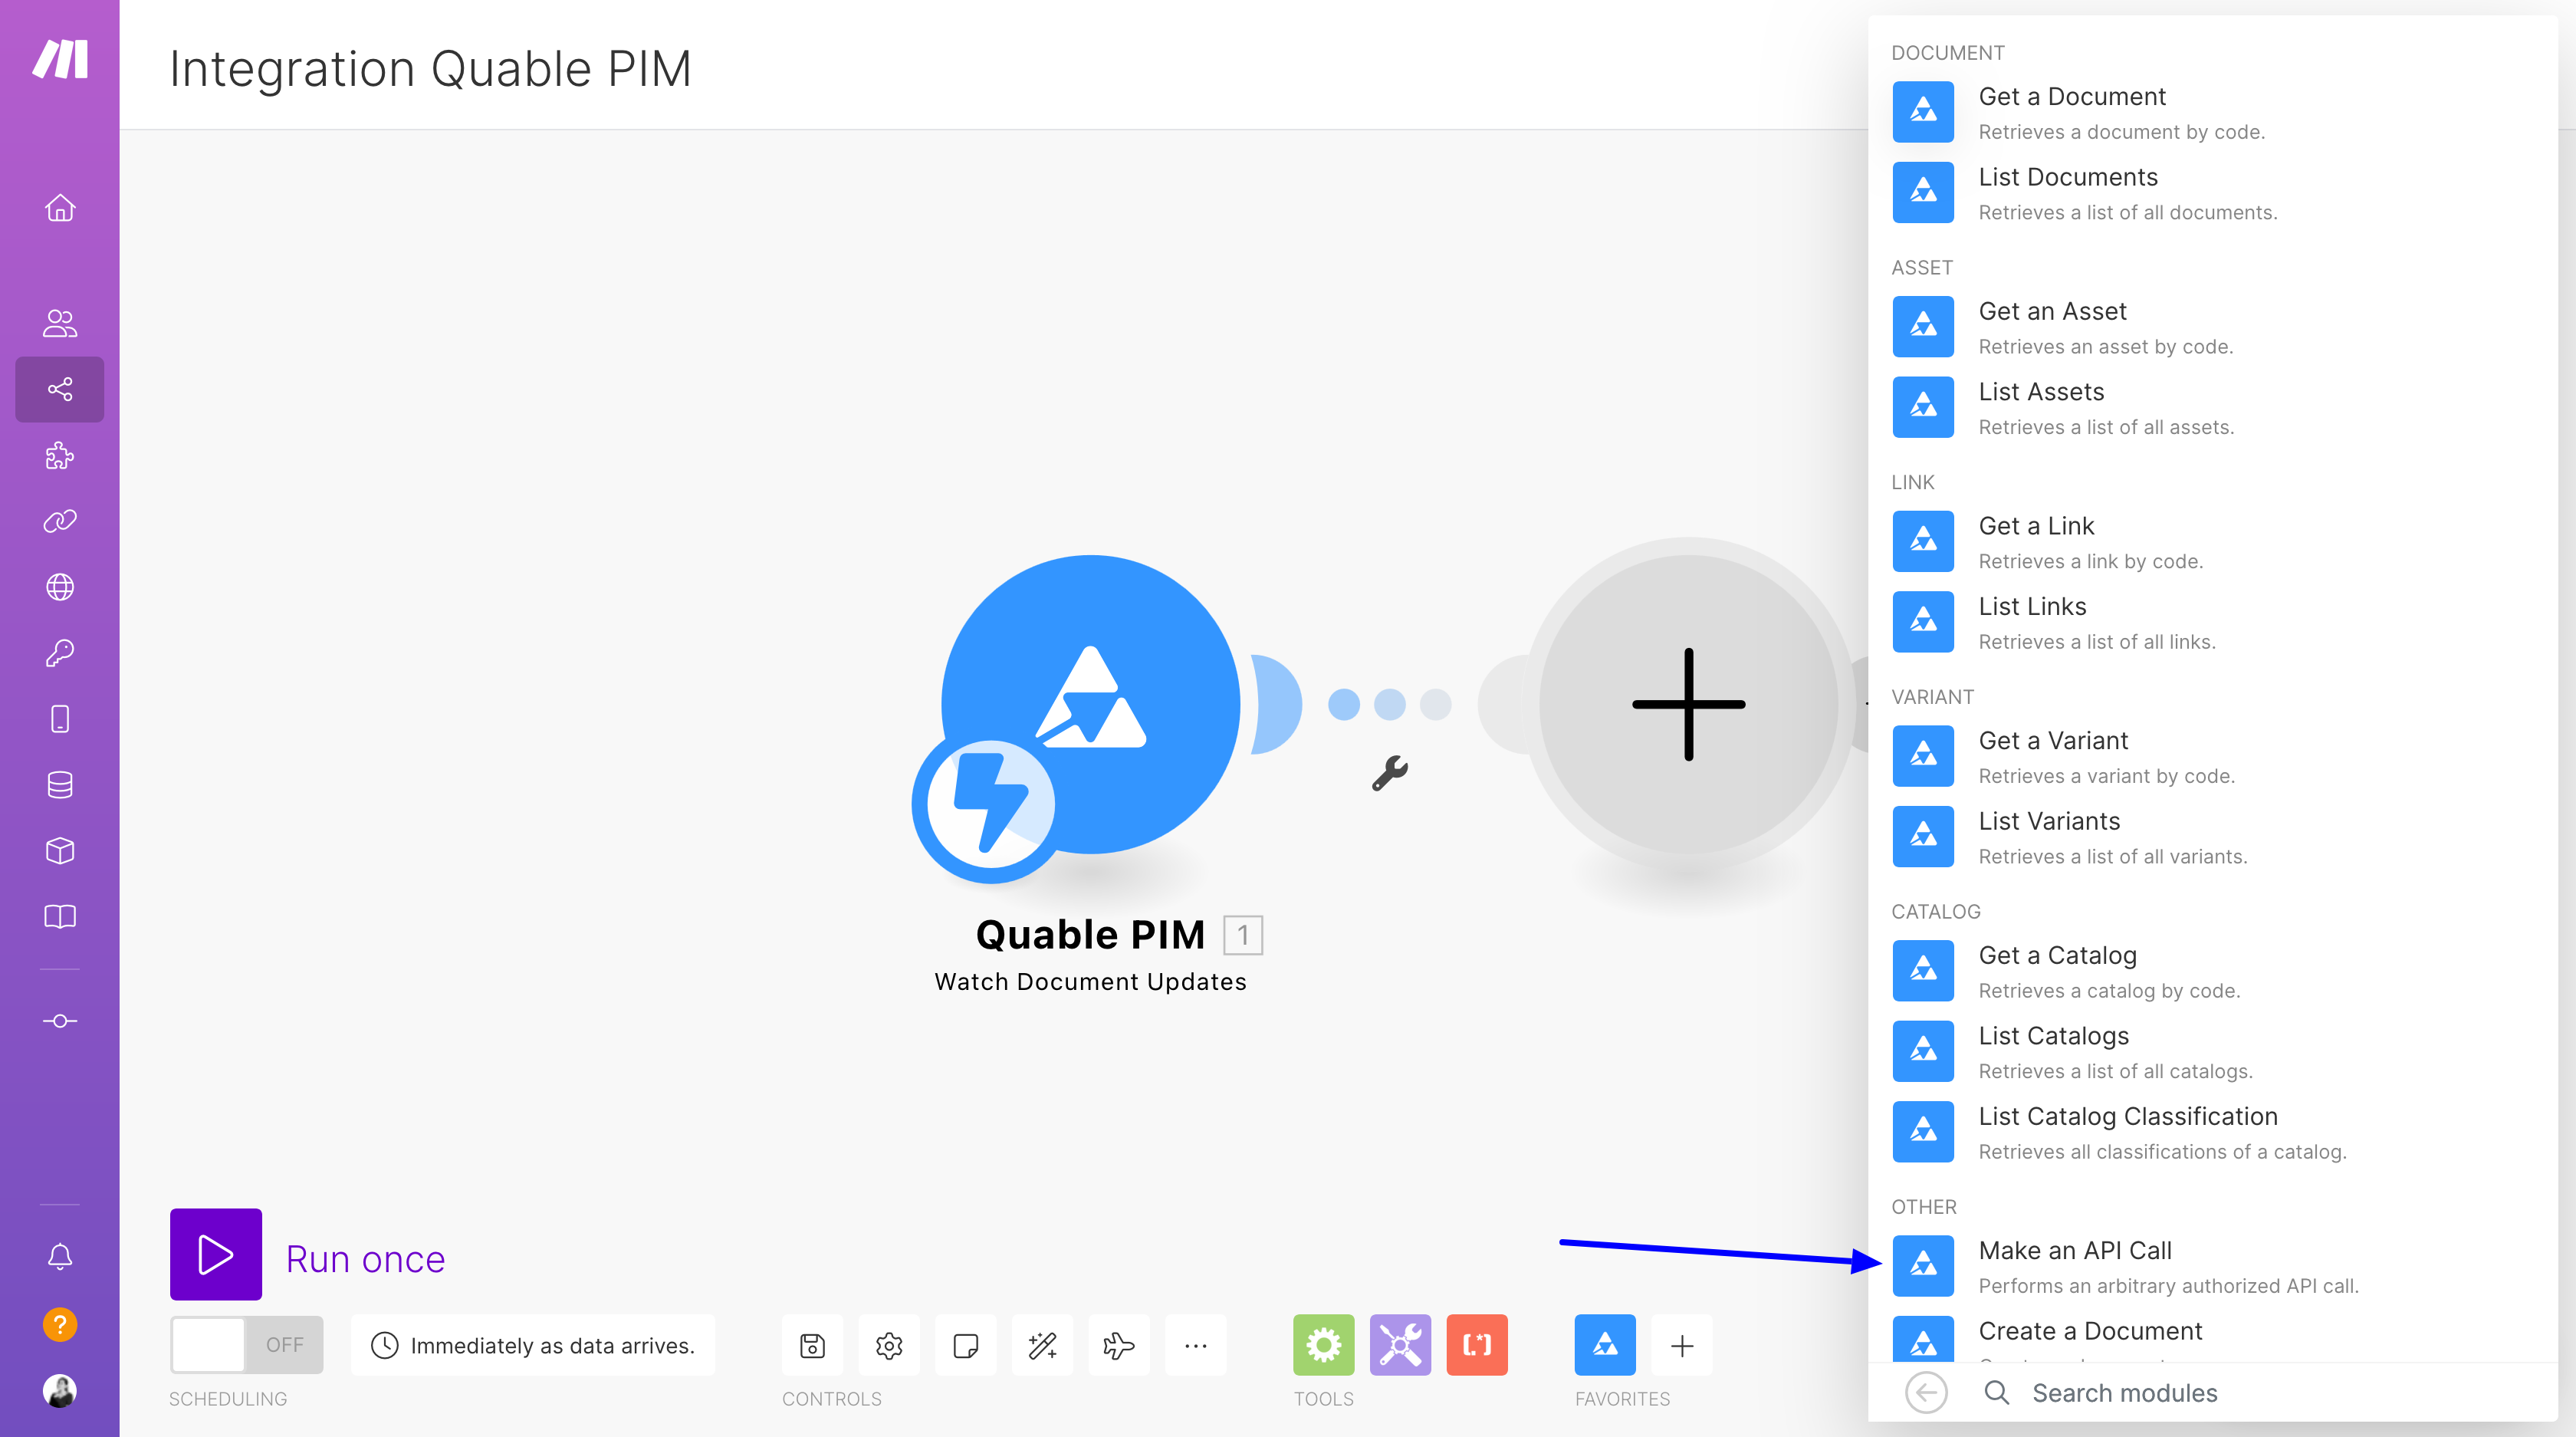
#
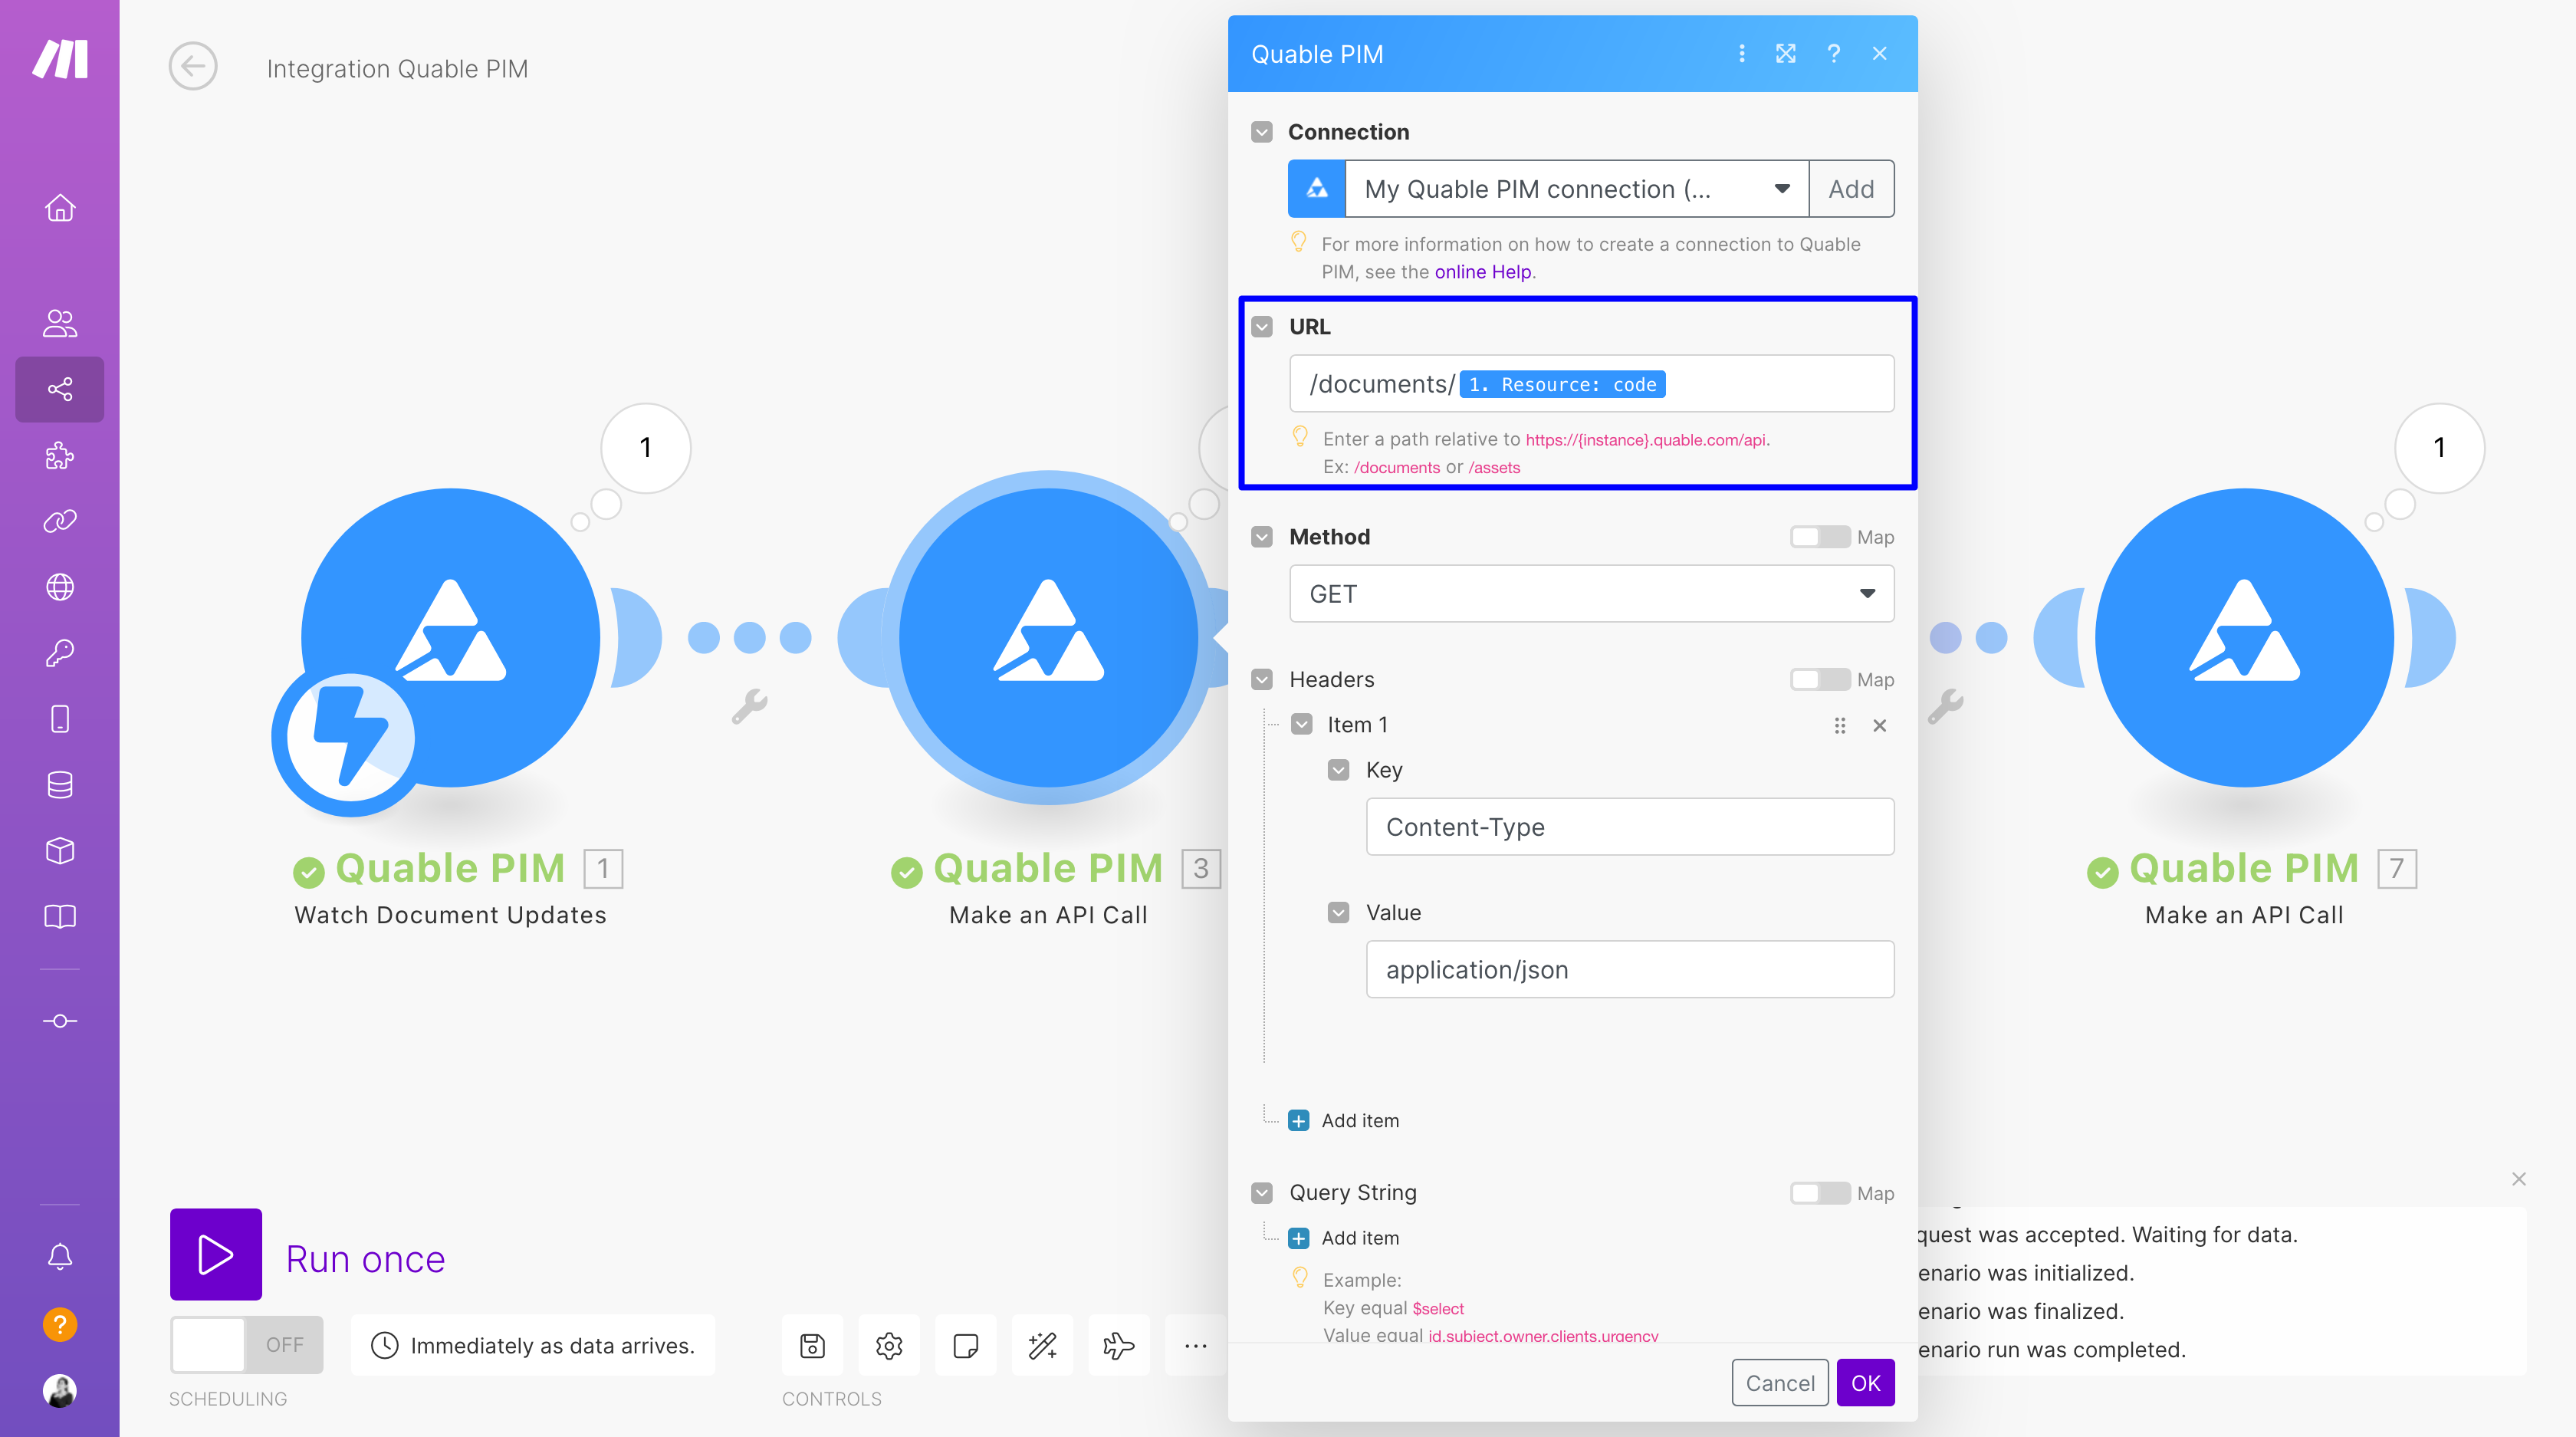
Step 2
The method to use is GET, to retrieve your document's information.
The header should contain one items with the key 'Content/Type' and the value 'application/json'
Warning
The URL should look like /documents/{{documentID}} and not include the full path.
#
3. Create the new value
#
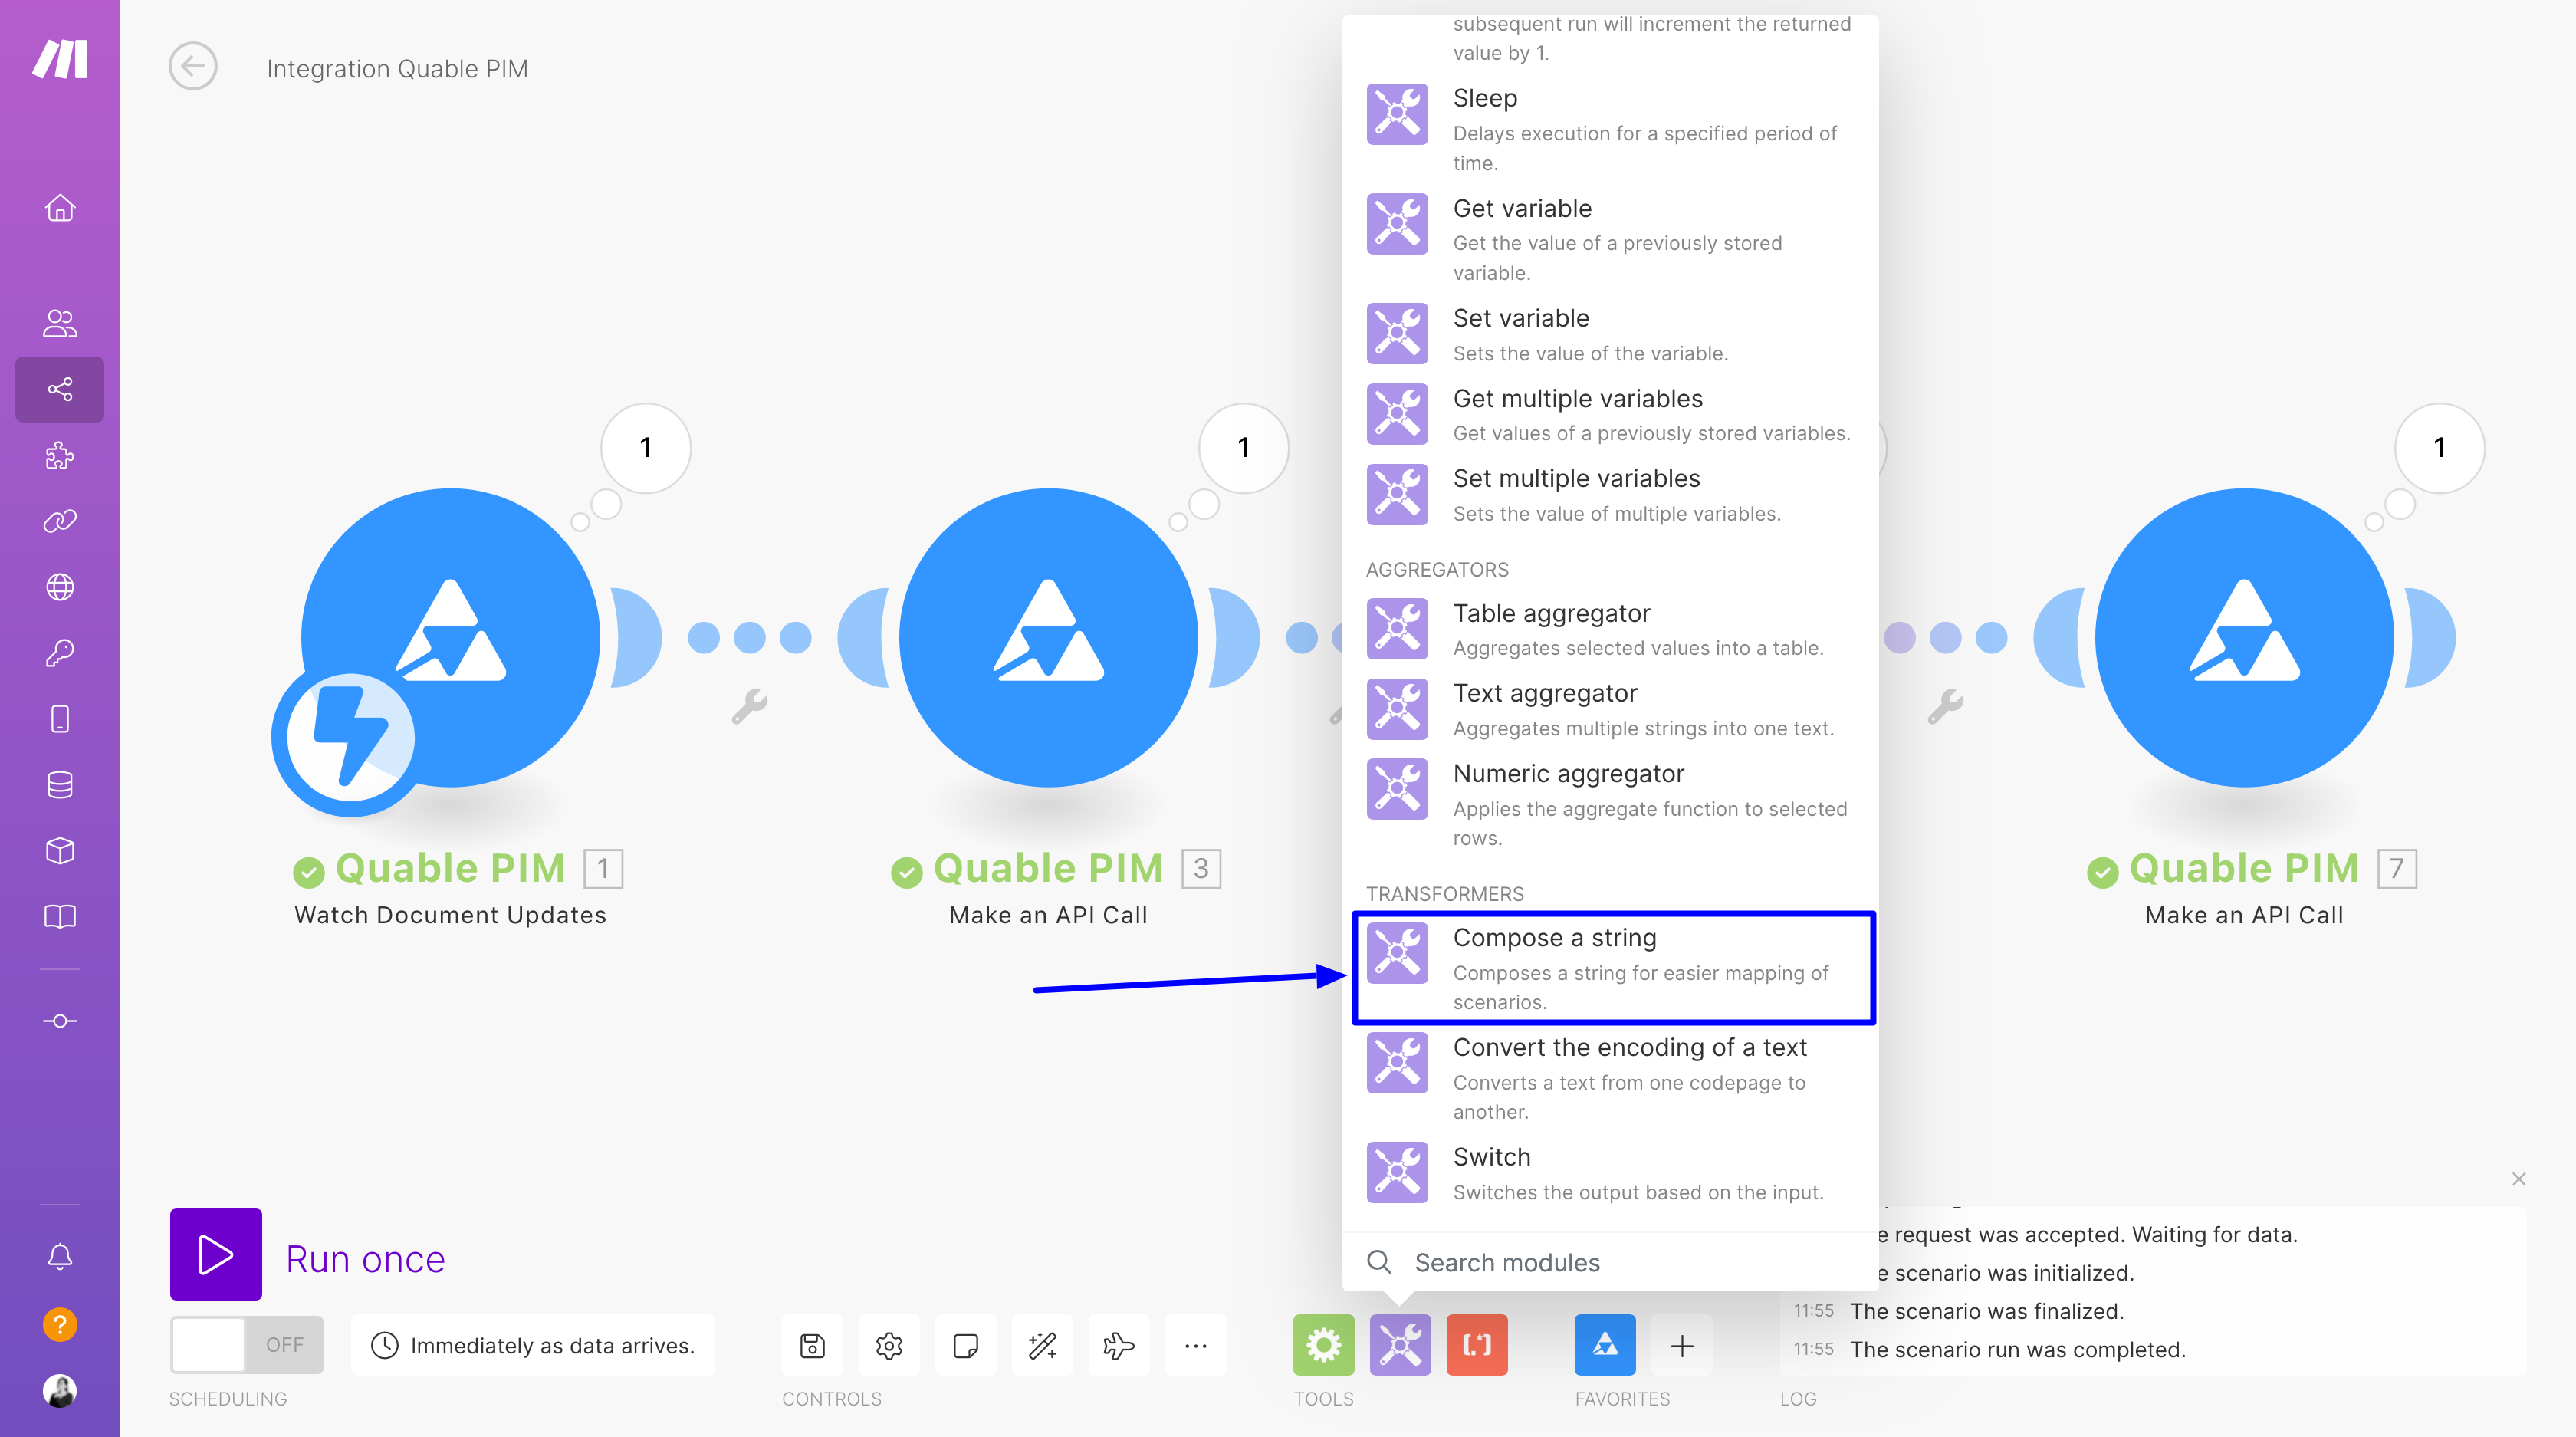
Step 1
Add a tool. Choose the "Compose a string" module.
#
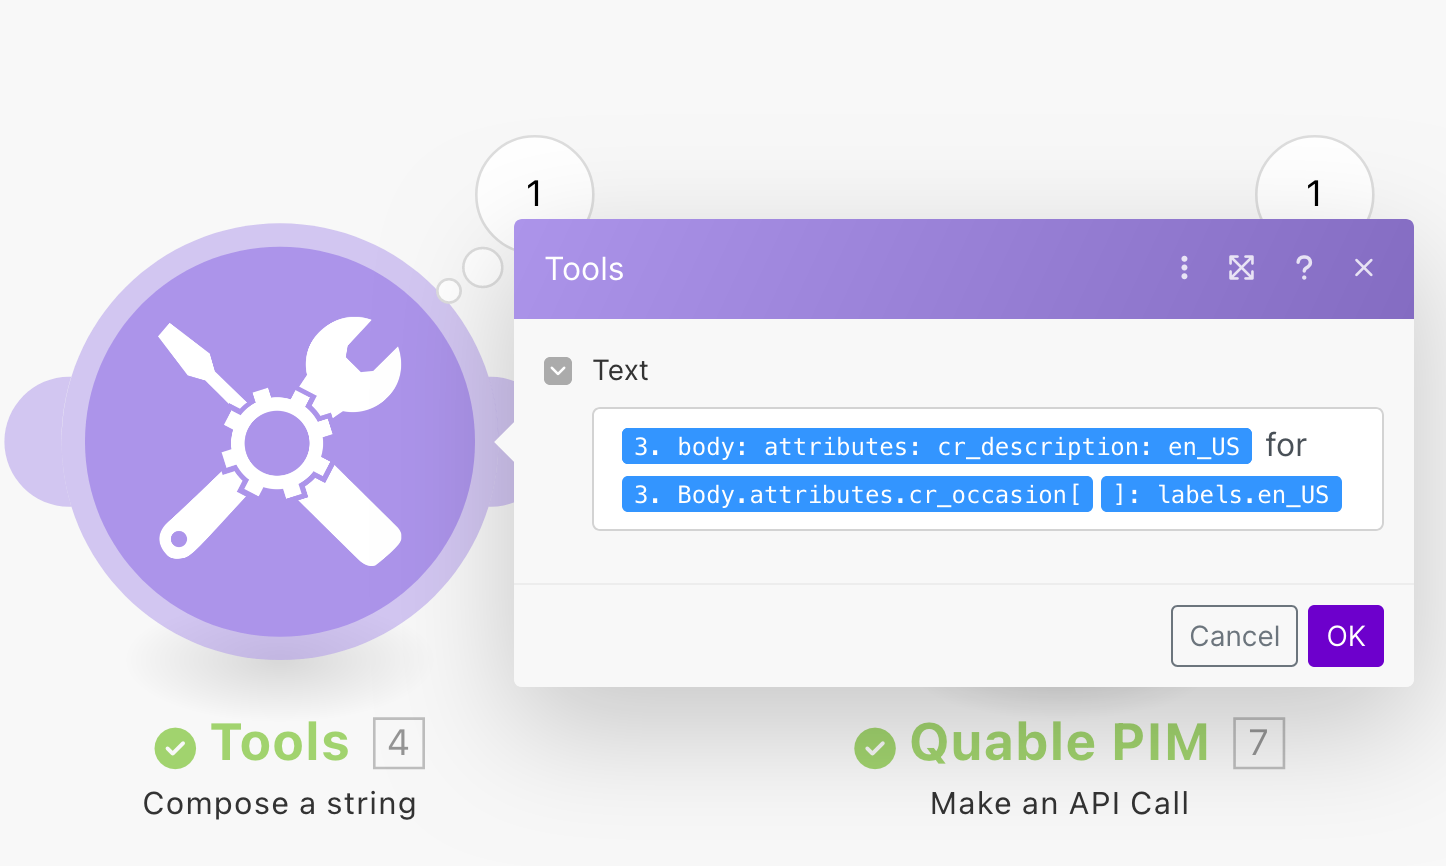
Step 2
Choose the values you want to concatenate or compute from the response of our previous API call. Click on "OK".
#
4. Push the new value into the PIM
Now that your new value is created, all that is left to do is to push it back into the PIM.
#
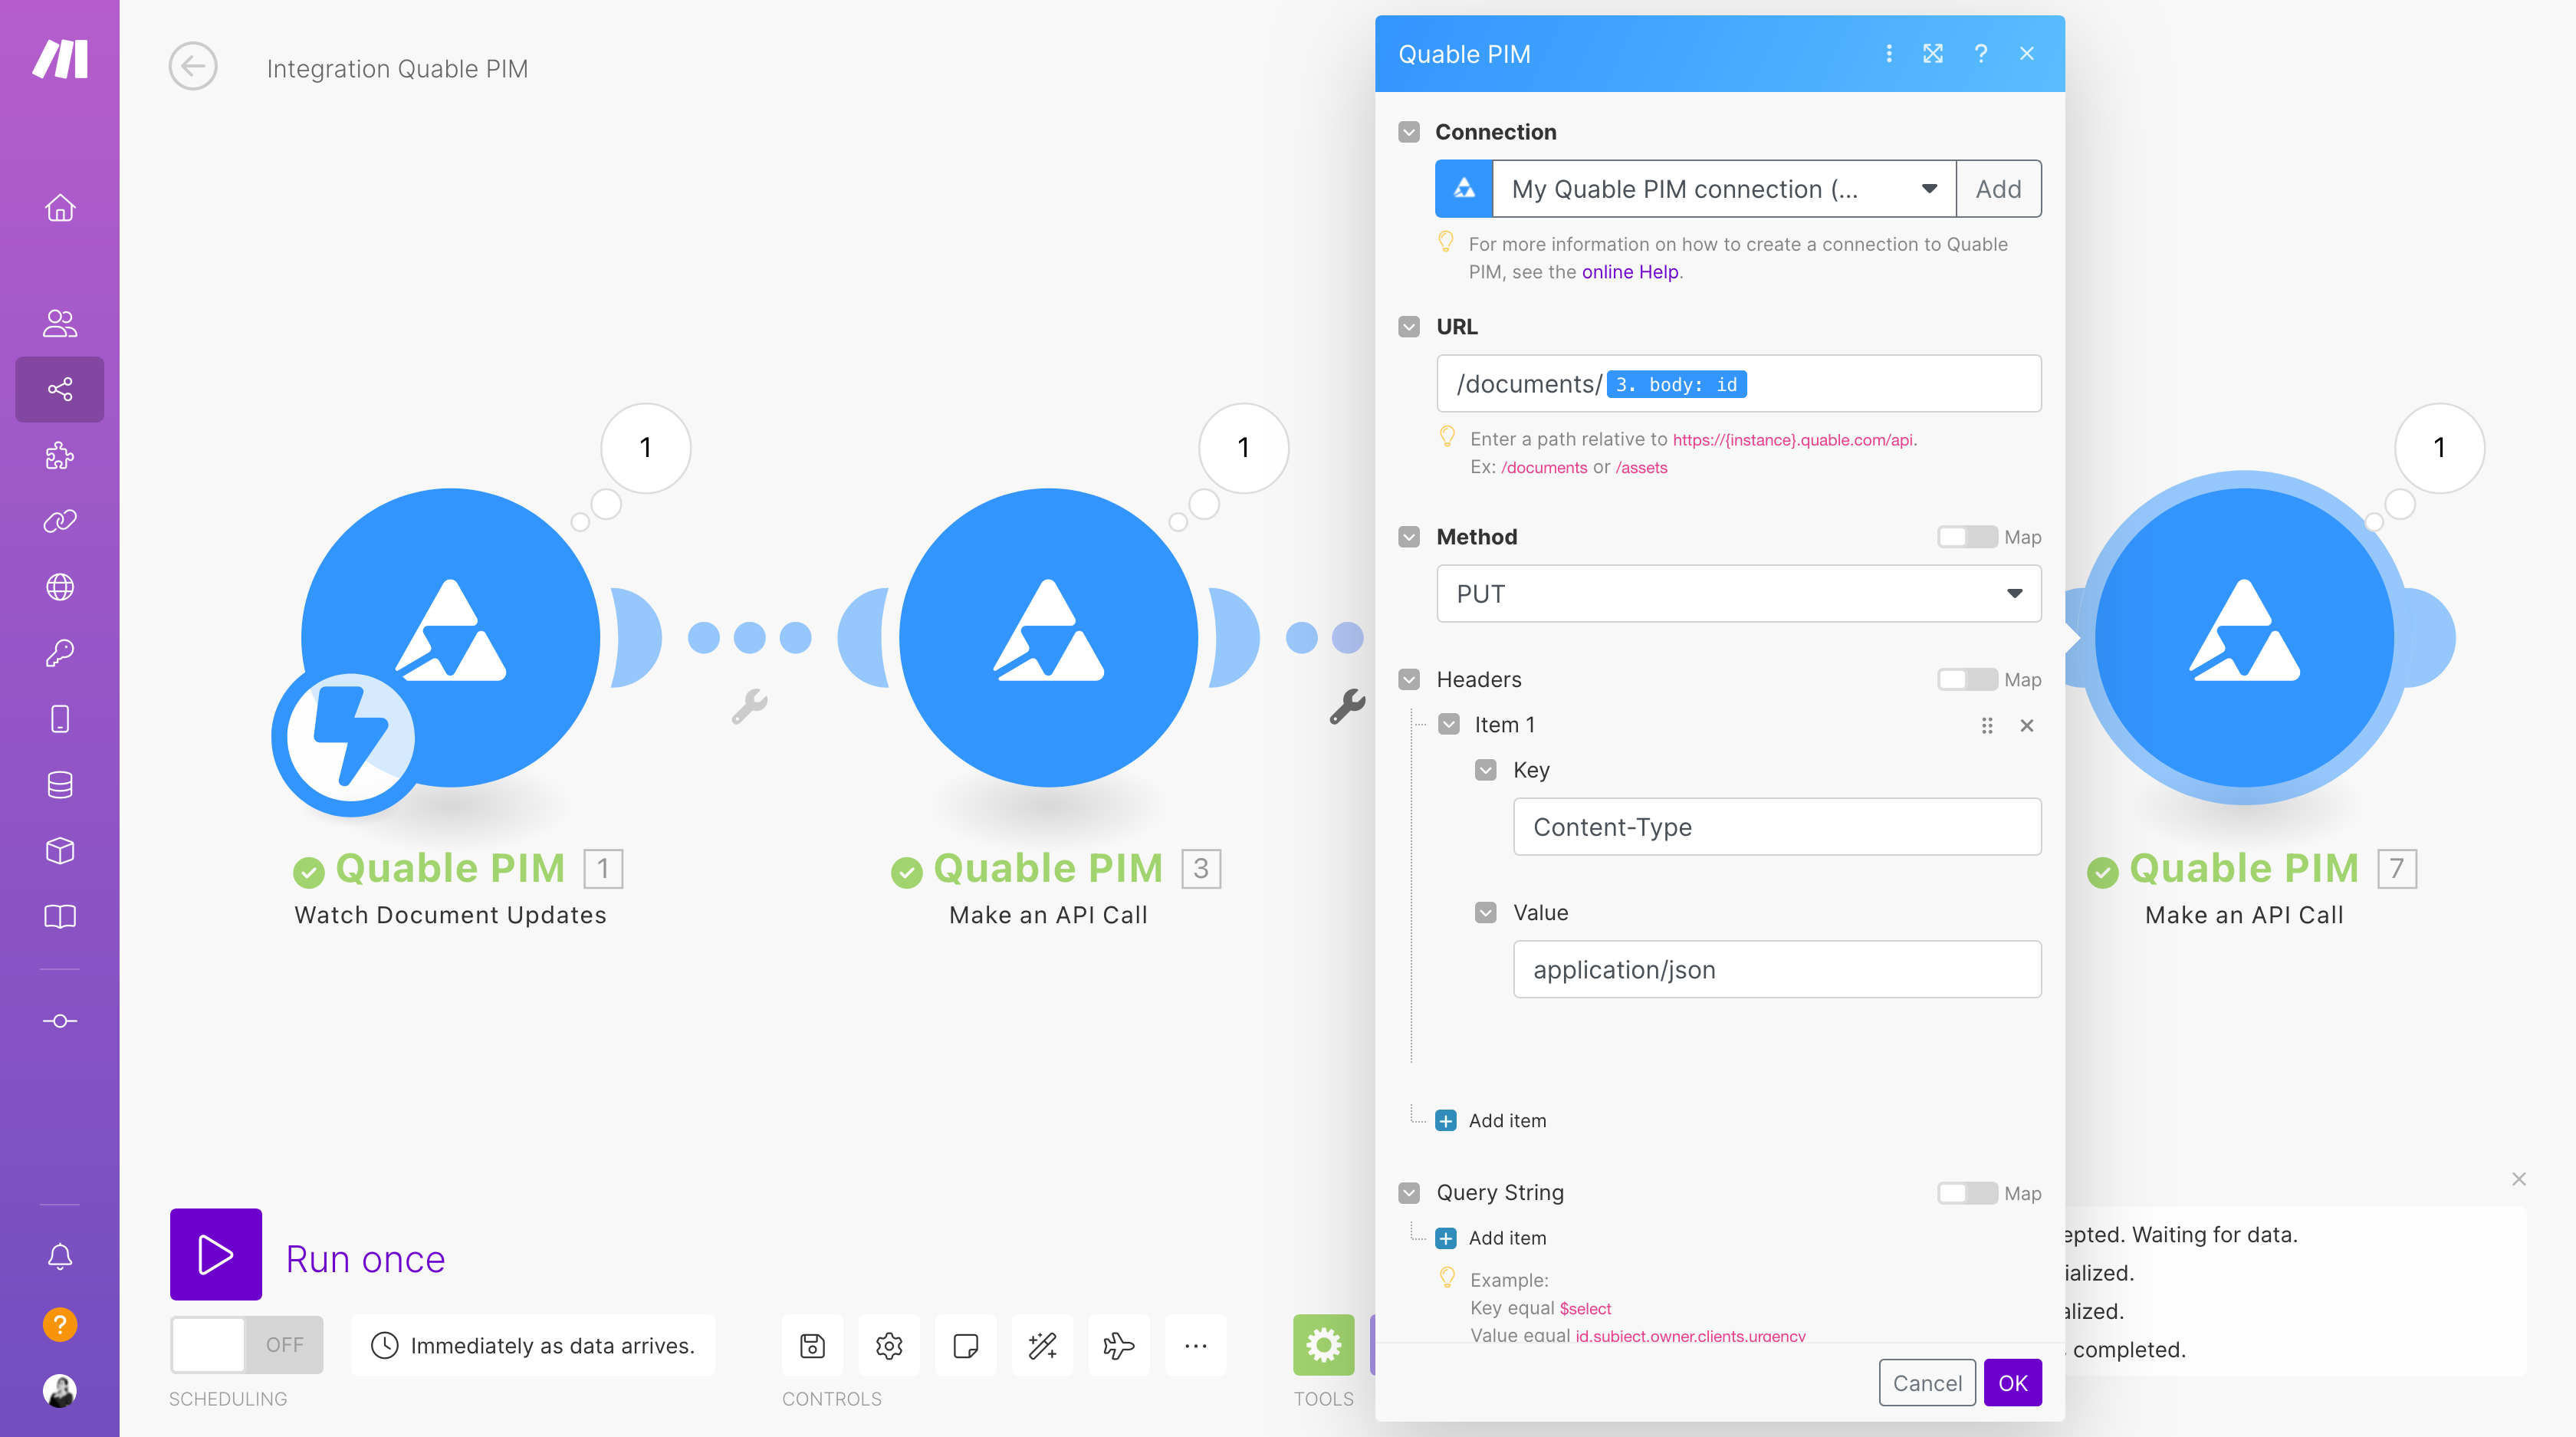
Step 1
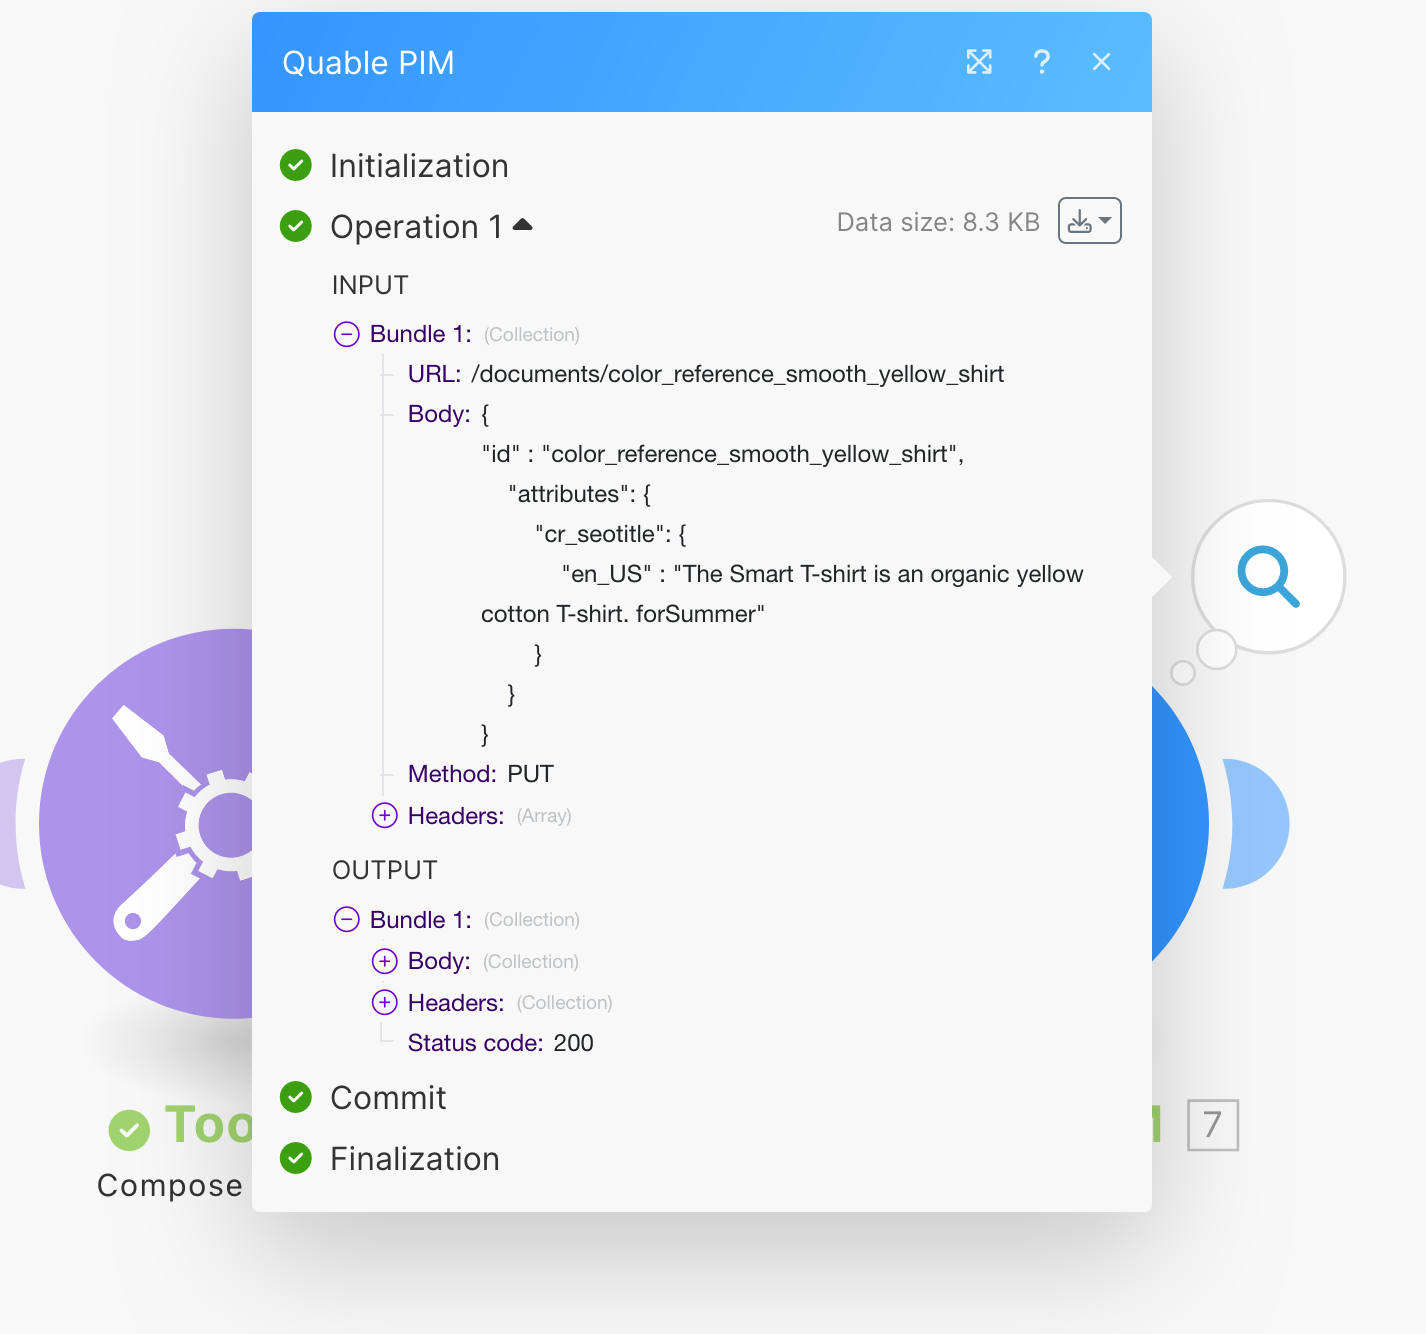
Add a new "Make an API call" module. The request is going to be a PUT, to edit your document with the new values.
In the body, specify the attribute(s) you want the concatenated or computed values to go.
{
"id" : "{{3.body.id}}",
    "attributes": {
        "cr_seotitle": {
            "en_US" : "{{4.value}}"
        }
    }
}
#
Step 2
You should be able to see the results of the modification in Make, but also in your PIM.