Shopify Connector
Subscription
Shopify application is a subscription-based option.
For more information, please contact your dedicated Customer Success Manager.
Introduction
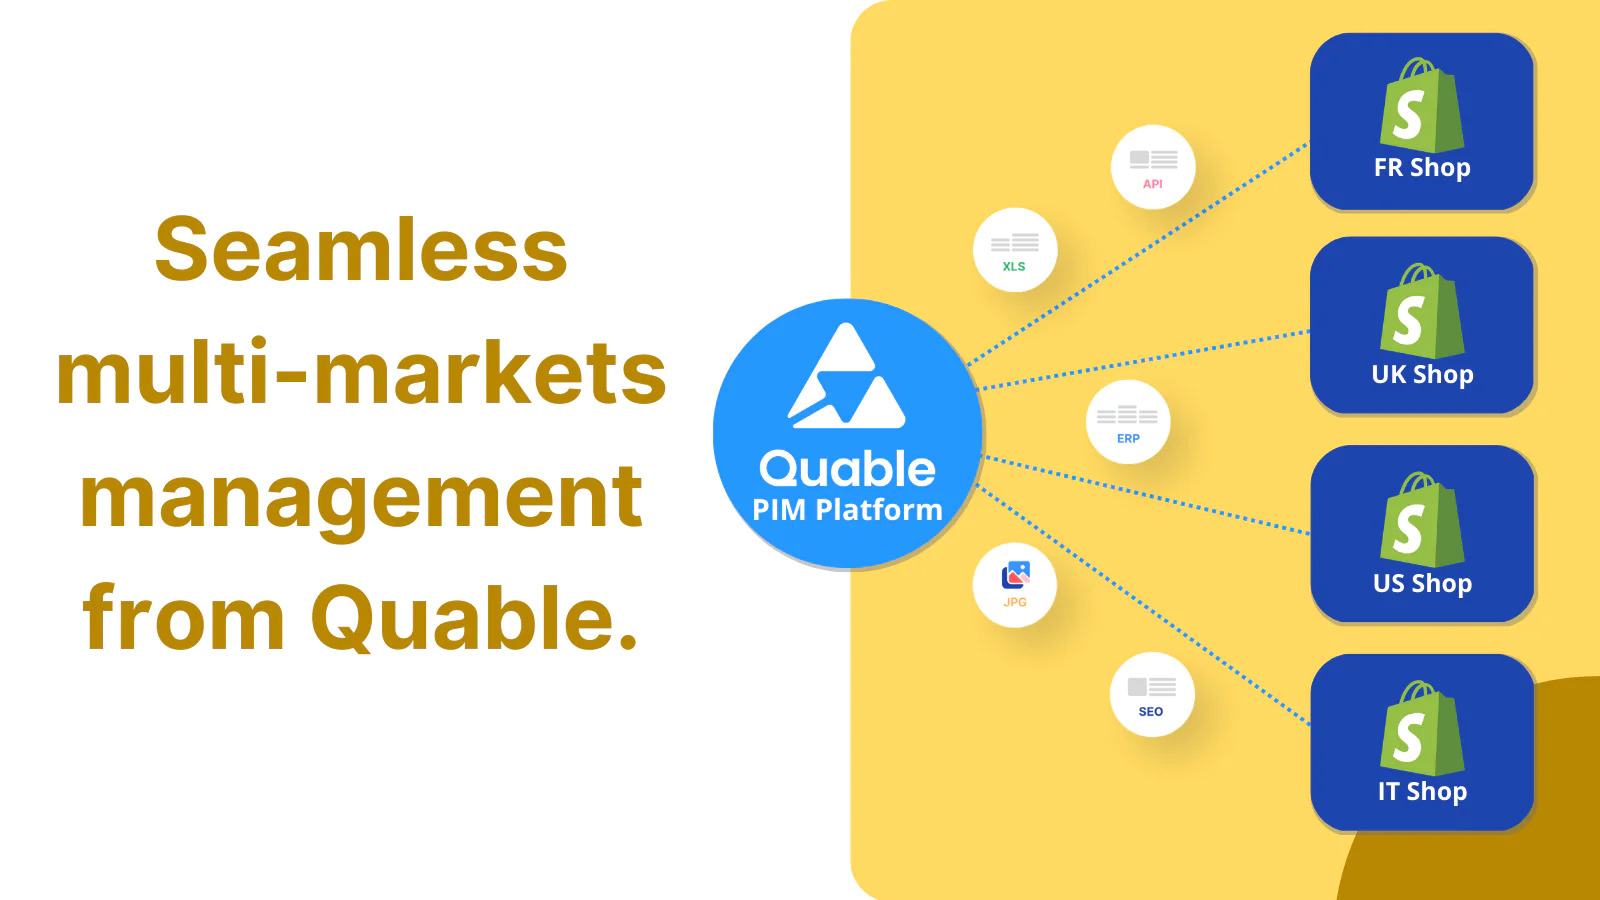
Quable PIM and Shopify have collaborated together to introduce an advanced connector designed to enhance online sales.
Shopify offers a user-friendly platform to create and manages e-commerce stores while Quable PIM centralises and unifies product information, providing a solid platform for efficient management of products.
The integration between these two platforms is key when it comes to improving productivity.
This connector provides automatic real-time synchronisation of your products from Quable PIM to Shopify.
Features
-
Product synchronization:
Automatically synchronize all your products, variants and assets. This ensures that your Shopify store is always up-to-date with your Quable PIM. -
Synchronization filters:
Use dynamic filters to synchronize products based on specific criteria such as sales channel, completeness and specific attributes of products or variants.
Only relevant products are updated on the Shopify store. -
Multi-stores support:
Manage and synchronize your product across multiple Shopify stores, directly from your Quable PIM. -
Multi-currency support:
Extend your global reach with multi-currency support. -
Multi-language support:
Synchronize product information in multiple languages. -
Sales channel and markets:
Publish your product on your sales channel and specific markets. -
Locations:
Enable inventory levels and product availability by activating stock locations. -
Assets - Images, PDF, Videos ...:
Send your PNG, JPG or others images but also PDF, MP4 videos or Youtube / Vimeo videos. -
Attribute mapping:
Map product attributes, including variants, metaobject, metafields, pricing, and locale from Quable to Shopify. -
Metaobject mapping:
Map your PIM document to push to Shopify as a meta object. This includes all its attributes and main assets. -
Product links:
Support the cross-sell and other related product links. -
Create, Update ?
Depending on your needs, you can configure the connector to :- Create products from Quable to Shopify
- Update products
- Create variants
- Update variants
-
Activity logs:
View detailed information about each synchronisation event. -
Configuration logs:
View detailed information about each change in the connector configuration. -
Configuration copy/export/import:
You can easily copy, export and import your connector settings between different Shopify stores.
Install the connector
Quable and Shopify integration is seamless through two applications: The Quable Shopify App and the Shopify Quable App .
These applications work together to synchronize data in real-time, ensuring that your product information remains consistent and up-to-date across both platforms.
Install the Quable Application in your Shopify store
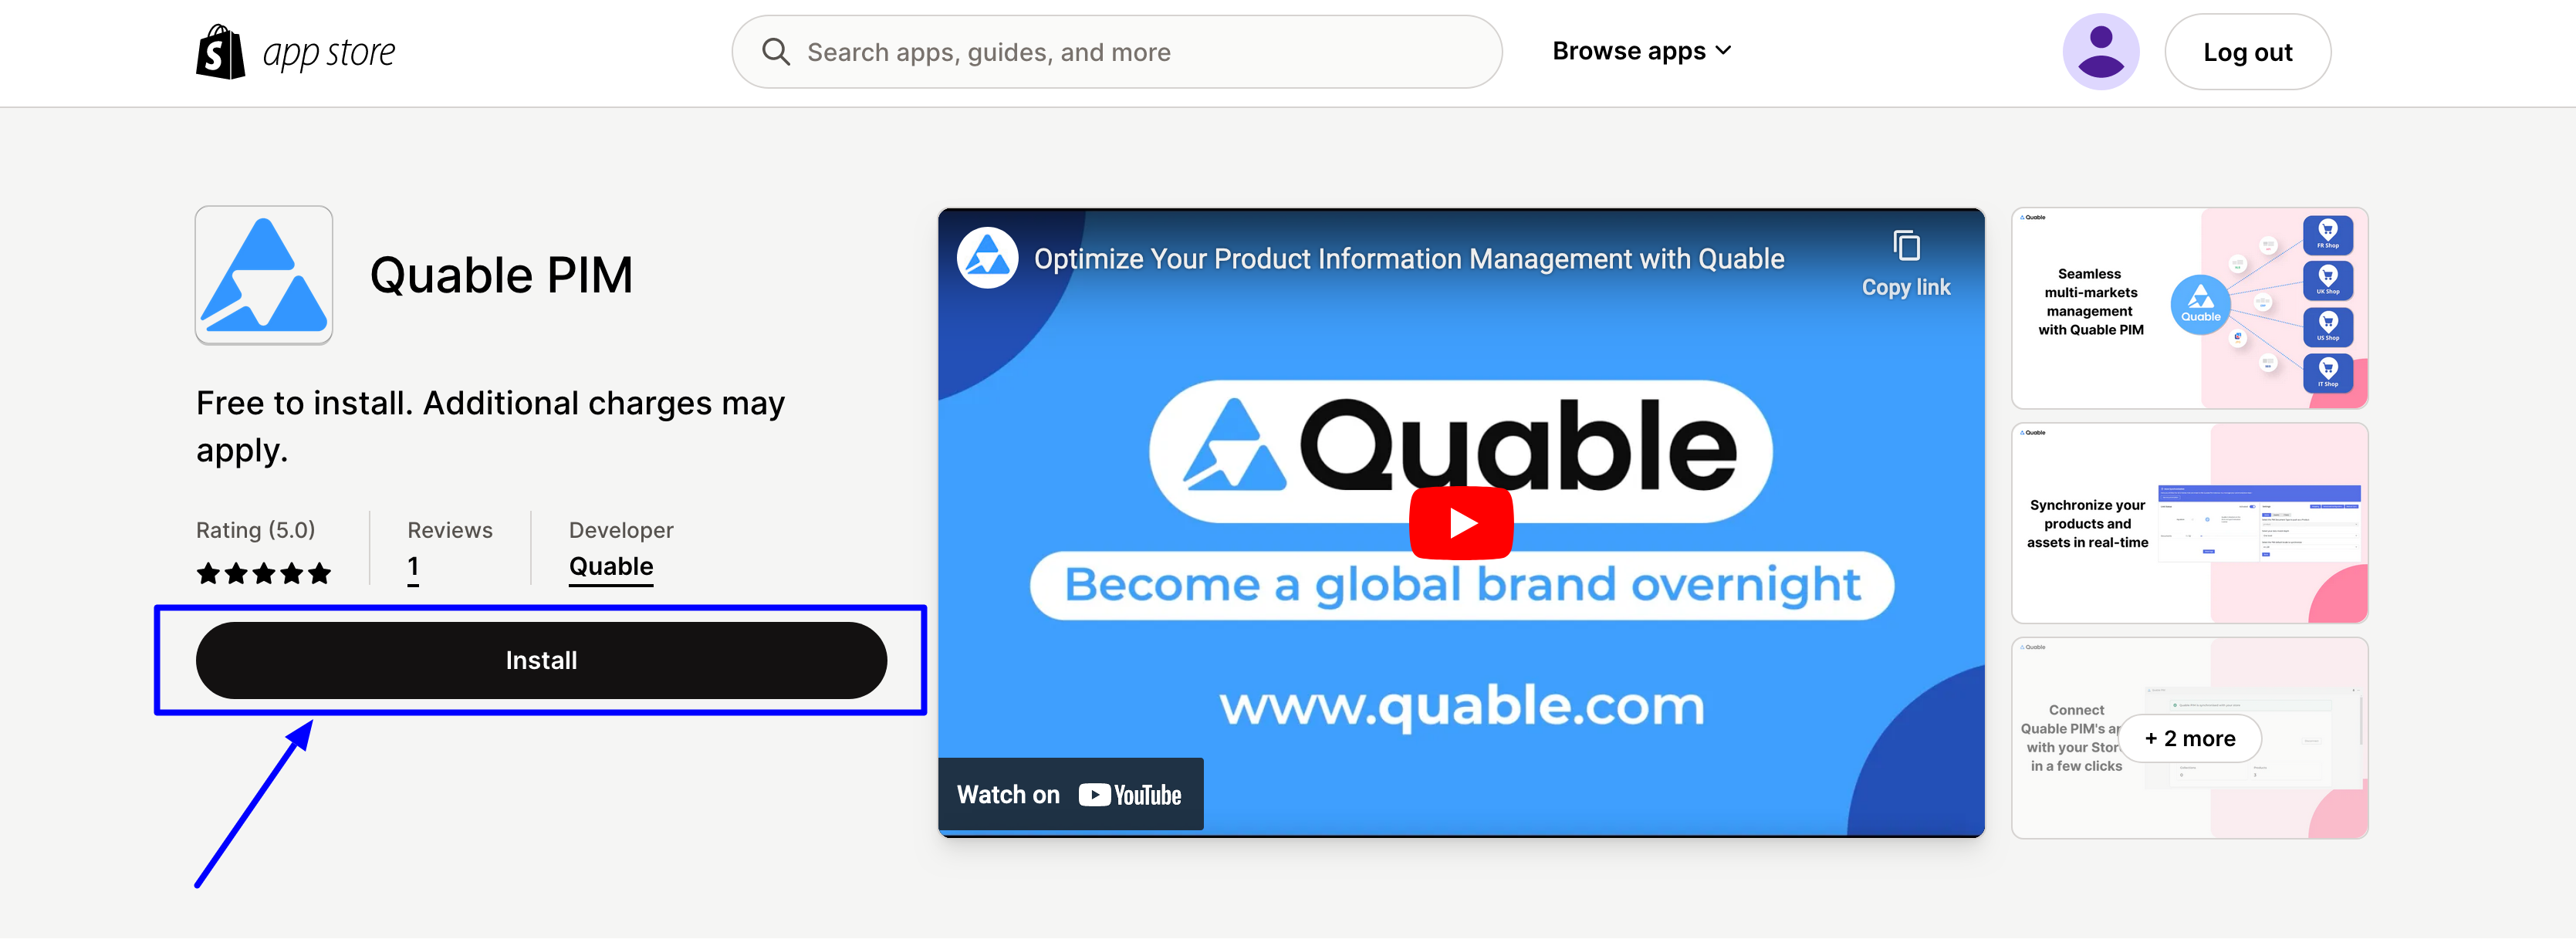
To connect Quable to Shopify, the first step is to install the Shopify Quable App, available on the Shopify App Store.
Add instance's name and API token
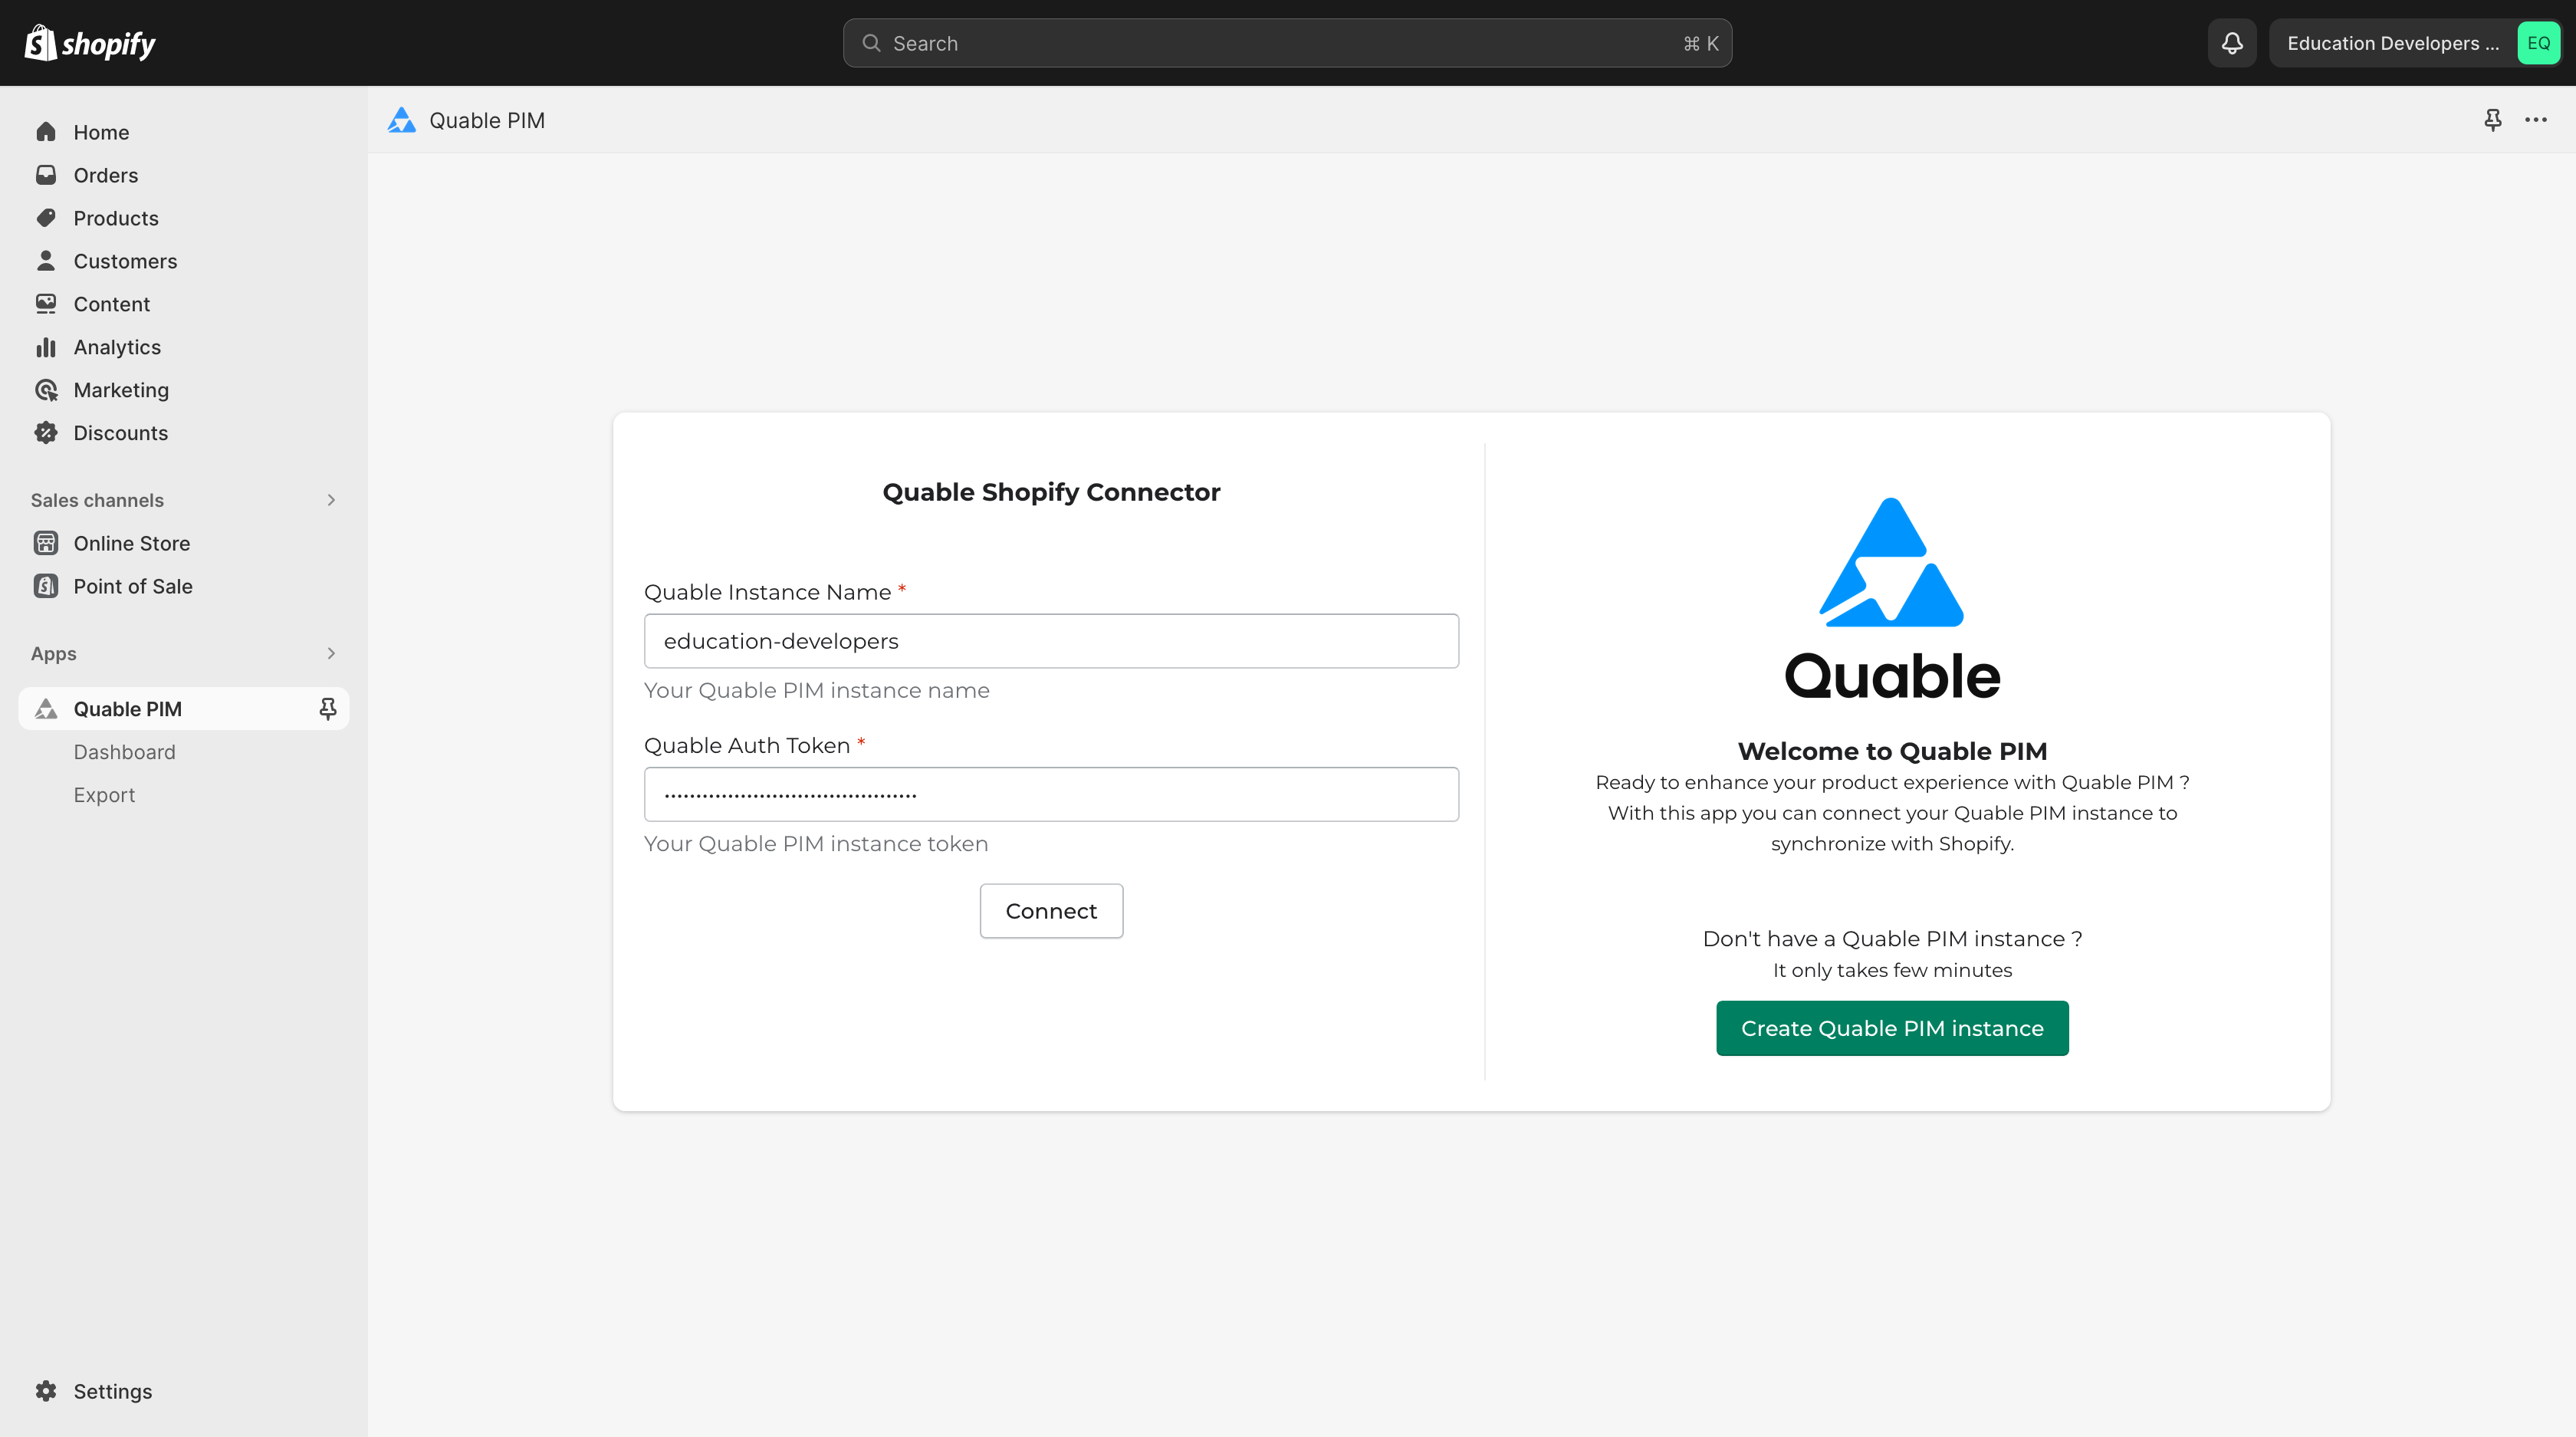
Once you added the app to your store, you will be redirected to an authentication page.
You will be asked for your instance's name as well as Quable API token.
You can find those informations in your Quable back-office:
- In Administration -> System -> API token for the token
A full access token is required
- From your Quable PIM URL for the instance's name: https://{{instance}}.quable.com
Don't use full instance url
You need to enter only the instance's name.
For example, if your quable instance url is https://education-developers.quable.com, your instance name is education-developers.
Install the Shopify Application in your Quable PIM instance
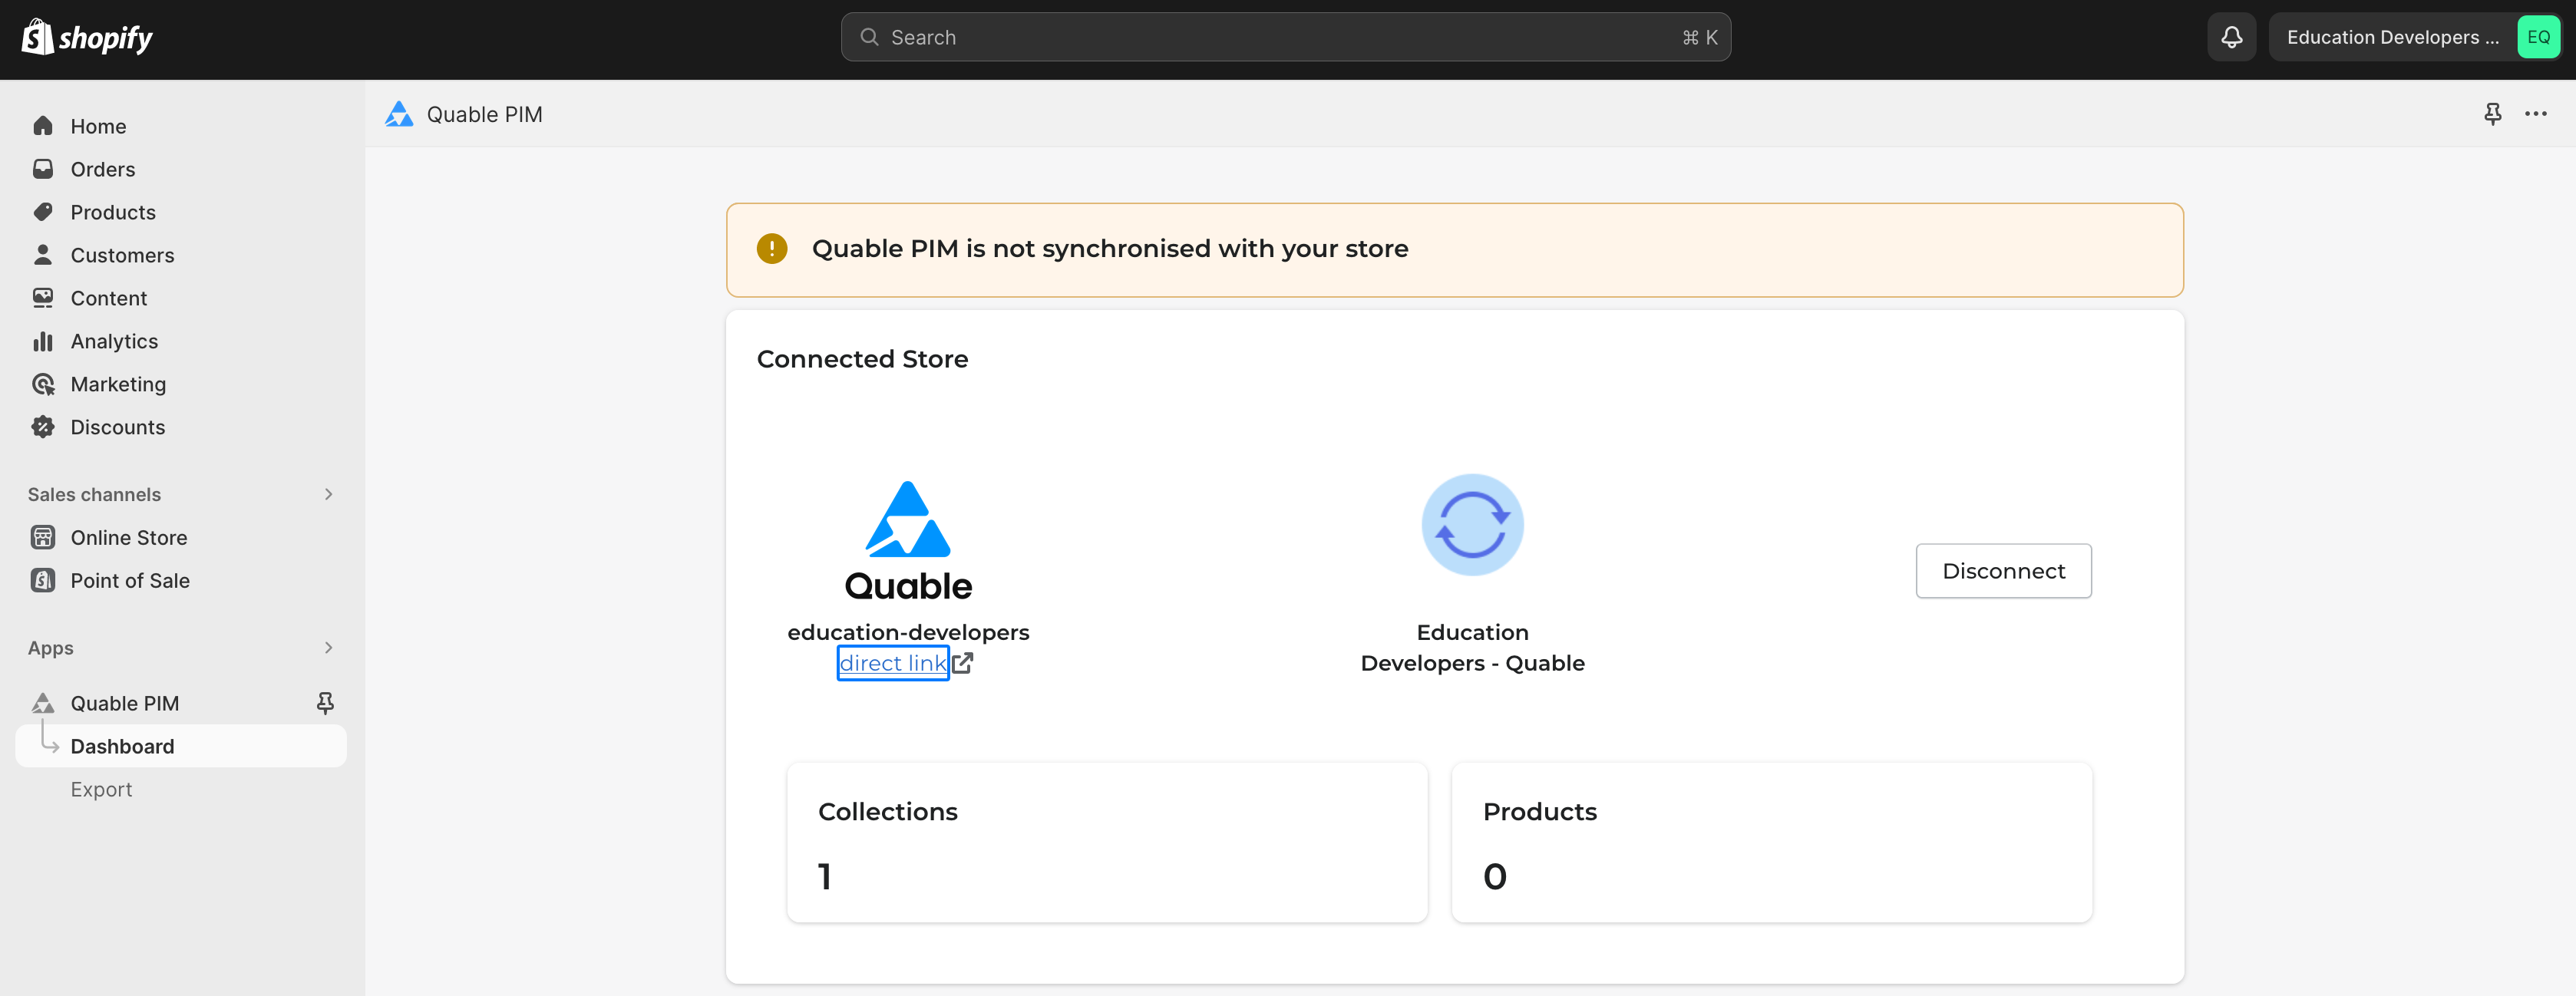
If previous authentication information you provided are valid, the Shopify Quable app will be also installed on your Quable PIM.
Now, You Shopify Shop is connected with your Quable instance (but not yet configured).
Click on "Direct Link" to access the Quable App Shopify. From here, you'll see all shops connected to your PIM .
Configuration
In the Quable App Shopify application, you can manage the synchronisation settings, such as data model configuration, data mapping, filters etc.
You can also monitor the status of data synchronisation.

From this point, there are three possible cases :
-
You already own a live Shopify store and a new empty Quable PIM.
Quable and your dedicated partner can help you retrieve DataModel and datas from your Shopify shop to Quable.
Please take contact with your partner and this actionw ill be planned with our team. -
You're already live with your Quable PIM and want to push to an empty Shopify store.
You can fill the Shopify store with your Quable PIM data.
Data model
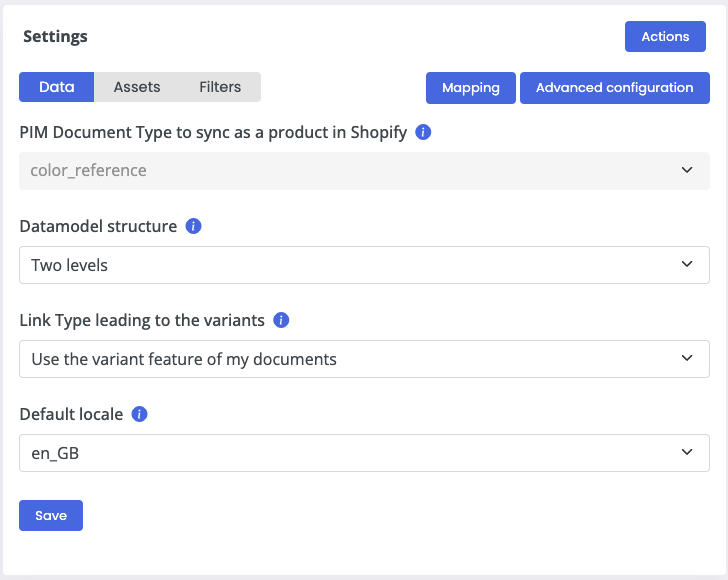
The first point in configuring synchronisation from Quable to Shopify is to set up your data model.
As you PIM Datamodel can be different from a simple Product + Variant mode, this is important for determining what type of documents will be synchronised to Shopify.
So this screen will help you define the depth of the data model and the default language for products and variants pushed to Shopify.
As told, your PIM relies on an open data model that can customized for any type of data structure, from simple to complex with many levels of data.
To remain compatible with Shopify, the data model must contain a maximum of 3 levels.
1- Select your product document type
Choose which of the document types your defined in your Quable PIM will be used as a product on Shopify.
2- Data model depth
The depth of your data model determines how the connector will manager Shopify variants.
-
PIM Datamodel with just one document type and no variants
If your PIM data model consists of unique products with no variants, please select One level as a variant type.
On Shopify, each product must however include one variant. The connector will be push your unique document type a product and variant. -
PIM Datamodel with one document type and variants
If your data model includes documents with variants (colors, sizes, materials...), you need to select Two levels. Then, select "use the variants of my documents".
Thus, the connector will consider your documents as products and the variants of your document as variations in Shopify -
PIM Datamodel with two document types and no variants
If your data model includes 2 document types and you do not use the variant feature in the PIM, you need to select Two levels.
Then, select the LinkType configured between those 2 types.
For example, if you do have a document type "model" and another "model_variant", then select : -
"model" as the PIM document type to push
-
"Two levels" as you datamodel depth
-
The LinkType between "model" and "model_variant"
Thus, the connector will consider "model" as products and "model_variant" as variations in Shopify -
PIM Datamodel with two document types and variants
If your data model includes 2 document types and you use the variant feature in the PIM, you need to select Three levels.
Then, select the LinkType configured between those 2 types.
For example, if you do have a document type "model" and another "model_color" (using variant), then select : -
"model" as the PIM document type to push
-
"Three levels" as you datamodel depth
-
The LinkType between "model" and "model_variant"
Thus, the connector will consider "model" as products and "model_color" variants as variations in Shopify
3- Select your default locale
Select the default language used for product/variant synchronisation.
Please Check the default language of your shopify shop to match it.
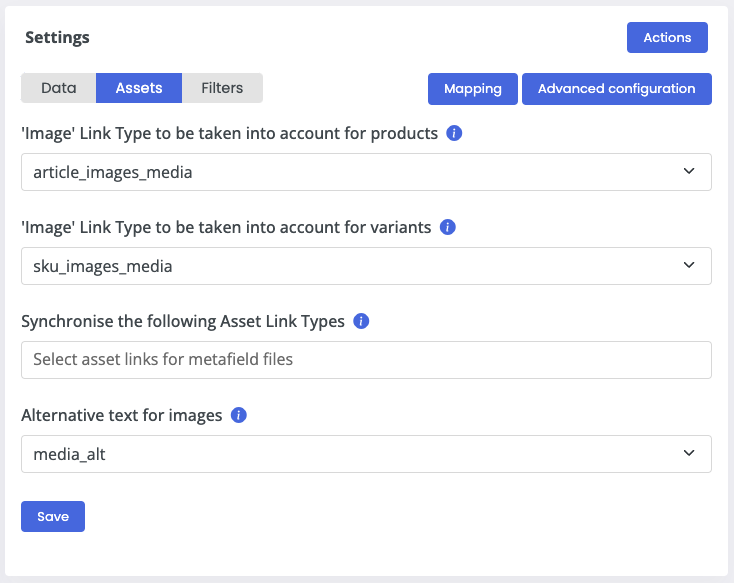
Assets
In the "Asset" tab, you can define the resources that will be used for the assets of your Shopify products.
The connector is exclusively based on the link types between products and assets. Link types determine how assets are linked to products. For example, you can link images, videos or documents to products.
-
Product default asset
Select the asset link that contains your product images
(Only images are supported) -
Variants default asset
Select the asset link that contains your variant images
(Only images are supported and only the first asset will be synchronized) -
Product & variant extra link
Select additional asset links to upload to your Shopify store.
When you select additional asset bindings, the connector will automatically create metafields on Shopify to reference them. These metafields will contain the GID needed to associate the additional assets with the corresponding products or variants in Shopify. -
Alt text : Select the asset attribute to use for the SEO alternative text value.
The connector sends the binary file, the file name and possibly the alt text - if the latter has been mapped.
Filters
Filters allow you to determine precisely which products should be synchronised with your shopify shop.
You can combine filters. Please note that all filters must be correct for your product to be eligible ("AND" mode).
-
Channel filter
Filtering by channel allows to keep only a selection of products coming from one specific channel.The selection is done in real time.
-
Completeness filter
You can filter your products by completeness value. You can learn more about completeness on this page -
Workflow filter
You can filter your products by their workflow status. Learn more about workflows in Quable PIM on this page -
Product attributes filter
You can filter your product to sync by their attribute values.
Enable the "Filter by attribute value (product)" section in the Filters tab to configure up to 5 conditions (attribute + operator + value). Only products matching all conditions (AND mode) will be sent to Shopify. Products that do not match are excluded from the sync.Available operators include:
equals,not equals,contains,not contains,starts with,ends with,is empty,is not empty.Is empty / Is not empty operators
Is emptymatches attributes whose value is"",null, or[]. Note that0andfalseare not considered empty.
Is not emptymatches any attribute that is not"",null, or[]. -
Variant attributes filter
You can filter your variants to sync by their attribute values.
Enable the "Filter by attribute value (asset)" section in the Filters tab to configure up to 5 conditions (attribute + operator + value). Only variants matching all conditions (AND mode) will be sent to Shopify. Variants that do not match are excluded from the sync; their parent product is still synchronized normally.Available operators include:
equals,not equals,contains,not contains,starts with,ends with,is empty,is not empty.Is empty / Is not empty operators
Is emptymatches attributes whose value is"",null, or[]. Note that0andfalseare not considered empty.
Is not emptymatches any attribute that is not"",null, or[]. -
Asset attributes filter
You can filter the assets to synchronize by their attribute values.
Enable the "Filter by attribute value (asset)" section in the Filters tab to configure up to 5 conditions (attribute + operator + value). Only assets matching all conditions (AND mode) will be sent to Shopify. Assets that do not match are excluded from the sync; their parent product or variant is still synchronized normally.This filter applies to all configured asset links: product default asset, variant default asset, and extra links.
Available operators include:
equals,not equals,contains,not contains,starts with,ends with,is empty,is not empty.Is empty / Is not empty operators
Is emptymatches attributes whose value is"",null, or[]. Note that0andfalseare not considered empty.
Is not emptymatches any attribute that is not"",null, or[].
Mapping
Please have a look at the
Multi-locales
Data can be send to Shopify in one or multiple languages.
To do this, you need to activate the desired languages on your Shopify store and map them in the connector.
Once you've mapped the languages, all product attributes and metafields will be automatically translated with Quable PIM translation.
By using this multilocales feature, you can easily manage product data in multiple languages from Quable PIM.
Multi-price
When you use Quable PIM to manage your products prices, you also have the possibility of managing several price levels, by mapping prices by currency for example.
Import / Export / Copy configurations
You can manage your shop's configurations by export, import and copy the configuration from one shop to another. This last feature is particularly useful when you have several Shopify shops. By copying the configuration from one shop to another, you can easily copy synchronisation settings, such as the data model, mapping and filters.
Mapping & metafields
One of the most important step is the mapping, which is the association of Shopify metafields with your Quable PIM attributes. The quality of mapped attributes will impact your product's synchronization.
You can configure product, variant, metafields, locale and price mapping.
Product fields
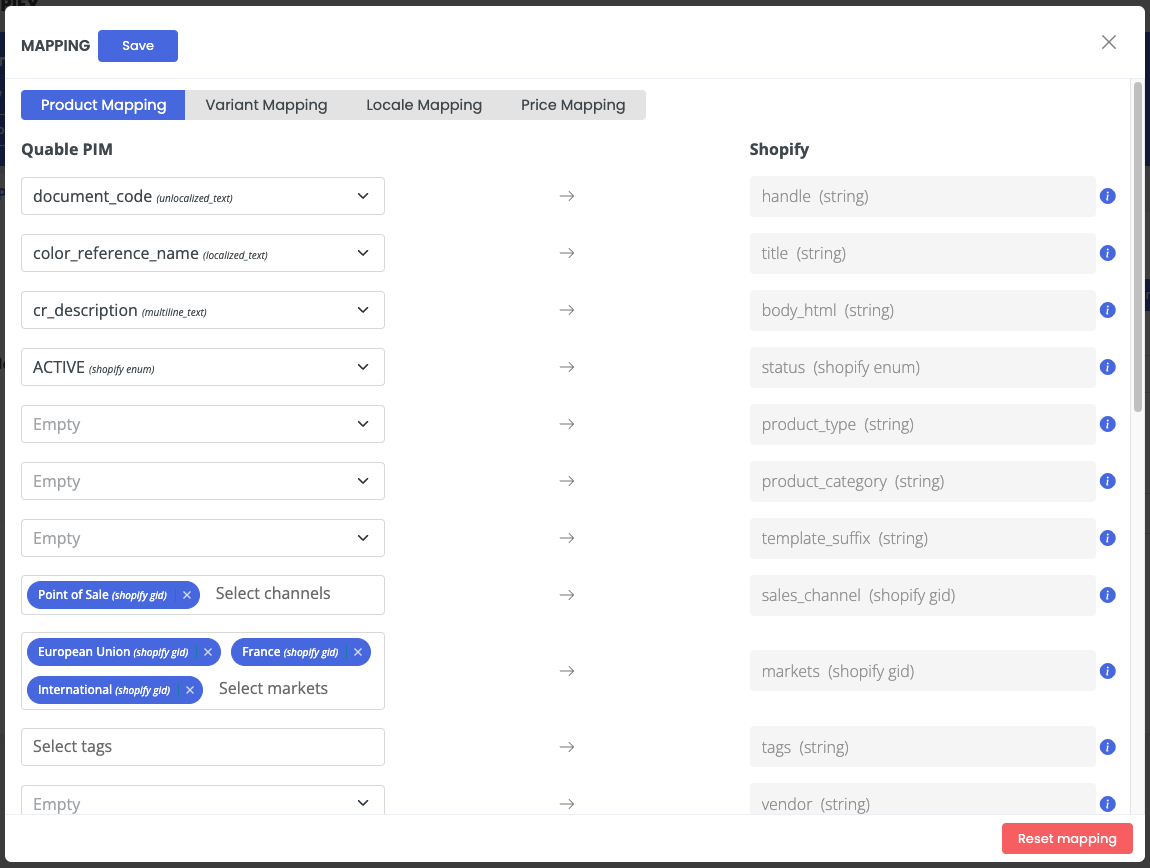
Here are the elements that can be configured for each Shopify field relating to Products
Markets attribute value
When markets are managed through a specific attribute (and not via a raw value), the attribute value must follow this format: gid://shopify/Market/XXX where XXX is the Shopify market ID.
If you use a Predefined values attribute, please use the code.
The Shopify Tags can be mapped with one or several Quable PIM Attributes.
There is a 100 PIM attributes limit for this field.
Variant fields
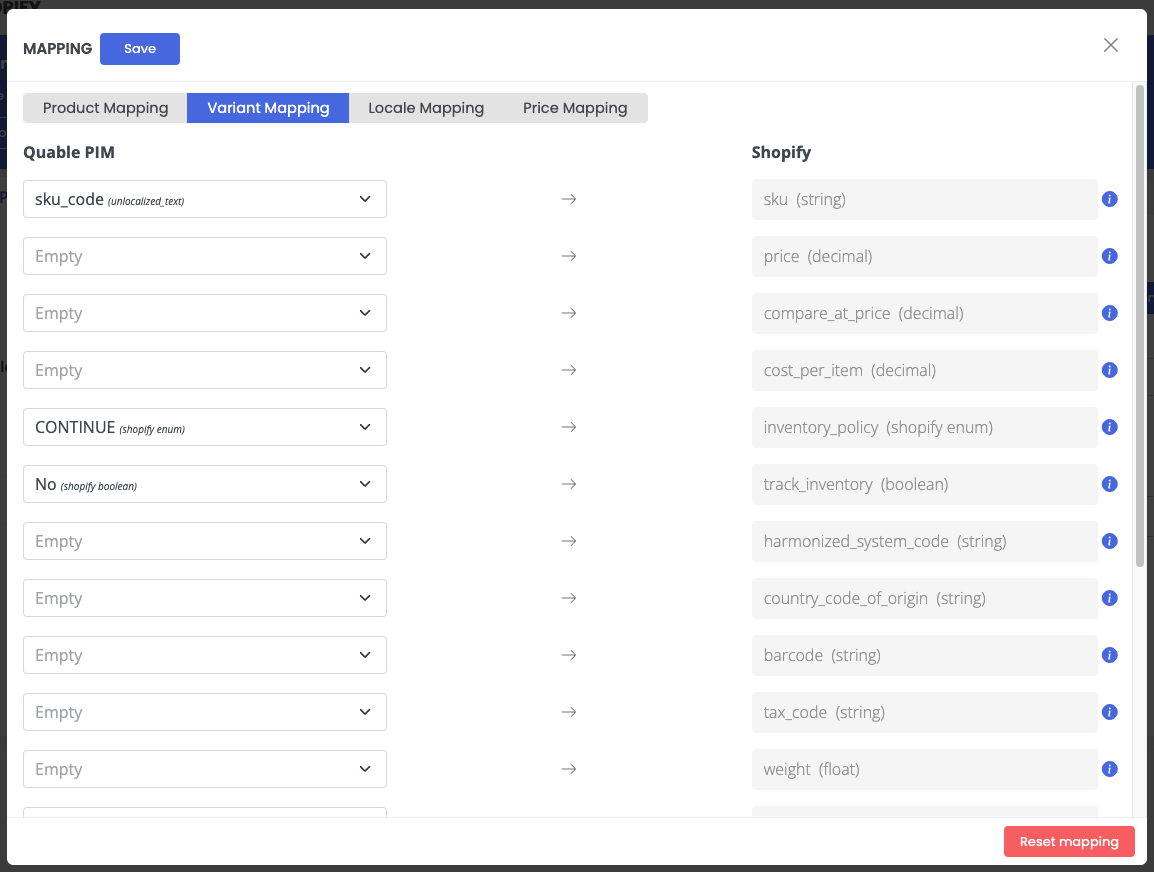
Here are the elements that can be configured for each Shopify field relating to Variants
Contry code of origin
Country code of origin values in the PIM should be a 2 letter digit-code.
This should be an ISO 3166-1 alpha-2 country code.
If you use a Predefined values attribute, the connector will use the code and not the label.

Options
Options define the axes of variation for your Shopify products (e.g., Color, Size). In the mapping, each option has a label field that accepts two formats:
- A free text value — used directly as the option name (e.g.,
Color). - A Quable attribute.
When an attribute reference is used, the connector resolves the value at synchronization time:
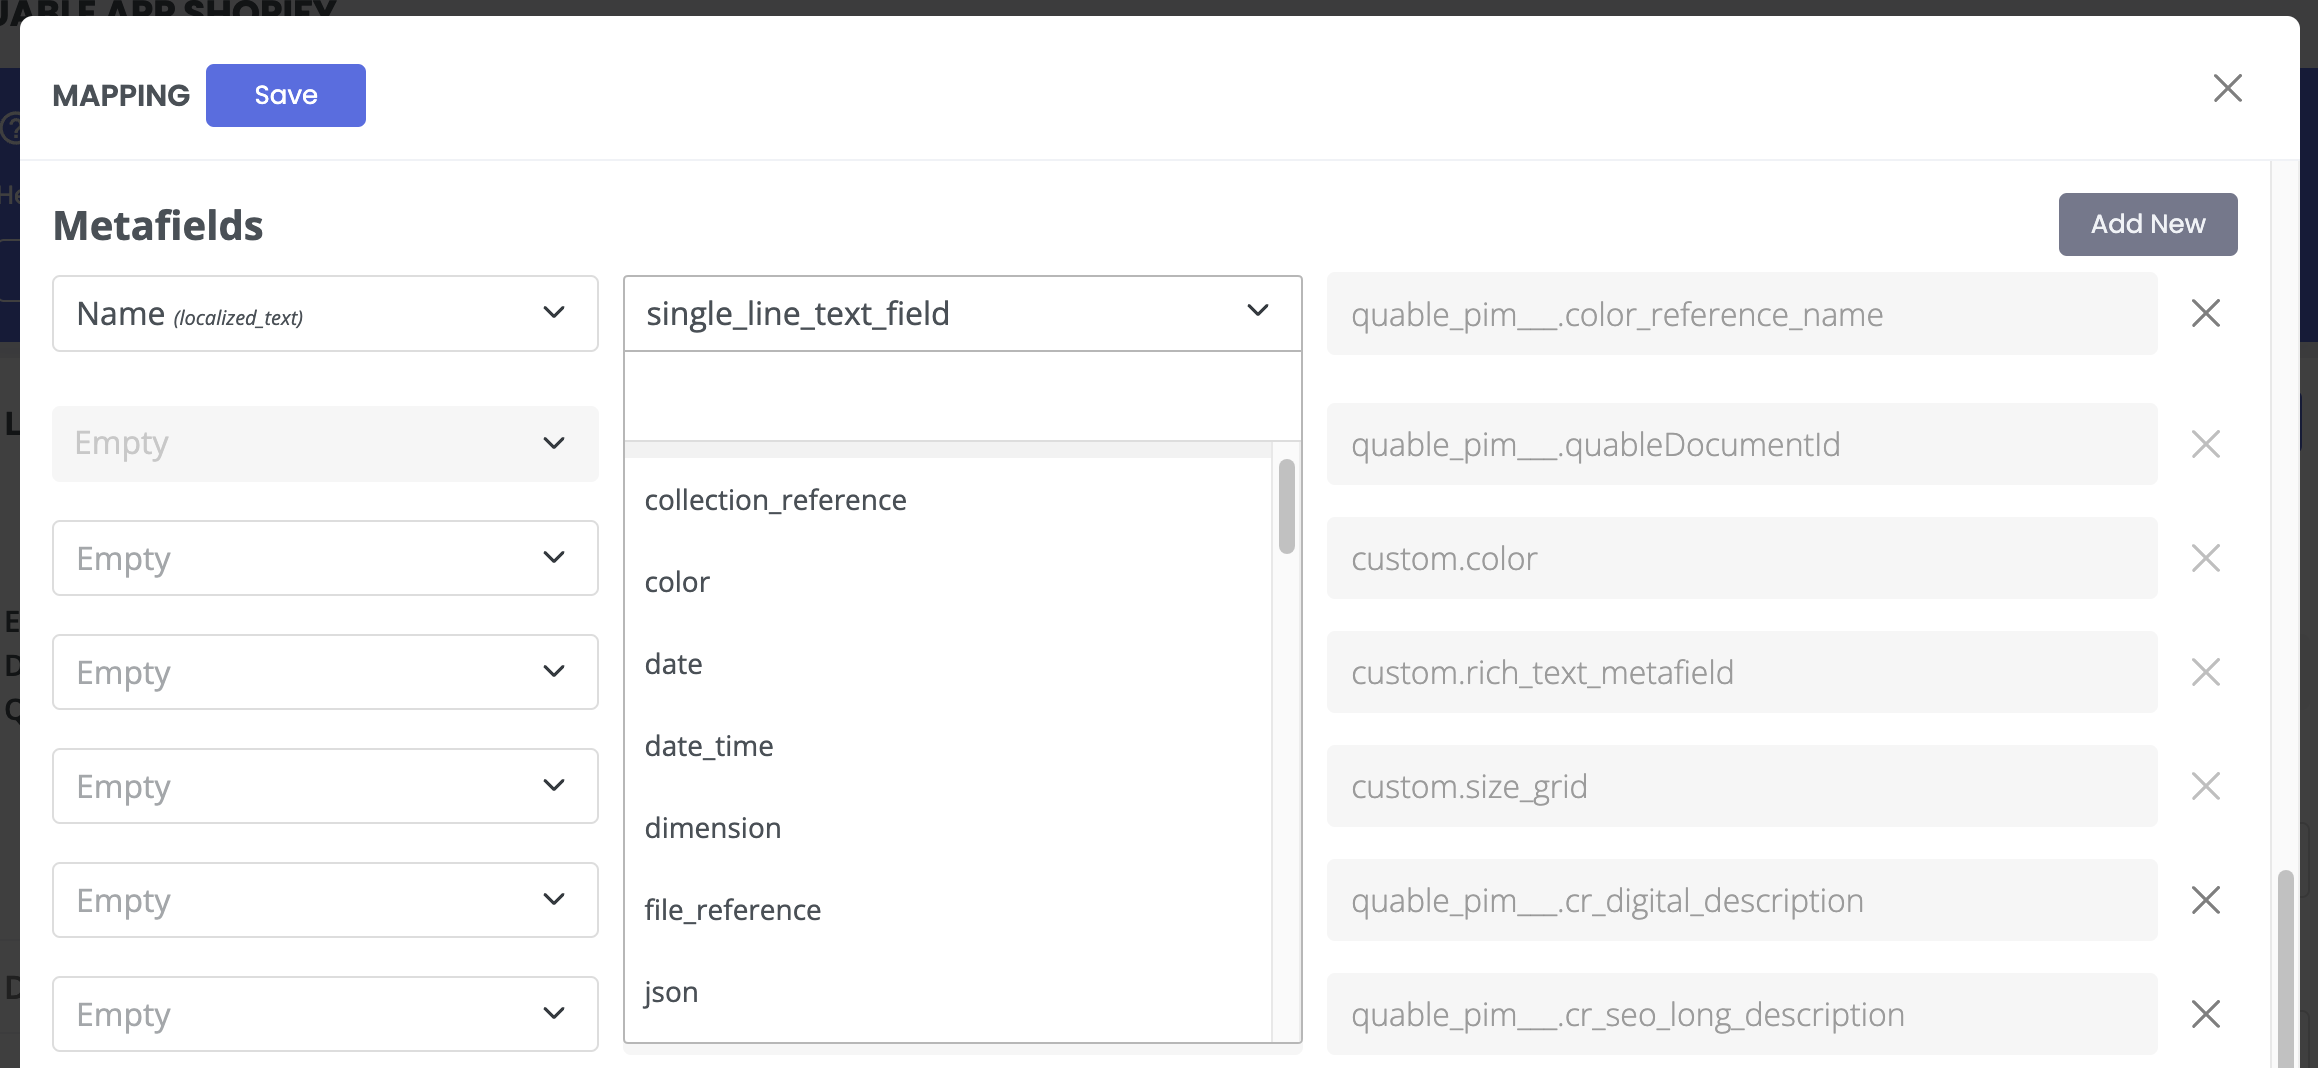
Metafields
Metafields in Shopify let you store extra and specific information about your products.
They can be used for internal tracking or displaying custom product information on your online store. Our connector supports a large number of shopify metafield types, both single and list.
When the mapped PIM attribute is empty, the Shopify metafield value will also be cleared to maintain consistency between the two systems.
For reference metafield types (file, product, collections...), Shopify expects the GID of the resources.
So if you are using a Quable PIM attribute to manage these metafield fields, remember to set the attribute value with the GID.
You can map every single PIM attribute to a Shopify metafield, including rich text (HTML attribute) and JSON.
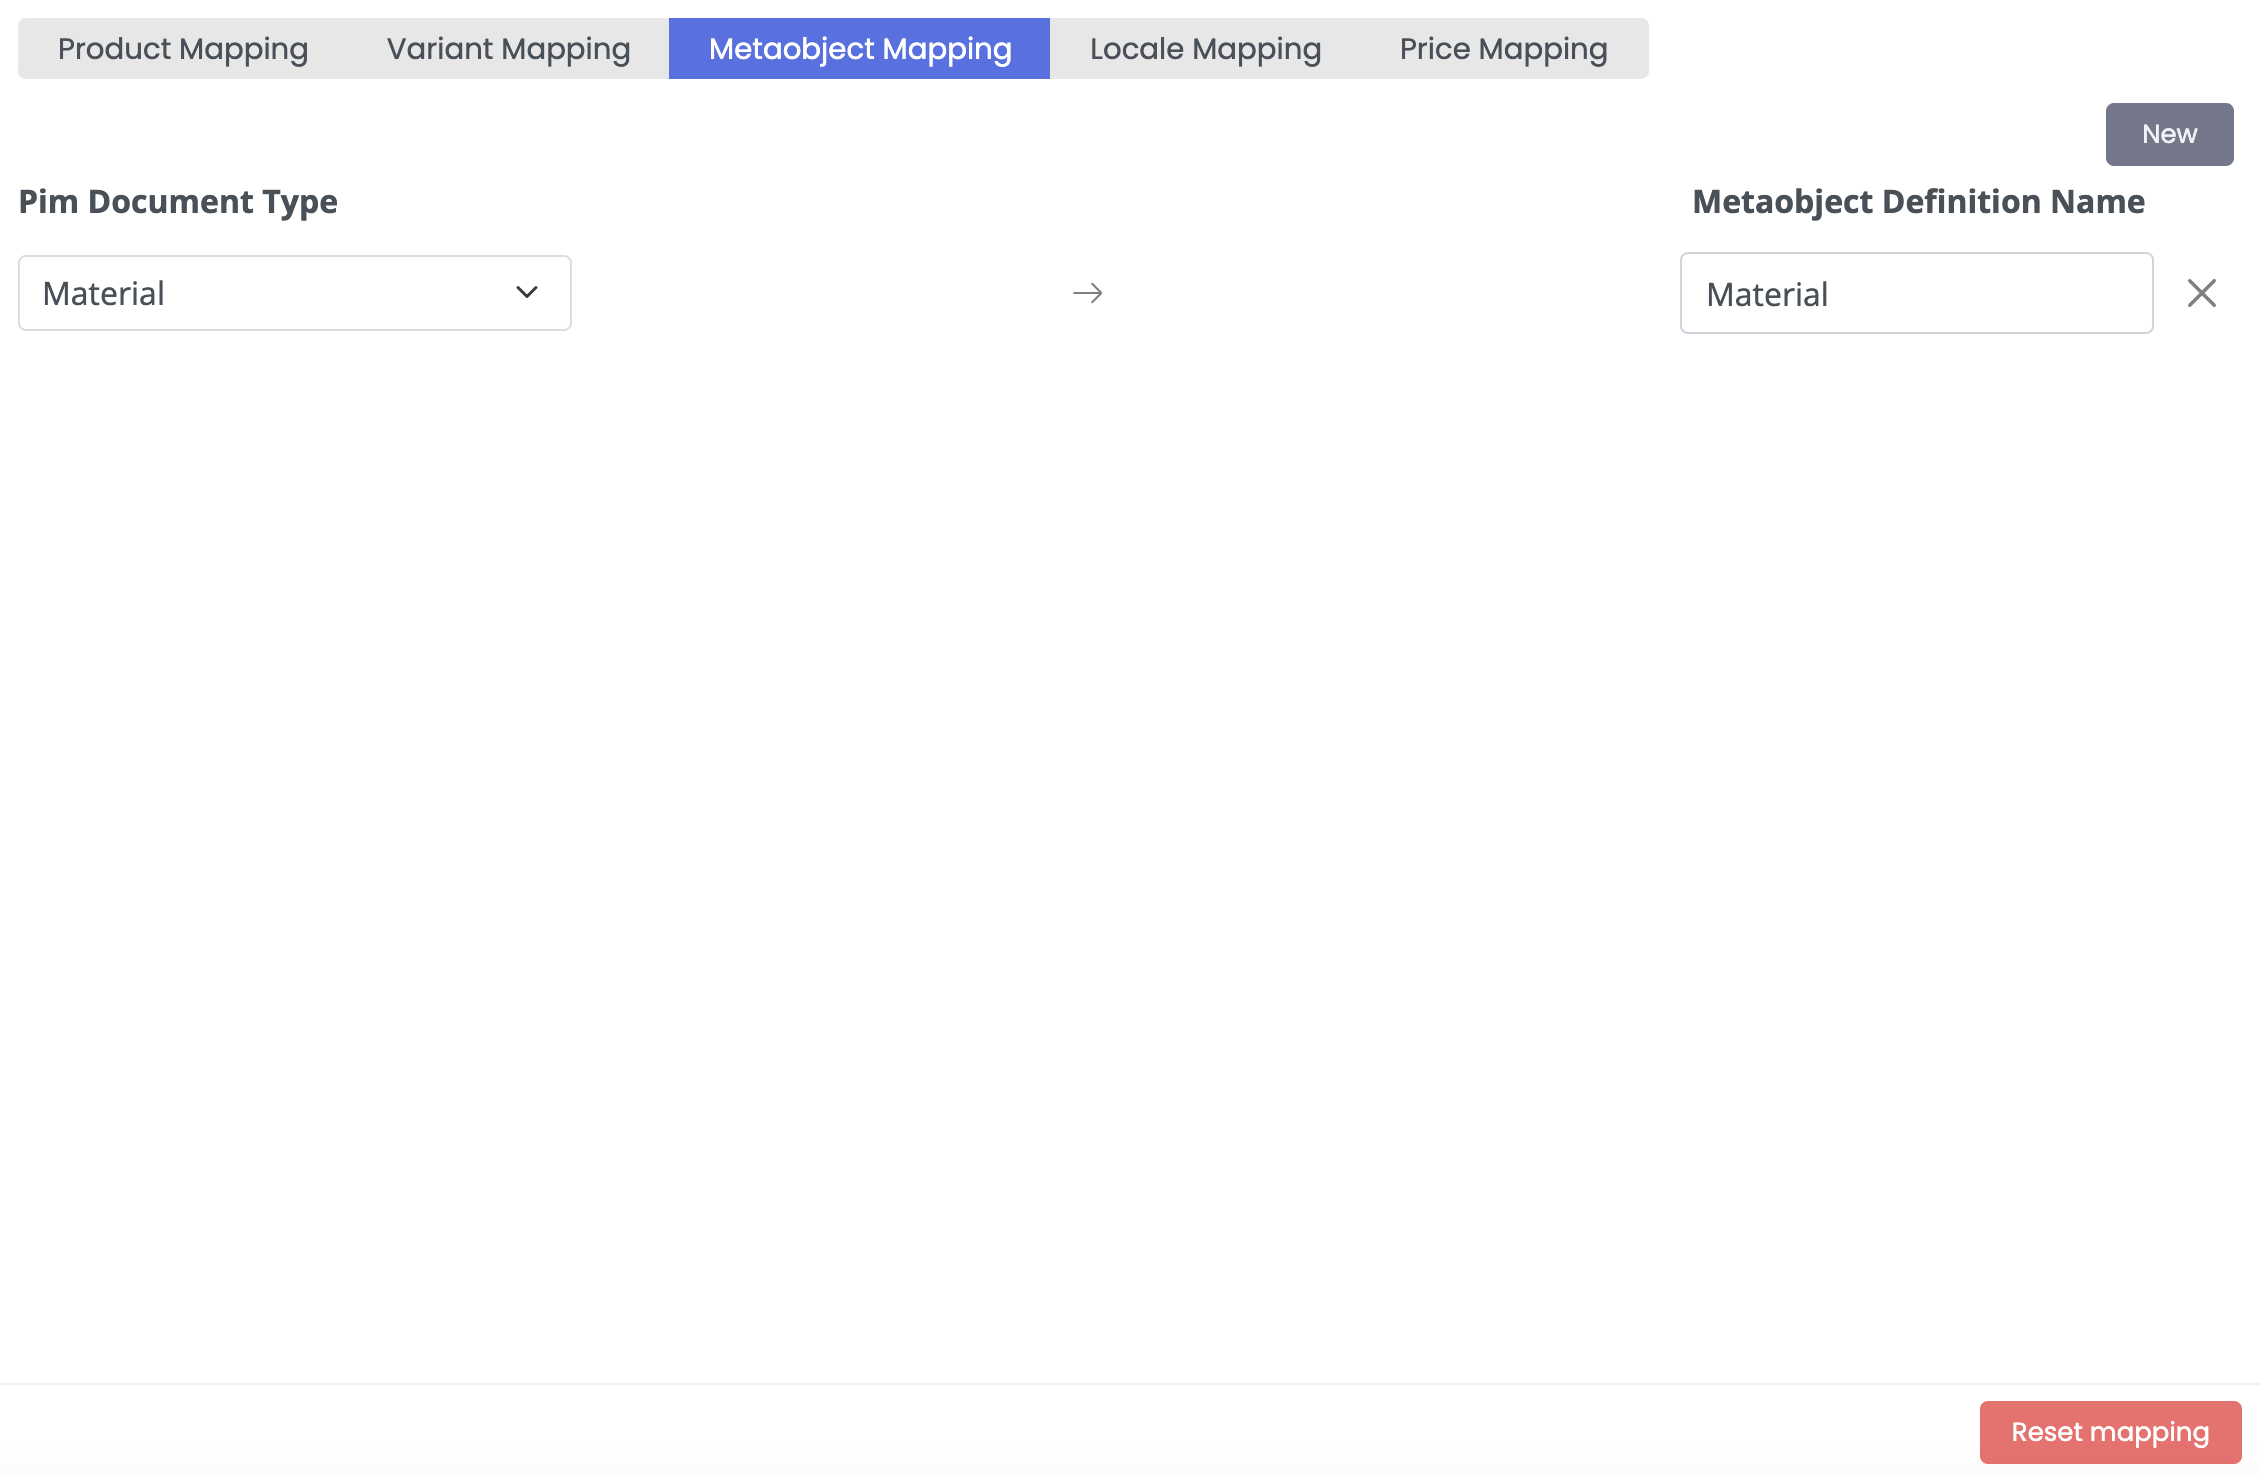
Metaobjects mapping
The Metaobject feature allows you to use a PIM document as a metaobject in Shopify. This feature allows you to manage your metaobject directly in the PIM by linking your product to another document type, such as materials or colors.
Advandced configuration
Advanced configurations empower you to define additional synchronization options for your products. It's provide you a flexible and powerful way to tailor your product synchronization to your specific needs.
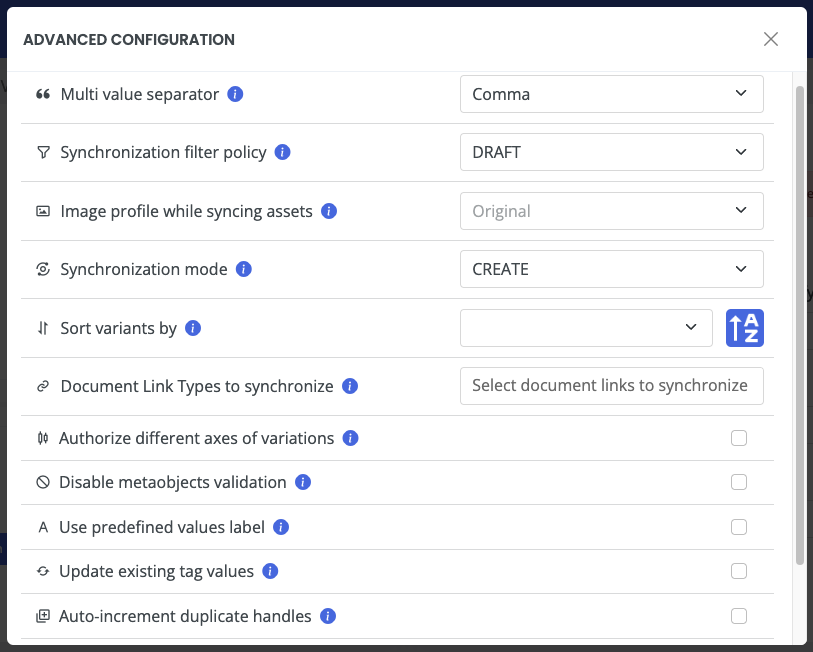
Multi value separator
This option allows you to choose how you want to separate multiple values for your multi-select fields. For example, you can choose a comma, semicolon, or any other available character as a separator to separate multiple values within a single field. This will ensure that the values are correctly parsed and displayed in accordance with your preferences.
Synchronization filter policy
This allows you to manage the status of your product when it has been pushed in the past but becomes ineligible.
For example, product A was pushed yesterday.
Product A has now changed and is no longer eligible according to the filters you have configured.
What should I do with this product on Shopify?
There are 3 options for this configuration :
- NOTHING : The connector will not changed anything on Shopify -> the product you have on your store is the last "good" version
- DRAFT : The connector will tell Shopify to set the product as "draft"
- ARCHIVED : The connector will tell Shopify to set the product as "archived"
Image profile
While pushing assets to Shopify, our connector can use the "original" format of the image.
But you can decide to select a specific Image Profile in order to send lighter or different format.
Please see documentation about Image Studio
Synchronization mode
Depending of the dataflow in your SI, you may want the PIM not ot create and update products and variants.
So you have the choice to telle the connector to :
- Create only : "CREATE"
- Update only : "UPDATE"
- Create & Update : "CREATE and UPDATE"
Sort variants by
If you want the connector to push the variants of a product in a specific order, you can choose an attribute.
The values of this attribute will be used to sort the variants of each product.
You can also decide whether the values should be sorted alphabetically or in reverse order.
Document links to synchronize
This feature allows you to synchronize document links, linking your products in Shopify. This is particularly useful for cross-sell and up-sell scenarios. For example, you can define a cross-sell link in the PIM for products such as a t-shirt, jeans and a cap. When this link is synced, a Shopify metafield is added to your product. This metafield contains the cross-sell you have defined.
Link Synchronization Mode
This feature allows you to choose the synchronization mode for your product links in Shopify. You can select one of the following options:
- Child links only: Synchronizes links only for the child documents of your product.
- Parent links only: Synchronizes links only for the parent documents of your product.
- Child and Parent links: Synchronizes links for both child and parent products.
This flexibility helps you optimize your cross-sell and up-sell strategies by tailoring the synchronization to your business needs.
Authorize different axes of variations
This option controls how the connector handles products with different variation structures.
When unchecked (default): All variants must have values for every configured option. This is ideal when your catalog is uniform.
Example: You sell t-shirts that always vary by Color and Size. Every variant has both attributes filled. Leave this option unchecked.
When checked: Variants can have partial option values. The connector only sends the options that exist for each product.
Example: Your catalog contains:
- T-shirts varying by Color and Size
- Posters varying only by Size
- Jewelry varying only by Material
Check this option. The connector will adapt to each product's variation structure and skip empty option values.
Disable metaobjects validation
This option allows you to disable meta object validation. This will result in a significant performance improvement for product sync if you have a large number of metaobjects in your Shopify. However, if metaobject validation is disabled, you must ensure that the GIDs of your metaobjects are valid in order for them to successfully sync with Shopify.
Use predefined values label
This option allows you to use predefined value labels instead of translatable labels. For example, if the predefined value code is VAL123 and the translatable label is Luxury Bag, enabling this option will push Luxury Bag value to shopify. If this option is not enabled, the value code VAL123 will be used.
Update existing tag values
This option allows you to update tags while preserving existing values in Shopify. For example, if your product on Shopify has the following tags: leather goods, red, luxury and your document in the PIM has the following tags: bag, woman. You will get the values leather goods, red, luxury, bag, woman if this option is enabled. Otherwise you will only get bag, woman.
Product status on creation
This option allows you to define the default status assigned to new products when they are first created in Shopify. This is particularly useful when you want products to arrive in a specific state (e.g., Draft) so you can prepare complementary content in Shopify before making them available to customers.
The available values are:
- Draft: New products will be created with a "Draft" status on Shopify.
- Active: New products will be created with an "Active" status on Shopify.
- Archived: New products will be created with an "Archived" status on Shopify.
- Unlisted: New products will be created with an "Ulisted" status on Shopify.
- Default: The connector will use the value coming from the field mapping (existing behavior).
This option only affects the creation of new products. On subsequent updates, the status will not be overwritten by this setting, allowing you to manage the product lifecycle directly in Shopify after the initial creation.
Example: You want your products to arrive in Draft status so you can review them in Shopify before publishing. Select Draft in this option. When the product is ready, activate it manually in Shopify. Future updates from the PIM will not change the status back to Draft.
Auto-increment duplicate handles
This option is useful for bulk operations. It allows you to automatically increment handles for duplicate products in Shopify. For example, if you have a product with the handle leather-bag and you add another product with the same handle, enabling this option will automatically adjust the handle of the new product to leather-bag-1. Without this option enabled, the duplicate handle may cause an error or require manual adjustment
Variants managed in Shopify only
This option is only available when the data model depth is set to One level.
This option is designed for customers who manage their products in Quable PIM but create and manage their variants directly in Shopify.
When unchecked (default): The connector behaves as usual — it pushes the product along with the invisible default variant required by Shopify (in a one-level data model). The Variants and Price mapping tabs remain enabled.
When checked: The connector will not send any variant or pricing information during synchronization. Variants that already exist in Shopify are preserved and left untouched.
Specifically:
- The Variants mapping tab is disabled.
- The Price mapping tab is disabled.
- During product creation/update, the
variantsandproductOptionsattributes are excluded from the Shopify mutation. - Inventory and Price synchronization steps are skipped (activity status will show as "No configuration or items to synchronize").
Example: You manage your product catalog in Quable PIM but your merchandising team creates and prices variants directly in Shopify. Enable this option so that the connector only pushes product-level data without overwriting the variants managed in Shopify.
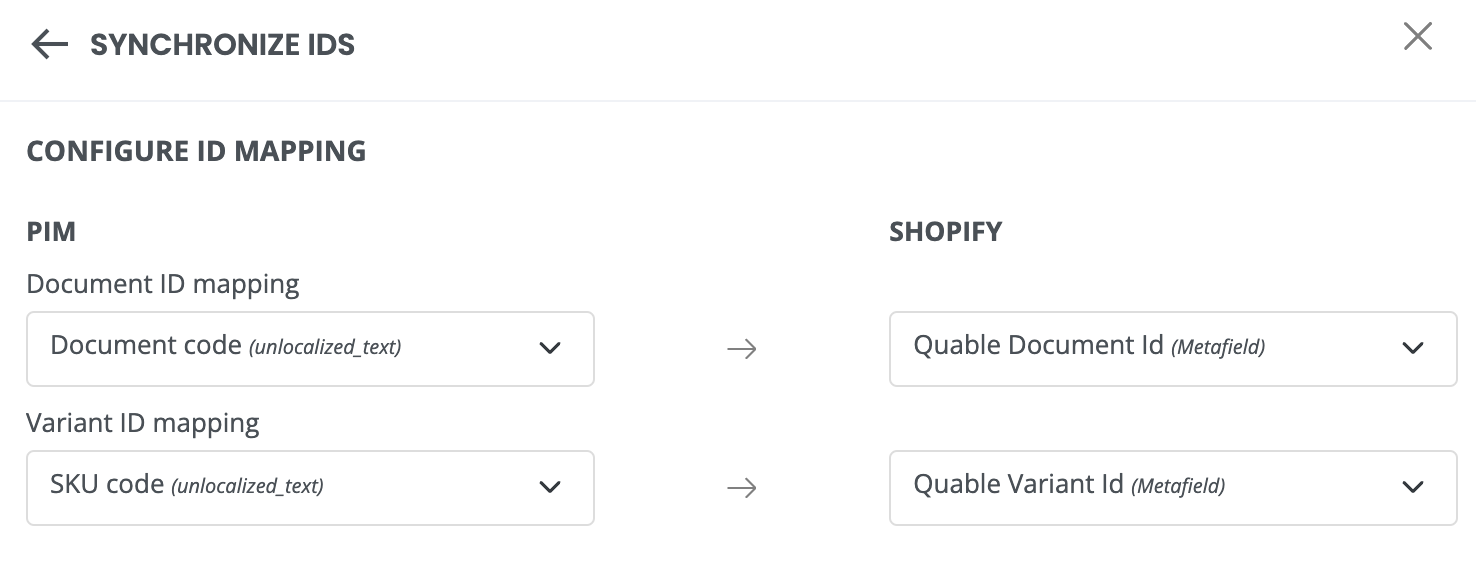
ID Synchronisation
If you have edited the some sensible product attributes on Shopify (changes metafields, etc.), an ID synchronisation will allow the connector to retrieve the new attributes ID.
To sync product IDs between Quable and Shopify, follow these steps:
1 - Click on the "Synchronise IDs" button in the Quable App Shopify.
2 - A window will appear where you can filter the products you want to sync based on different criteria, such as vendor name, category, etc.

3- The next step is to select a unique key for each product between the two systems.
This unique key can be the SKU, the handle or any other unique attribute that is present in both systems. Finally, Click on "Synchronise IDs" to start the synchronisation process.
An ID synchronisation process will start and your 2 platforms will be synchronised at the end of the process.
Data Synchronisation
Webhook synchronisation
This is the default synchronisation when the connector is activated.
Webhook synchronisation allows you to synchronize the data produced between Quable and Shopify in real time.
This option is useful when you want to update specific products in Shopify based on changes proposed in Quable.
We recommend that you use this option by default and only use the "Bulk" option when necessary.
Bulk synchronisation
A Full synchronisation allows you to synchronize all your data between Quable and Shopify. This option is useful when you want to update all your product data at once.
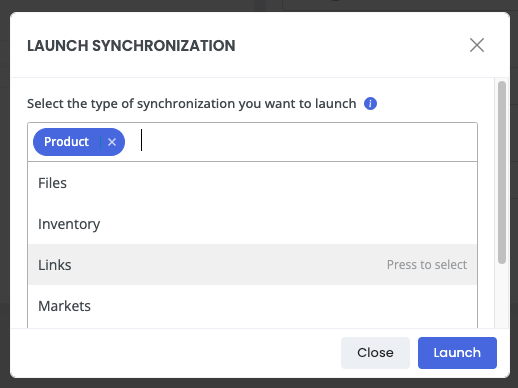
To synchronize all your data at once
1- Click on the "Action" button, then "Synchronisation".
2- A pop-up window will open offering you the option of adding other synchronisation options: Translation, Localisation, Files, Prices, Markets, etc.
By default, all other synchronization processes (such as Translation, Localization, Files, Prices, Markets, etc.) will initiate product synchronization first. This ensures that all your products are updated on Shopify before proceeding to the next steps. However, you have the option to disable this behavior and initiate only a specific synchronization.
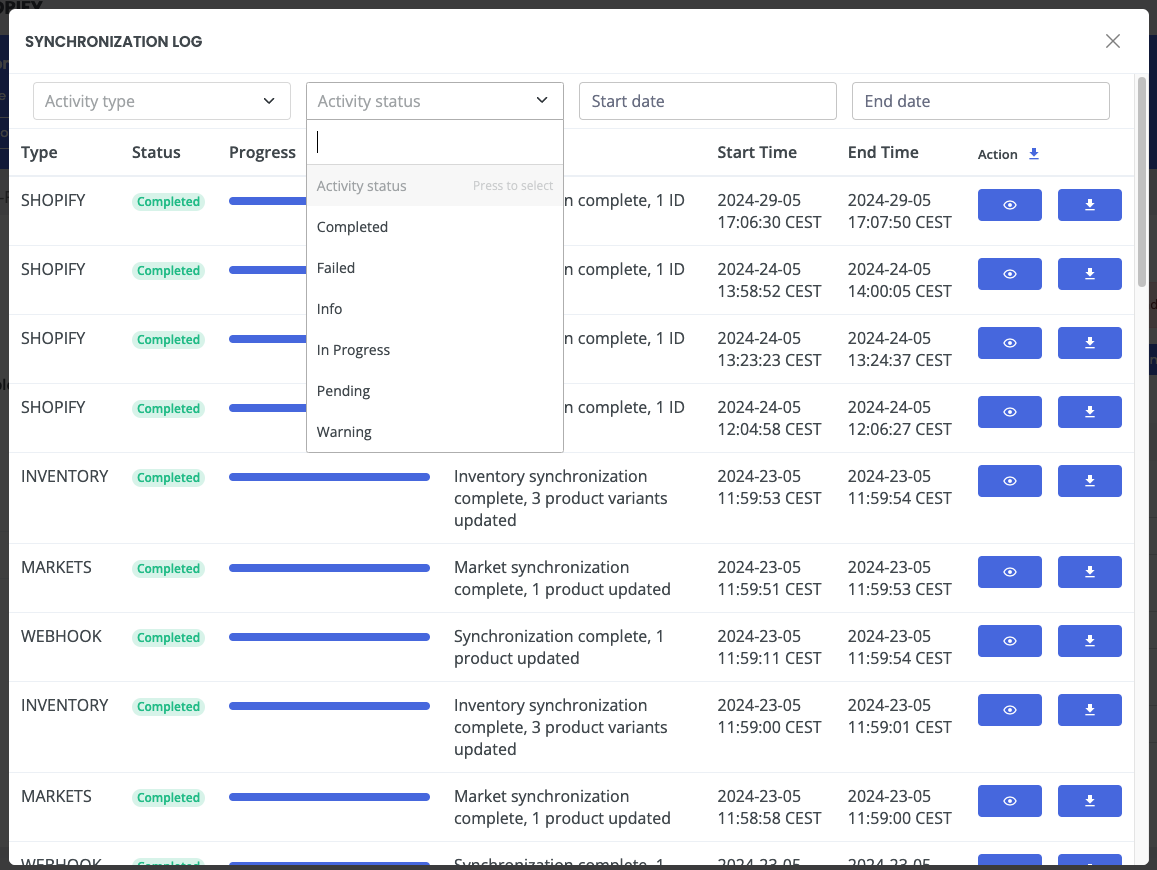
Activity logs
Effortlessly track and monitor all your synchronizations through the activity log. It offers insights into the synchronization type, its status, progress status, associated messages, as well as the start and end dates of the synchronization. You also have the option to download synchronization logs for more detailed information.
Multishop
The Quable-Shopify connector lets you connect multiple Shopify shops to the same Quable instance. This means you can manage multiple Shopify shops from your PIM, with specific configurations for each shop. This enables centralised management of product data, seamless integration between systems and consistent data of your products across all your online shops.
Congratulations, you've completed the configuration of the Quable x Shopify connector.
Synchronization Performance
Response times observed during Quable PIM to Shopify synchronization operations show significant variability that must be taken into account.
Observed Metrics
- Optimal time: ~0.3 seconds per item
- Average time: 0.7-3 seconds per item
- Very degraded time: up to 30 seconds per item
- Max/min ratio: 100x factor
Performance Impacting Factors
Shopify Architecture and Rate-limiting
- Variable quotas depending on plan:
- Basic: ~2 requests/second
- Shopify: ~4 requests/second
- Advanced: ~8 requests/second
- "Leaky bucket" system:
- 40 points/request for GraphQL mutations
- Progressive point restoration (~0.5 point/second)
- Hidden Shopify internal queue
- Dynamic throttling behavior based on global load
Target Store Context
- Store CPU/memory load
- Peaks during high traffic hours
- Impact of webhooks and other integrations
- Ongoing order processing
- Catalog volume
- Total number of products
- Variant complexity
- Number of collections
- Other concurrent operations:
- Ongoing imports/exports
- Mass updates
- Inventory recalculations
Infrastructure and Network
- Geographic location
- Latency based on data center distance
- Performance variations between regions
- Network status
- Peak hour congestion
- DNS latency
- Connection stability
- Shopify service health
- Planned maintenance
- Technical incidents
- Ongoing deployments
Staging store on Shopify
Why Use a Staging Setup?
When integrating your Quable PIM with Shopify, setting up a staging environment is a crucial step to ensure the success of your data synchronization. A staging store acts as a safe sandbox, allowing you to test and validate the transfer of product, variant, and media data without risking disruptions to your live store. This approach offers several benefits:
- Risk Mitigation: Changes can be tested thoroughly in a controlled environment, minimizing the chances of errors impacting your live store.
- Enhanced Collaboration: Teams can experiment with configurations and workflows collaboratively before committing changes to production.
- Quality Assurance: Ensure that all product data, such as pricing, images, and descriptions, appears correctly in Shopify and aligns with your business requirements.
- Seamless Customer Experience: By identifying and resolving issues early, you can ensure a smooth experience for customers when changes are deployed to production.
This process is particularly useful when launching new product catalogs, migrating existing data, or testing advanced features like field mapping and StoreSync functionality. Follow the steps below to configure your staging environment and integrate it with Quable PIM.
Note: While these recommendations provide a comprehensive guide, it is highly advised to cross-check and collaborate with your integrator to ensure compatibility with your specific setup and business requirements.
Initial Setup
1 - Create a Shopify Staging Store
Log in to Shopify:
- Navigate to Shopify’s website and log in with your credentials.
Create a new Shopify store dedicated to staging:
- Once logged in, go to the Shopify Admin Dashboard.
- Click on your account avatar in the top-right corner and select Create another store.
- Choose the Development store option if you are a Shopify Partner, or a basic plan if you are not.
Configure the staging store:
- Set up the store to mirror your production environment as closely as possible:
- Themes: Use the same theme as your production store. Go to Online Store > Themes, and either upload the theme file or duplicate the theme if available.
- Collections: Recreate or import the same collections as the production store. For manual collections, add the same products you plan to test.
- Settings: Ensure tax rules, shipping zones, and currencies are consistent with production settings to simulate the real environment.
Invite team members (if needed):
- Go to Settings > Users and permissions, and add any collaborators who will be working on the staging store.
2 - Install StoreSync
Access the Shopify App Store:
- Log in to the staging store and go to the Apps section in the Shopify Admin Dashboard.
- Click Shopify App Store and search for StoreSync.
Install StoreSync:
- Select Add app for StoreSync.
- Follow the prompts to authorize the app for your staging store.
Set up StoreSync:
- Open the StoreSync app and configure the synchronization settings.
- Link the staging store to your production store by entering the production store’s Shopify credentials.
- Adjust synchronization preferences, such as whether to overwrite existing data or add new items only.
https://www.syncio.co/blog/sync-inventory-between-two-shopify-stores
3 - Connect the Quable PIM to the Staging Store
Please see the install process.
4 - Validate the Staging Environment
-
Simulate customer interactions:
- Preview the staging storefront to check how products are displayed.
- Verify navigation, filters, and search functionality.
-
Test store workflows:
- Perform test orders to ensure checkout and payment gateways are functioning as expected.
- Verify that any apps or customizations used in production behave similarly in the staging store.